How to Fix Splintering Deck Boards (And Restore the Color)
Restore your gray, splintering deck to a barefoot-friendly surface without a costly replacement. Learn how to properly clean, sand, and oil your wood deck in a single weekend.
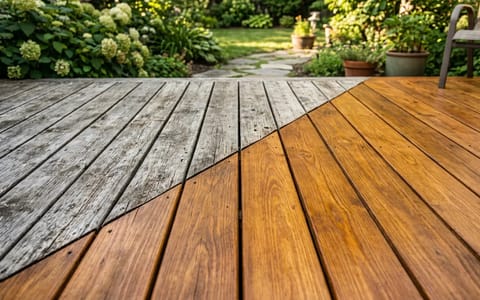
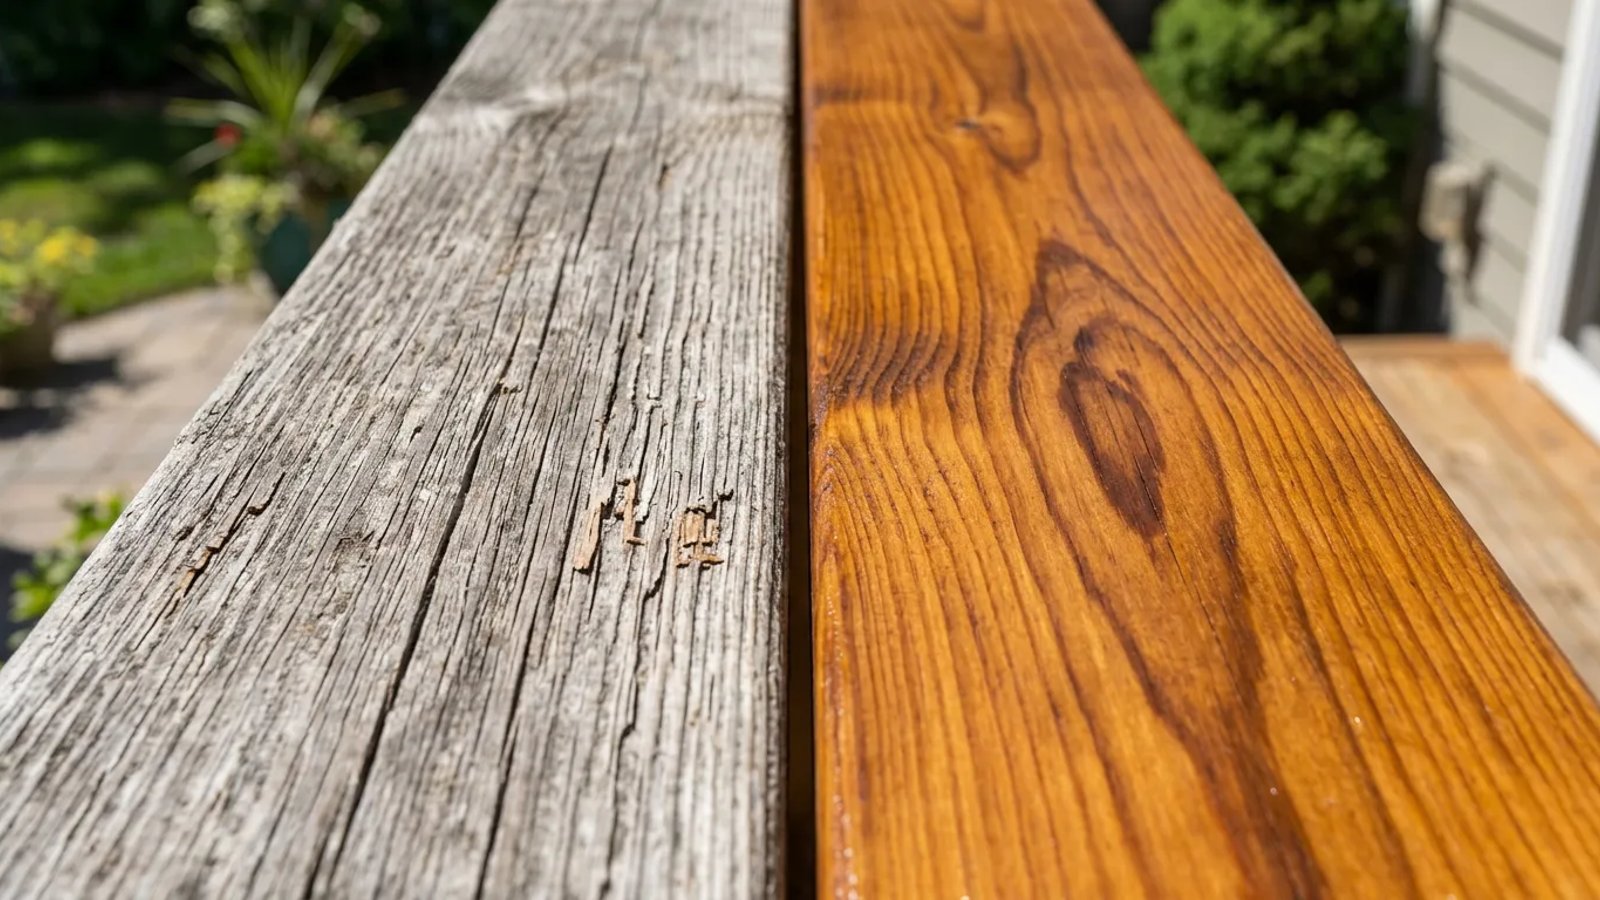
Stepping barefoot onto your wooden deck on the first warm day of the year should be a relaxing experience, not a trip to the first-aid kit. If your deck has turned a weathered gray and is covered in sharp, dry splinters, the elements have stripped away its natural protective oils. Fortunately, you can restore that safe, barefoot-friendly surface over a single weekend without paying thousands for a full replacement.
Why Deck Boards Splinter and Turn Gray
Wood is a highly resilient building material, but it is constantly at war with two relentless enemies: ultraviolet radiation and moisture. When your deck is exposed to direct sunlight, UV rays break down lignin, the natural organic glue that holds wood fibers together. As the lignin degrades, the wood loses its structural integrity at the surface and its natural color fades to a dull, silvery gray.
While the sun breaks down the surface, moisture does the heavy lifting of physical wear. Every time it rains, bare, unprotected wood absorbs water and swells. When the sun comes out, the wood dries rapidly and shrinks. This constant expansion and contraction cycle causes the wood fibers to warp, crack, and separate. Those separated, brittle fibers are the splinters currently threatening your bare feet.
To fix the issue permanently, you cannot just paint over the damage. You have to remove the dead, gray wood fibers, smooth out the damaged surface, and replenish the vital oils that the wood has lost over the years.
Step 1: Inspect for Rot vs. Surface Wear
Before investing time and money into resurfacing, you need to confirm that your deck is structurally sound. A splintering, gray deck looks terrible, but it might just be surface-level cosmetic damage. Wood rot, on the other hand, is a structural failure that requires immediate board replacement.
Grab a flathead screwdriver and walk your deck. Pay special attention to areas that stay damp, such as shaded corners, beneath heavy potted plants, and where the deck boards meet the underlying joists. Press the tip of the screwdriver firmly into the wood.
If the wood is hard and resists the screwdriver, you are dealing with normal surface wear. If the screwdriver easily sinks into soft, spongy, or crumbling wood, you have rot. You will need to remove and replace those specific boards before proceeding with the restoration.
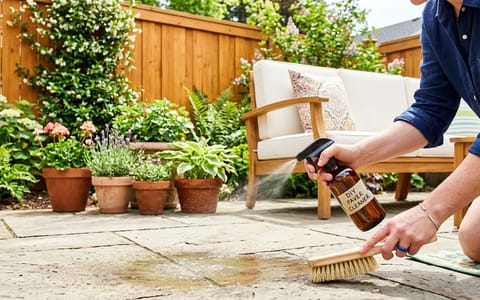
Step 2: Deep Cleaning (Put the Power Washer Away)
The most common mistake homeowners make when trying to restore a deck is blasting it with a high-pressure power washer. While a 3,000 PSI pressure washer will certainly remove the gray color, it will also gouge the wood and tear the fibers, creating hundreds of new splinters in the process.
Instead of high pressure, use chemistry. You want to use a two-part chemical cleaning process: an oxygen-based cleaner followed by a wood brightener. Avoid household bleach (sodium hypochlorite) entirely, as it destroys the wood's cellular structure and leaves a washed-out, unnatural look.
Mix a powdered oxygen bleach (sodium percarbonate) cleaner with warm water according to the manufacturer's instructions. Apply it liberally to the deck using a pump sprayer. Let it dwell for 10 to 15 minutes, allowing the active bubbles to lift dirt, algae, and dead gray wood fibers to the surface. Use a stiff-bristled synthetic brush on a pole to scrub the boards, then rinse thoroughly with a standard garden hose.
Once the deck is rinsed but still wet, apply a wood brightener containing oxalic acid. This step is crucial. The alkaline cleaner darkens the wood during the washing phase. The acidic brightener neutralizes the pH, opens the wood pores, and miraculously restores the rich, original color of the lumber in minutes. Rinse again and let the deck dry completely for at least 48 hours.
Step 3: How to Fix Splintering Deck Boards with Spot-Sanding
Once the wood is bone dry, it is time to address the physical damage. Knowing exactly how to fix splintering deck boards comes down to using the right grit sequence. Sanding too aggressively removes too much wood, while sanding too lightly won't eliminate the hazard. I’ve spent too many hours pulling splinters out of my golden retriever's paws to skip this step—taking an extra 30 minutes to properly sand the high-traffic areas makes a world of difference.
Before you sand, walk the deck with a hammer and an impact driver. Sink any protruding nails and drive screws down slightly below the surface of the wood. If you skip this step, you will instantly tear your sandpaper to shreds.
Wood is a lot like your skin—when it dries out, it cracks, peels, and desperately needs hydration to survive the elements.
- Start with 80-grit sandpaper. Load an orbital sander with 80-grit paper. Focus heavily on the splintered areas, cracked edges, and handrails. This coarse grit cuts through the rough, raised fibers quickly.
- Smooth with 120-grit sandpaper. Switch to 120-grit paper and go over the same areas. This smooths out the scratches left by the 80-grit paper and leaves a barefoot-friendly finish. Do not use anything finer than 120-grit, or you risk closing the wood pores and preventing stain absorption.
- Clear the gaps. Use a putty knife or a 5-in-1 painter's tool to scrape out debris, leaves, and pine needles trapped between the deck boards. Proper airflow between boards prevents future rot.
- Sweep and vacuum. Thoroughly sweep the deck, then use a shop vacuum to remove all fine sawdust from the surface and out of the board gaps. Stain will not adhere properly to a dusty surface.
Step 4: Nourish and Protect with a Penetrating Finish
With the dead wood gone and the splinters sanded away, your deck is completely unprotected. It is incredibly thirsty and ready to absorb a protective finish. For older, weathered wood, avoid solid paints or film-forming stains. These sit on top of the wood and will eventually peel, bubble, and flake, trapping moisture underneath and forcing you to strip the deck next year.
Instead, choose a high-quality, semi-transparent penetrating oil. Penetrating oils soak deep into the wood fibers, replacing the natural oils lost to the sun and rain. They condition the wood from the inside out, keeping it flexible so it can expand and contract without cracking. Semi-transparent formulas contain iron oxide pigments, which provide excellent UV protection while still allowing the natural wood grain to show through.
Apply the oil using a high-quality 4-inch natural bristle brush or a dedicated stain pad. Work on two or three boards at a time, applying the oil continuously from one end of the board to the other to avoid lap marks. If you use a roller or a stain pad to apply the finish, you must follow up with a technique called "back-brushing." This involves taking a wide brush and working the freshly applied stain deep into the wood grain and down into the gaps. Back-brushing breaks the surface tension of the oil and forces it into the cellular structure of the wood, ensuring an even, long-lasting finish.
Keeping Your Deck Splinter-Free Year-Round
A beautifully restored deck requires minimal, but consistent, upkeep to stay that way. Keep your deck swept clear of wet leaves and debris, as trapped organic matter holds moisture against the wood and encourages rot. Give the deck a light wash with a mild soap and a soft brush every spring to remove surface dirt. Depending on your climate and the deck's sun exposure, plan to reapply a fresh maintenance coat of penetrating oil every two to three years. Staying ahead of the wear means you will never have to spend a weekend fighting gray wood and sharp splinters again.