How to Check Attic Ventilation and Lower Your Summer AC Bill
Stop cooling a 150-degree attic. Learn how to inspect and clear your attic ventilation to lower your AC bills and keep your second floor comfortable.
Many homeowners struggle with a second floor that feels like a sauna during the summer months, even when the central air conditioning is running non-stop. They often blame an aging HVAC system, low refrigerant, or poorly sealed windows. But more often than not, the real culprit is trapped heat right above their heads. Taking an afternoon to check attic ventilation is one of the most effective ways to solve this problem.
When attic ventilation is blocked or inadequate, temperatures under your roof can reach a staggering 150 degrees Fahrenheit. This massive blanket of heat bakes your living spaces from above, forcing your cooling system to work overtime and driving your energy bills through the roof. By ensuring your attic breathes properly, you not only lower your monthly utility costs but also extend the lifespan of your roof shingles and HVAC equipment.
Understanding How Passive Attic Airflow Works
To fix ventilation issues, you first need to understand how a healthy attic breathes. Most residential roofs rely on a passive ventilation system. This means it uses natural physical forces—specifically thermal buoyancy and wind—to move air without the need for motorized fans. The system relies on two main components working in tandem: intake vents and exhaust vents.
Intake vents are typically located at the lowest point of the roof, under the eaves. These are called soffit vents. Cool, fresh outdoor air is drawn into the attic through these perforated panels. Exhaust vents are located at the highest point of the roof, usually running continuously along the peak. These are called ridge vents.
As the sun beats down on your roof, the air inside the attic heats up. Because hot air is less dense than cold air, it naturally rises toward the peak of the roof. As this superheated air escapes through the ridge vent, it creates a negative pressure zone lower down in the attic. This vacuum effect pulls fresh, cooler air in through the soffit vents. This continuous cycle is known as the stack effect.
A healthy attic is a breathing attic; if the intake or exhaust is choked off, your home will bake from the top down.
When this system works, the temperature inside your attic stays relatively close to the outside ambient temperature. However, if either the intake or the exhaust is blocked, the stack effect completely halts. The heat has nowhere to go, building up until it radiates down through your ceiling insulation and into your bedrooms.
Signs It Is Time to Check Attic Ventilation
Before you climb a ladder, your house will often give you subtle clues that its airflow is compromised. The most obvious symptom is a significant temperature differential between the floors of your home. If your ground floor is a comfortable 72 degrees but your upstairs bedrooms are pushing 80 degrees, trapped attic heat is a prime suspect.
You might also notice your air conditioning unit running continuously during the afternoon and early evening, struggling to satisfy the thermostat. This constant cycling not only spikes your electricity bill but also causes premature wear and tear on your compressor and blower motor.
Take a walk outside and look up at your roof. Are the edges of your asphalt shingles beginning to curl, blister, or look prematurely aged? Excessive attic heat bakes shingles from the underside, destroying their adhesive bonds and significantly reducing their lifespan. In extreme cases, you might even notice a wavy or rippled appearance across the roof deck, indicating that the plywood sheathing is warping from trapped heat and moisture.
Step 1: Inspect and Clean Soffit Vents from the Outside
The most common point of failure in any attic ventilation system is the soffit vents. Over the years, these intake grilles become clogged with airborne dust, pollen, spider webs, and debris. Even worse, well-meaning exterior painters frequently spray right over them, sealing the tiny perforations with thick coats of acrylic latex paint.
Start your inspection on a dry day. You will need a sturdy step ladder, a stiff-bristled nylon brush, and a shop vacuum with a brush attachment. Set your ladder up securely on flat ground. Climb up and closely examine the perforated panels under your eaves.
If the vents are simply covered in dust and cobwebs, use your stiff brush to agitate the debris, then vacuum it away. For stubborn dirt, an air compressor with a blower nozzle can push the remaining dust up and into the attic cavity, clearing the holes.
If you discover that the vents have been painted over, cleaning becomes more labor-intensive. You can try using a small awl or a stiff wire brush to poke through the holes, but this is tedious. Often, the most time-effective solution is to use a piece of 120-grit sandpaper wrapped around a sanding block to scuff the paint off the raised perforations. If the panels are completely hopelessly sealed, you may need to purchase replacement aluminum soffit vent covers, which typically cost around $5 to $10 each at a local hardware store, and screw them in place of the old ones.
Step 2: The Attic Hatch Inspection
Once the exterior intakes are clear, you need to ensure the air can actually make it into the main attic space. This requires a trip up the attic hatch or pull-down stairs. Before you open the hatch, prepare your safety gear. Attics are dusty environments filled with fiberglass or cellulose particles. Wear a high-quality N95 respirator mask, safety goggles, long sleeves, and a reliable LED headlamp.
Climb the ladder and push open the hatch. You do not necessarily need to walk around up there just yet; simply poke your head and shoulders up into the space and turn off your headlamp for a moment. Let your eyes adjust to the darkness.
Look straight down toward the edges of the roof where the eaves meet the attic floor. On a sunny day, you should see a faint, continuous glow of daylight entering from the soffit vents. If you see daylight, your intake path is clear. If it is pitch black at the edges, you have a blockage.
The most frequent cause of an internal blockage is blown-in insulation. When contractors or homeowners add loose-fill fiberglass or cellulose insulation to an attic floor, it is incredibly easy to accidentally blow the fluffy material all the way to the edges, completely burying the soffit vents. The insulation acts like a dense wool blanket, choking off the fresh air supply and rendering your clean exterior soffit vents useless.
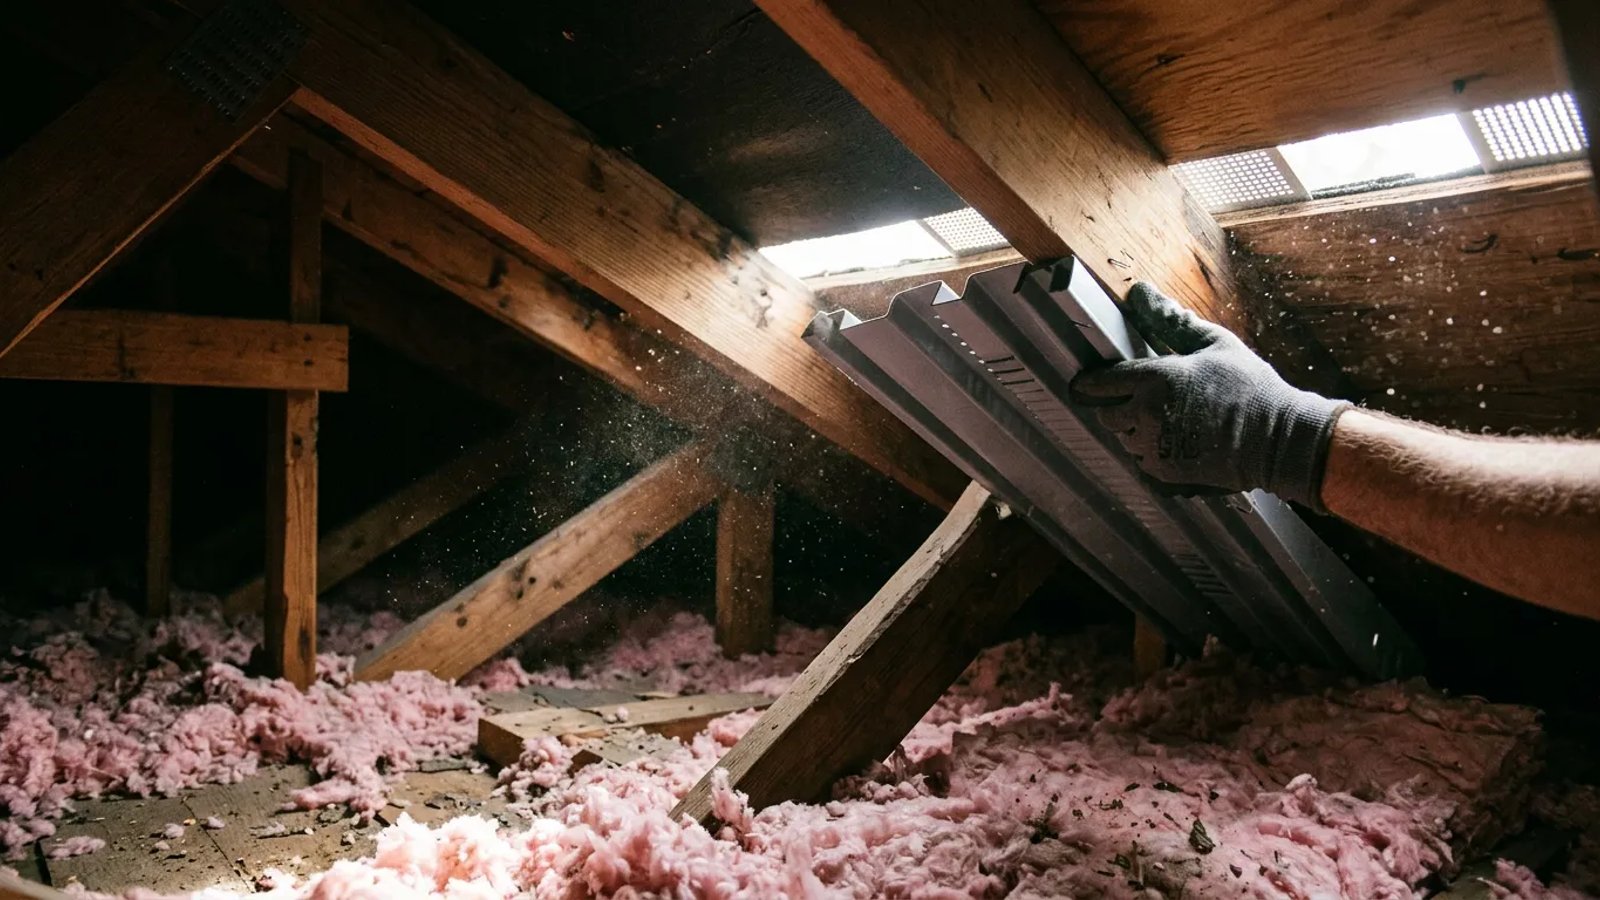
Step 3: Installing Baffles to Clear the Eaves
If your inspection reveals that insulation has buried the eaves, you will need to clear it back and install rafter vents, commonly known as baffles. This is a straightforward DIY project that yields massive improvements in home cooling. Baffles are long, U-shaped channels made of rigid foam or thin plastic that cost about $2 to $3 each. Their job is to hold the insulation back while creating a dedicated, unobstructed tunnel for air to flow from the soffit up into the main attic space.
Installing them is a simple, repeatable process for each rafter bay:
- Clear the existing insulation. Use a garden rake or gloved hand to gently pull the loose-fill insulation away from the eaves, exposing the top of the soffit vent.
- Insert the baffle. Slide the rigid foam or plastic channel down into the cavity between the roof rafters, pushing it all the way down until it extends past the top plate of the exterior wall.
- Staple it securely. Use a heavy-duty staple gun loaded with 3/8-inch staples to secure the flanges of the baffle to the underside of the roof decking. Staple every six to eight inches.
- Replace the insulation. Gently push the fluffy insulation back against the baffle. The insulation will now insulate your ceiling, while the baffle protects the airflow channel.
Step 4: Examining the Ridge Vent
With the intake side functioning perfectly, turn your attention to the exhaust. The ridge vent runs along the very top peak of your roof. It is usually covered by a layer of matching asphalt shingles, making it blend in with the rest of the roof. Underneath those cap shingles is a rigid plastic or corrugated metal structure that allows hot air to escape while keeping rain and snow out.
From inside the attic, look up at the peak. You should see a continuous cut in the wooden roof decking, usually about two inches wide, running the length of the ridge. Make sure no one has mistakenly stuffed insulation into this gap or covered it with plastic sheeting.
Next, grab your binoculars and inspect the ridge vent from the ground outside. Look for any visible damage, sagging sections, or heavy accumulations of pine needles and leaves. Debris can pack tightly into the exhaust slots, preventing the hot air from escaping. If you spot significant debris, you will need to carefully sweep it away with a broom from a safe vantage point.
When to Call a Roofing Professional
While checking and clearing existing vents is a manageable task for most homeowners, there are distinct limits to what you should tackle yourself. If your home has a steeply pitched roof, do not attempt to climb it to clean the ridge vent. A fall from that height can be disastrous.
Furthermore, if you discover that your home simply does not have enough soffit or ridge vents to begin with, you will need to have new ones cut into the structure. Adding new soffit panels requires cutting through the exterior carpentry, while installing a new ridge vent involves slicing through the roof decking and modifying the shingles. These are complex jobs that require specialized tools and waterproofing knowledge.
By taking an afternoon to inspect your ventilation, clear your soffits, and ensure your baffles are in place, you are giving your home the ability to breathe. You will be amazed at how much faster your second floor cools down when it isn't fighting a 150-degree heat source from above. Your air conditioner will run less often, your energy bills will drop, and your entire home will feel significantly more comfortable as the summer heat sets in.