How to Clean Your Dryer Vent and Prevent Fire Hazards
Emptying the lint trap isn't enough. Learn how to clean your dryer vent to prevent dangerous house fires, reduce drying times, and lower your energy bills.
Most of us are diligent about swiping the fuzz off the lint screen before every single load of laundry. But completely ignoring the main exhaust duct hidden behind the machine creates a massive fire hazard right in your home. If you are looking for exactly how to clean dryer vent pipes, you are already taking a crucial step toward protecting your property and improving your appliance's efficiency.
According to the U.S. Fire Administration, failure to clean the dryer is the leading cause of home clothes dryer fires, resulting in thousands of dangerous incidents annually. When lint builds up in that hidden tube, your dryer has to work twice as hard to push hot, moist air out of your house. Eventually, the airflow gets so restricted that the heat backs up, igniting the highly flammable lint.
The Real Dangers of Lint Buildup
Even if you clean your lint trap religiously, microscopic fabric particles slip past the screen and travel into the ductwork. Over months and years, this lint mixes with moisture from your damp clothes, pasting itself to the walls of the exhaust pipe. It creates a rough surface that catches even more lint, rapidly accelerating the blockage.
A clogged dryer duct doesn't just waste electricity—it turns your laundry room into a serious fire hazard.
I once helped a neighbor who complained their dryer was "broken" because a load of towels was taking three hours to dry. We pulled the duct off the back of the machine and found a solid plug of lint the size of a football. The dryer was perfectly fine; it just couldn't breathe. Once we cleared it, their drying time dropped back to 40 minutes.
Warning Signs Your Vent is Clogged
Your dryer will usually try to tell you it's suffocating long before a fire starts. Pay attention to how your appliance behaves during a normal cycle. If you notice any of the following symptoms, it is time to inspect your ductwork immediately.
- Extended drying times: Clothes—especially heavy items like jeans and towels—take two or three cycles to dry completely.
- Excessive heat: The top of the dryer is too hot to touch while running, or your laundry room feels like a sauna.
- Burning smells: You notice a faint, hot, dusty, or burning odor while the machine is operating.
- No exterior exhaust: When the dryer is running, you go outside and feel little to no air coming out of the exterior vent flap.
How to Clean Dryer Vent Systems: Step-by-Step
Cleaning a standard, ground-level dryer vent is a straightforward DIY project that usually takes about 30 to 60 minutes. You will need a standard 4-inch rotary dryer vent brush kit, which costs about $15 to $25 at any local hardware store. These kits come with a brush head and several flexible fiberglass extension rods that attach to your power drill.
- Disconnect the power and gas. Unplug the dryer from the electrical outlet. If you have a gas dryer, turn the gas supply valve off before moving the machine to prevent accidental leaks.
- Pull the dryer away from the wall. Carefully shimmy the machine forward about two feet so you have room to work behind it.
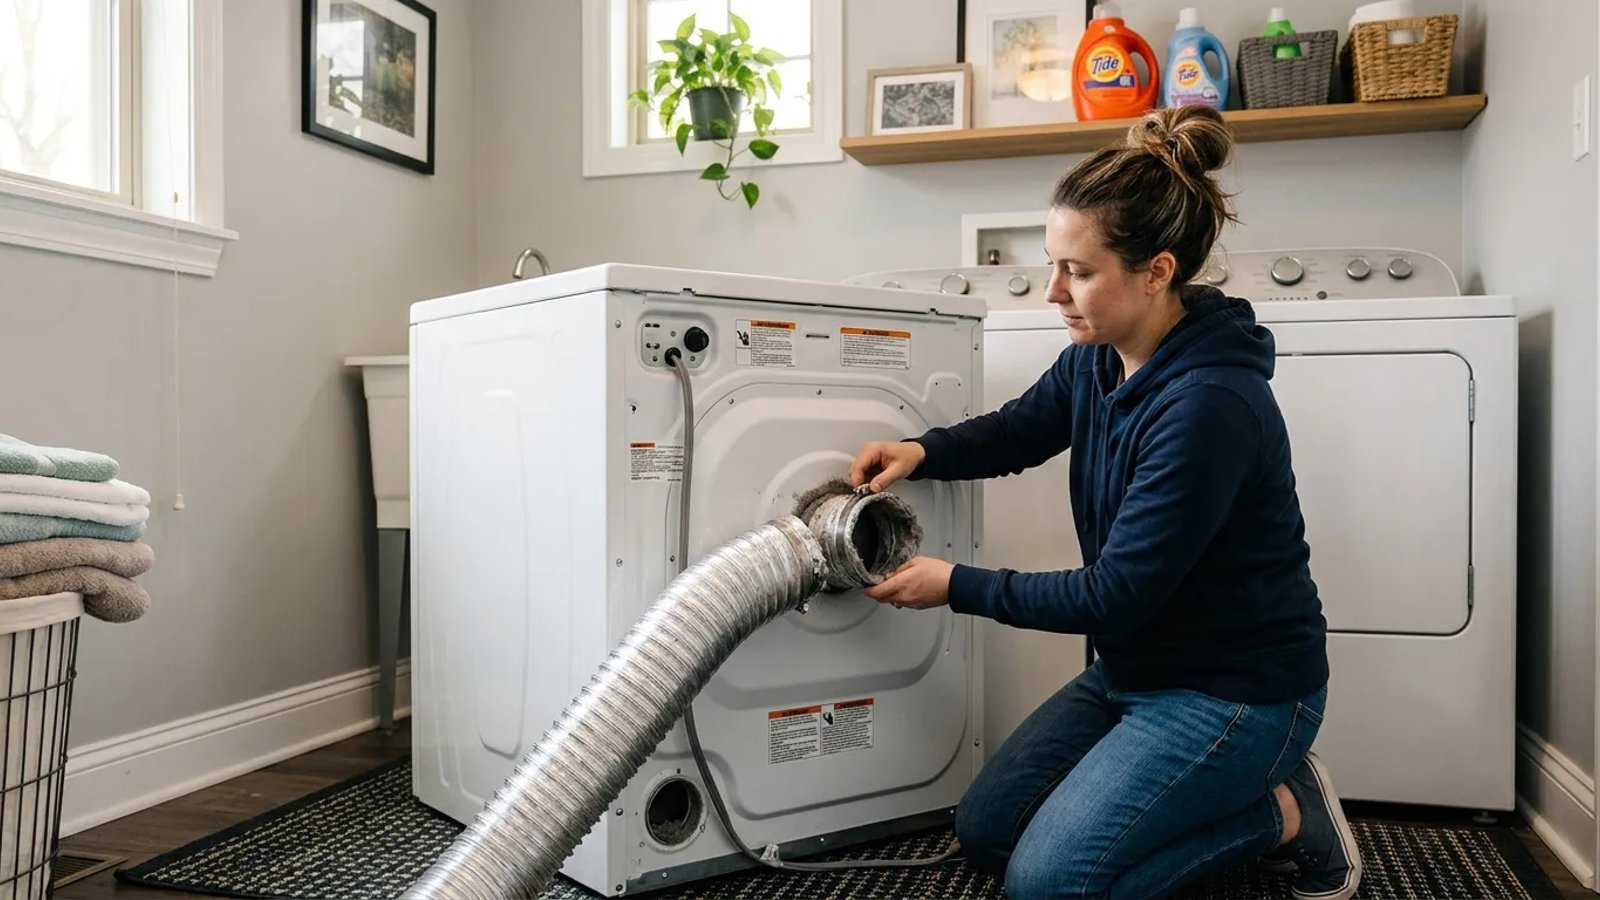
- Disconnect the ductwork. Loosen the metal hose clamp or remove the foil tape holding the vent pipe to the back of the dryer. Pull the pipe off the dryer exhaust. Do the same where the pipe connects to the wall.
- Brush out the wall duct. Attach the brush head to the first flexible rod, chuck it into your power drill, and insert it into the wall duct. Run the drill on medium speed while slowly pushing the brush in and pulling it out. Add extension rods as needed to reach the end of the duct.
- Clean the exterior exhaust. Go outside, open the exterior vent cover, and clear away any lint the brush pushed through. You can also run the brush from the outside in to ensure it is completely clear.
- Clean the dryer's interior port. Go back inside and use your brush (or a vacuum with a crevice tool) to gently clean out the exhaust port on the back of the dryer itself.
- Reconnect and test. Reattach the ductwork, securing it tightly with hose clamps or UL-listed foil tape. Plug the machine back in, turn on the gas, and run the dryer on the "air fluff" (no heat) setting for 10 minutes to blow out any remaining loose dust.
Upgrading Your Ductwork
While you have the dryer pulled out, take a close look at the transition duct—the piece connecting the dryer to the wall. If it is made of flimsy white plastic or thin foil accordion material, throw it in the trash. These materials are notorious for sagging, crushing easily, and trapping massive amounts of lint in their deep ridges.
Replace it with a semi-rigid or rigid aluminum metal duct. Metal ducts have smoother interiors that allow lint to pass through easily, and they can withstand the heat of a fire long enough to keep it contained, whereas plastic will melt and spread the flames instantly.
When to Skip the DIY Route
While most ground-floor laundry setups are easy to clean with a basic drill kit, not every home is built the same. Modern construction often places laundry rooms on the second floor or deep in the center of the house, requiring long, complex duct runs.
Taking the time to clear out your exhaust duct is one of the highest-return maintenance tasks you can perform. For the cost of a cheap brush kit and an hour of your Saturday, you eliminate a major household hazard, extend the lifespan of your appliance, and ensure your favorite clothes are dry and ready when you need them.