Dryer Taking Forever? How to Clean a Clogged Dryer Vent
Learn how to diagnose and clear a clogged dryer vent to restore your appliance's drying power. This step-by-step DIY guide saves you money and eliminates a major home fire hazard.
When your clothes dryer suddenly requires two or three cycles just to dry a single load of towels, the appliance itself usually isn't broken. The absolute most common culprit is a heavily restricted exhaust line. Learning how to clean clogged dryer vent restores your machine's efficiency, lowers your electric bill, and removes a serious residential hazard.
Beyond the inconvenience of damp clothes and higher utility bills, a clogged dryer vent poses a severe fire risk. Lint is highly flammable, and when trapped in a hot, restricted exhaust line, it can easily ignite. The U.S. Fire Administration reports that clothes dryers cause approximately 2,900 home fires annually, resulting in deaths, injuries, and millions in property loss. If you have a gas dryer, a blocked vent can also lead to a buildup of carbon monoxide, a colorless, odorless, and deadly gas.
Ignoring a clogged vent also puts unnecessary strain on your appliance. The motor and heating elements work harder, leading to premature wear and tear and potentially costly repairs or early replacement of your dryer. Regular maintenance is key to both safety and longevity.
How Do You Know It's Time to Clean Clogged Dryer Vent?
Before buying tools or moving heavy appliances, verify the restriction. A key sign is if a typical load of laundry now takes **more than 45-60 minutes** to dry. Start a normal drying cycle on high heat. Walk outside to where the exhaust exits your house. Hold your hand under the vent flap. You should feel a strong, hot blast of air.
If the flap barely opens or the air feels weak and humid, the line is choked with lint. You might also notice condensation dripping from the vent hood, which happens when hot, moist air hits a blockage and cools inside the pipe before it can escape.
Keep an eye out for other indicators too. If your laundry room feels unusually hot or humid during a drying cycle, or if you notice a burning smell, these are red flags. Sometimes, lint will even start to accumulate visibly around the dryer's exhaust port, or behind the machine itself, signaling that it's struggling to expel debris.
The Tools Required for the Job
You do not need expensive commercial equipment for a standard residential setup. Grab a drill-powered rotary brush kit, which typically costs $20 to $30 at local hardware stores. These kits include a synthetic brush head and flexible nylon rods that screw together to navigate 90-degree turns inside the wall.
- Power drill (cordless or corded)
- Shop vacuum with a hose attachment
- Rotary brush kit (ensure it reaches your vent's total length, usually up to 20 feet)
- Screwdriver or nut driver (usually 1/4-inch or 5/16-inch)
- UL-listed aluminum foil tape
- Work gloves and a dust mask
The drill-powered rotary brush kit is the star of this show. Its flexible rods allow you to reach deep into the vent system, dislodging stubborn lint that a vacuum alone can't touch. Investing in a kit that matches the length of your vent run ensures you can tackle the entire blockage, from the dryer connection all the way to the exterior vent hood.
Safety is paramount during this task. Always wear work gloves to protect your hands from sharp edges or debris, and a dust mask to avoid inhaling lint particles, which can irritate your respiratory system. Good lighting, like a headlamp, can also be incredibly helpful when working in tight spaces behind the dryer.
Why Regular Dryer Vent Cleaning is Crucial
Beyond the immediate benefits of faster drying times and lower energy bills, consistent dryer vent maintenance is a critical component of home safety. As mentioned, lint is highly combustible, and a hot dryer combined with restricted airflow creates an ideal environment for a fire to start. Professional organizations like the NFPA consistently highlight clogged dryer vents as a leading cause of residential fires, making this a maintenance task that literally saves lives and homes.
From an economic standpoint, an efficiently running dryer uses significantly less electricity or gas. When your vent is clear, your dryer doesn't have to work overtime, translating directly into noticeable savings on your monthly utility statements. Over the lifespan of your appliance, these savings can add up considerably, offsetting the small cost of cleaning tools or professional service.
Additionally, preventing your dryer from overheating and overworking extends its operational life. Components like heating elements, thermostats, and motors are under less stress when airflow is unrestricted. This reduces the likelihood of costly breakdowns and the need for premature dryer replacement, ensuring your appliance remains reliable for years to come.
Step-by-Step: Clearing the Main Duct Line
Once you have your tools gathered, you can clear the ductwork in about 30 to 60 minutes. Work carefully to avoid damaging the rigid pipe inside your walls.
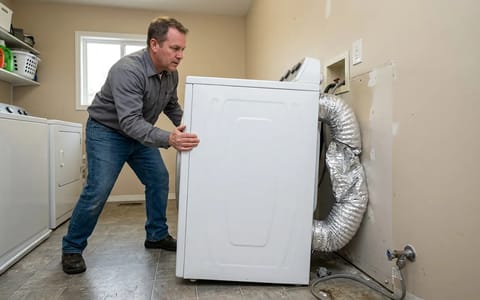
- Disconnect the utilities. Unplug the dryer's power cord from the wall. If you have a gas dryer, turn the supply valve to the off position before sliding the machine forward.
- Detach the transition duct. Loosen the metal hose clamp connecting the flexible duct to the wall exhaust port and pull it free. Remove the other end from the back of the dryer.
- Vacuum the immediate area. Suck up the loose lint directly inside the wall port and around the back of the dryer unit.
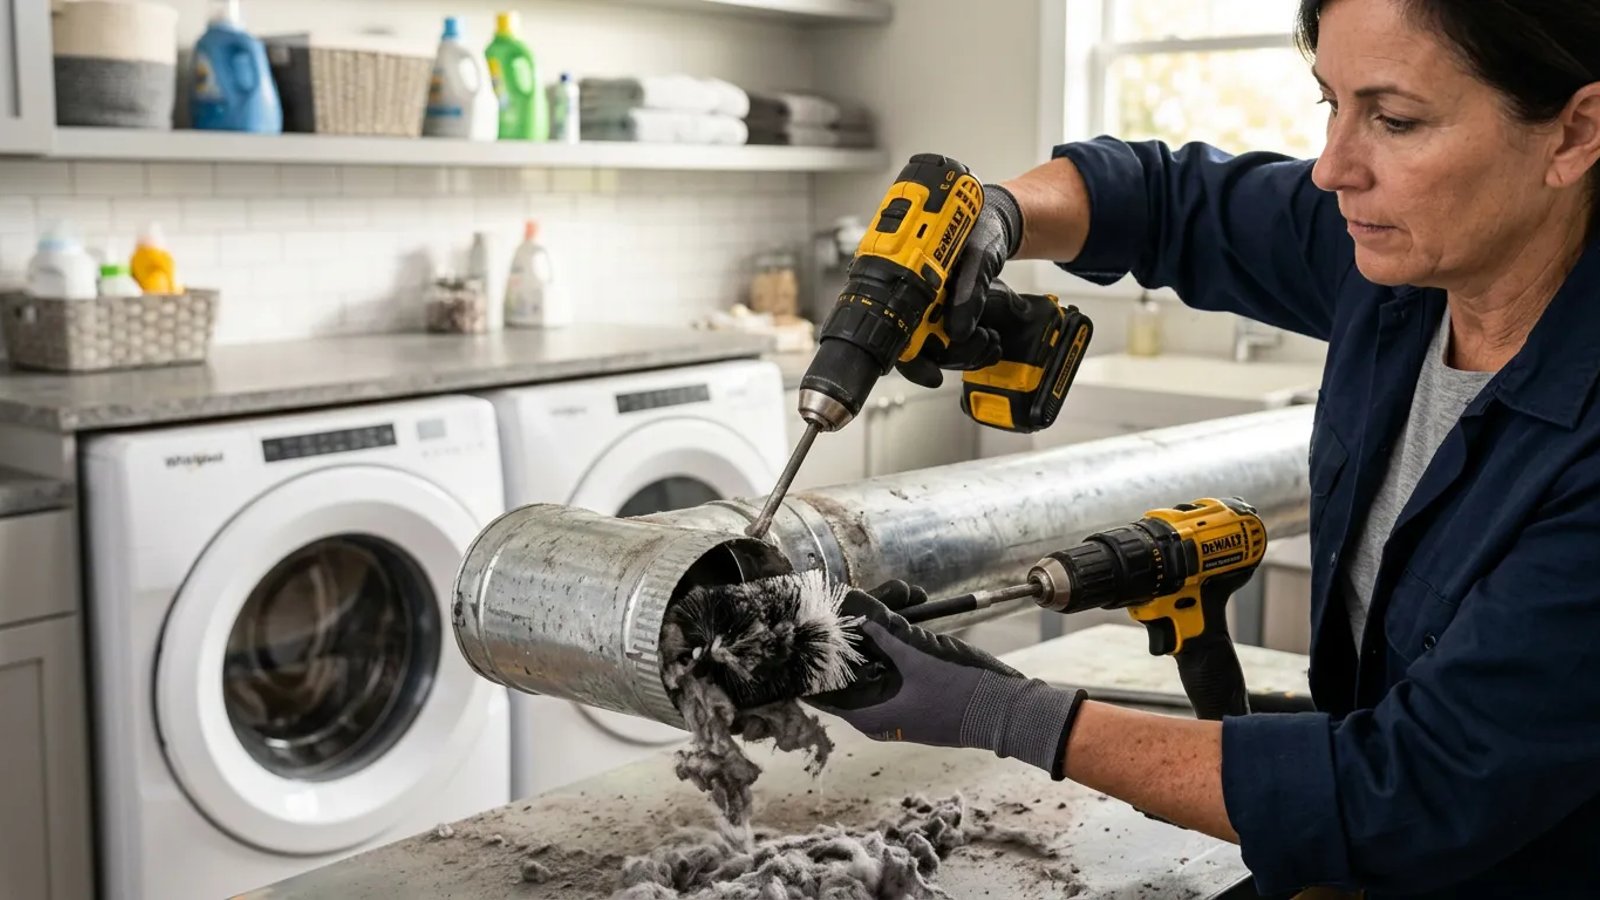
- Run the rotary brush. Attach the brush head to the first nylon rod, chuck it into your power drill, and feed it into the wall duct. Spin the drill clockwise while slowly pushing the rod forward.
- Add extensions. Continue adding rods one by one, spinning the brush clockwise until you reach the exterior of the house.
- Vacuum the debris. Pull the brush out slowly (still spinning clockwise) and use your shop vacuum to clean up the massive pile of dislodged lint from the wall port.
After clearing the main duct, don't forget to thoroughly clean the inside of the dryer's exhaust port. Often, lint accumulates heavily right where the transition duct connects to the dryer. Use your shop vacuum's crevice tool to reach into this opening and remove any remaining debris that could quickly start a new blockage.
Checking and Clearing the Exterior Hood
The exterior hood features a flapper or louvers designed to keep birds and rodents out. Lint heavily accumulates on these hinges. Go outside and inspect the housing. Use a screwdriver to prop the flap open and pull out any remaining clumps by hand.
If the flap is stuck open or broken, replace the entire exterior vent hood. A broken flap invites mice and birds to build nests inside the warm pipe, which creates an immediate and severe blockage.
A clean vent doesn't just save you 20 minutes on laundry day—it actively prevents one of the most common causes of house fires.
Upgrading Your Transition Duct
When I inspected my own laundry setup last year, I found a crushed corrugated foil hose shoved behind the unit. That flimsy foil is a magnet for lint and restricts airflow the moment you push the dryer back against the wall. The ridges inside the foil trap moisture and dust, building up a hard layer of restriction over just a few months.
Replace any white plastic or thin foil hoses with a semi-rigid metal transition duct. Metal holds its shape, preventing kinks. According to the National Fire Protection Association, local fire departments respond to thousands of fires involving clothes dryers each year, with failure to clean the equipment being the leading factor.
Semi-rigid metal ducts offer a smoother interior surface compared to their corrugated counterparts, which significantly reduces friction and lint accumulation. Their sturdy construction means they won't crush or kink when the dryer is pushed back into place, ensuring continuous, unimpeded airflow. This superior design not only enhances safety by preventing blockages but also maximizes your dryer's efficiency.
When installing your new duct, ensure all connections are secured with UL-listed aluminum foil tape and metal hose clamps. Avoid sharp 90-degree bends whenever possible, opting for gradual curves to maintain optimal airflow. The shorter and straighter your vent run, the more efficiently your dryer will operate and the less frequently it will need cleaning.
Reconnect your new semi-rigid duct using metal hose clamps. Ensure the connections overlap properly and secure them firmly. Plug the machine back in, turn on the gas valve if applicable, and run a 15-minute air-fluff cycle to blow out any remaining airborne dust.
How Often Should You Clean Your Dryer Vent?
The frequency of cleaning depends on several factors, but a good rule of thumb is to clean your dryer vent at least once a year. If you have a large household, use your dryer frequently, or have pets that shed a lot of hair, you might need to clean it every six months. Lint from pet hair can accumulate much faster than from clothing alone.
Beyond scheduled cleanings, it's wise to perform visual checks periodically. Every few months, pull your dryer out, disconnect the transition duct, and inspect for lint buildup. Also, observe your dryer's performance; if you notice clothes taking longer to dry, or the exterior vent flap showing less airflow, it's a clear sign that a cleaning is overdue, regardless of your last scheduled maintenance.
You will immediately notice your clothes drying faster, your laundry room feeling much cooler, and your appliance operating exactly as it should.
- Check the exterior exhaust flap for strong airflow to diagnose a restriction before buying replacement parts.
- Always disconnect power and shut off the gas supply before moving your appliance.
- Use a drill-powered rotary brush to scrub the duct walls, as a vacuum alone cannot remove caked-on lint.
- Never use standard cloth duct tape on dryer vents; use UL-listed aluminum foil tape to seal joints.
- Upgrade dangerous corrugated foil transition ducts to semi-rigid metal to prevent future buildup.