How to Clean Your Outside AC Unit Before Summer Heat
Prepare your central AC for the summer heat by safely cleaning the exterior condenser unit. Learn how to remove debris, wash delicate fins, and improve efficiency.
As mid-spring rolls into summer, your central air conditioning system is preparing to work overtime. Over the fall and winter, the outside condenser unit—that large metal box sitting in your yard—typically gets choked with dead leaves, mud, cottonwood seeds, and pollen. This buildup acts like a heavy winter coat, restricting critical airflow and making the compressor work much harder than necessary.
For the homeowner, this translates directly to higher electric bills and a significantly increased risk of a system breakdown on the hottest day of the year. When the compressor overheats because it cannot breathe, the resulting repair bill can easily exceed $1,500. Fortunately, you can completely clean your outside ac unit yourself in about 30 to 60 minutes. This guide will walk you through safely prepping your HVAC system for the summer load, saving you money and preventing emergency service calls.
Why Your AC Condenser Needs a Spring Deep Clean
To understand why cleaning is so important, it helps to know what that outside unit actually does. Your central AC doesn't just pump cold air into your house; it removes heat from the inside and carries it outside via refrigerant lines. The outside unit, known as the condenser, is responsible for taking that hot refrigerant and cooling it down by pulling massive amounts of outdoor air through its metal fins.
Those thin aluminum fins provide the surface area needed to dissipate the heat. When they become clogged with grass clippings, dandelion fluff, and dirt, the air cannot pass through. The system runs longer, struggles to cool your home, and drives up your energy costs. A thorough spring cleaning restores that airflow, ensuring your system runs at peak efficiency.
Gathering Your Maintenance Tools
Before you begin, you will need to gather a few basic tools. You don't need anything highly specialized, but having everything on hand will make the job go smoothly.
- A standard garden hose with a spray nozzle (do NOT use a pressure washer)
- A 5/16-inch or 1/4-inch nut driver or socket wrench (to remove the top grille)
- Heavy-duty leather work gloves
- A shop vacuum or small broom
- Pruning shears (if you have bushes nearby)
- Foaming coil cleaner (optional, available for about $10 at hardware stores)
Step 1: The Critical Power Shut-Off
This is the most important step in the entire process. You are going to be working around water, electricity, and moving parts, so cutting the power is non-negotiable.
First, go inside your house and turn your thermostat to the "Off" position. Next, walk outside to the condenser unit. Mounted on the exterior wall of your house nearby, you will find an electrical disconnect box. Open the lid of this grey metal box.
Inside, you will typically find either a switch that you can flip to the "Off" position, or a pull-block. If it is a pull-block, grab the handle and pull the block straight out, then close the lid. To be absolutely certain the power is off, you can also flip the dedicated AC breaker in your home's main electrical panel.
Step 2: Clearing the Perimeter
Before opening the unit, address the surrounding environment. Your condenser needs to breathe. Bushes, tall grass, and encroaching vegetation are major culprits for restricted airflow.
Take your pruning shears and trim back any shrubs, branches, or tall ornamental grasses so there is a minimum of two feet of clear space on all sides of the unit. Ensure there is also at least five feet of clearance above the unit, as the fan blows the hot exhaust air straight up. Rake away any dead leaves or debris piled against the base of the concrete pad.
Step 3: Removing the Top Grille and Fan
Now it is time to open the unit. Look at the top grille where the large fan sits. You will see several screws around the perimeter securing the grille to the side panels. Using your nut driver or socket wrench, carefully remove these screws. Place them in a safe spot, like a cup or your pocket, so they don't get lost in the grass.
Once the screws are out, put on your leather gloves. Carefully lift the top grille. The fan motor is attached to this grille, and it is connected to the unit by electrical wires. Do not pull or stretch these wires. Gently lift the entire fan assembly and set it down across the corner of the unit, or rest it against a sturdy nearby object, ensuring there is plenty of slack in the wiring.
Step 4: Scooping the Interior Muck
With the fan moved out of the way, look down inside the condenser. You will likely see a depressing accumulation of dead leaves, pine needles, twigs, and dirt sitting at the bottom of the metal housing.
Reach in with your gloved hands and scoop out the bulk of this debris. It is highly recommended to wear long sleeves for this part, as the edges of the aluminum fins are sharp and can easily scrape your forearms. If you have a wet/dry shop vacuum, use it to suck up the remaining dirt and smaller debris from the bottom pan. Clearing this out prevents the drain holes at the bottom from clogging, which keeps the unit from rusting out prematurely.
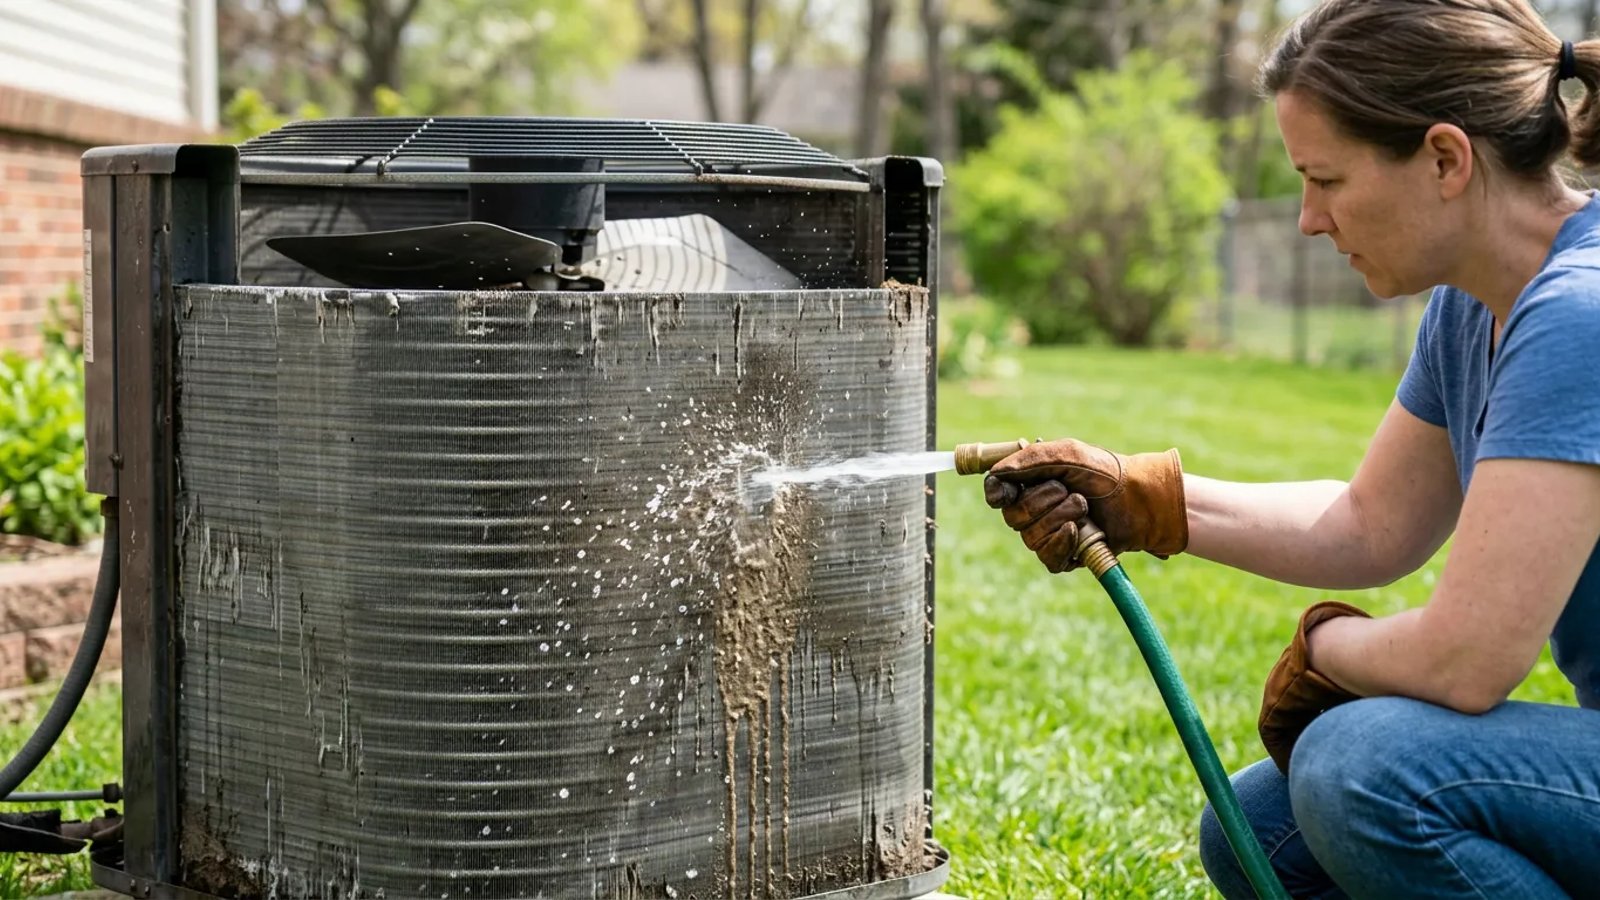
Step 5: How to Clean Your Outside AC Unit Fins
This is the core of the job. The aluminum fins wrap around the sides of the unit, and they are likely coated in dust and pollen. The trick to cleaning them is to push the dirt back out the way it came in.
- Grab your garden hose. Equip it with a standard spray nozzle set to a moderate spray—think of a hard rain, not a laser beam.
- Spray from the inside out. Stand over the open unit, point the nozzle at the inside of the fins, and spray outward. Work your way around the entire perimeter, moving from top to bottom.
- Watch the dirt flow. You will see dirty water, white cottonwood seeds, and mud pushing out through the exterior of the fins. Keep spraying until the water runs clear.
- Tackle the outside. Once the inside-out wash is complete, you can gently rinse the exterior of the fins, aiming the hose straight down at a 45-degree angle to avoid pushing dirt deeper into the unit.
The Cardinal Rule: Put Down the Pressure Washer
It is tempting to grab the pressure washer to blast away the grime quickly, but you must resist this urge.
Using a pressure washer on your AC condenser is a guaranteed way to cause hundreds of dollars in damage in a matter of seconds.
The aluminum fins on your AC unit are incredibly delicate—they are roughly the thickness of heavy-duty aluminum foil. A pressure washer, even on a low setting, will instantly fold and flatten these fins against the coils. When the fins are flattened, air cannot pass through. You will have effectively choked your AC unit to death, and fixing flattened fins is a tedious, expensive nightmare.
Straightening Bent Fins
While you are hosing down the unit, you might notice small patches where the fins are already bent or mashed together. This often happens from hail, errant baseballs, or bumps from the lawnmower.
If you see bent fins, you can purchase a specialized tool called a "fin comb" for about $15 at your local home improvement store. A fin comb has teeth designed to match the spacing of your specific unit's fins. You simply insert the comb above the damaged area and carefully drag it down, realigning the soft aluminum. Take your time; rushing this step can tear the metal.
Wrapping Up and Restoring Power
Once the water is running clear and the interior is free of debris, it is time to put everything back together. Carefully lift the fan assembly and set it back into place, ensuring the wires tuck safely inside the housing and do not get pinched between the grille and the side panels. Reinstall the screws, tightening them snugly with your nut driver so the fan doesn't vibrate and rattle when it runs.
With the unit fully reassembled, go back to your electrical disconnect box. Reinsert the pull-block or flip the switch back to the "On" position, and close the lid securely. Finally, head inside and turn your thermostat back to the "Cool" setting.
Step outside one last time and listen to the unit. It should be humming smoothly, and if you hold your hand a foot above the fan, you should feel a strong, steady draft of warm air being exhausted. By taking an hour to clean your outside AC unit this spring, you have set your home up for a cooler, more energy-efficient summer.