How to Prevent Roof Ice Dams Permanently This Summer
Stop winter roof leaks before they start. Learn how to permanently prevent ice dams this summer by air-sealing your attic, clearing soffit vents, and upgrading your insulation.
When thick layers of ice build up along your gutters in late January, panic usually sets in. Homeowners grab roof rakes, ladders, and sometimes even hammers to chip away the frozen blocks before water backs up under the shingles and ruins the bedroom drywall. But trying to fight ice in freezing temperatures is dangerous, frustrating, and mostly ineffective. The real secret to prevent roof ice dams permanently requires you to fix the problem when the weather is warm.
Ice dams are not a roofing problem. They are an attic temperature problem. If you suffered from massive icicles or ceiling leaks last winter, as I have personally experienced, right now is the perfect time to stop the cycle for good. By spending a weekend air-sealing your attic floor, improving ventilation, and upgrading your insulation, you can ensure your roof stays completely cold next winter.
Preventing Ice Dams: Why They Form
Understanding the physics of an ice dam makes it much easier to fix the root cause. In a perfectly functioning house, the roof surface should be exactly the same temperature as the outside air. When snow falls on a cold roof, it stays frozen and eventually blows away or melts uniformly in the sun.
However, most older homes have thermal leaks. Warm air from your heated living space rises and escapes into the attic. This trapped heat warms the underside of the roof decking, causing the bottom layer of snow on the roof to melt. The meltwater runs down the slope of the roof under the snowpack. Even a slight temperature difference, sometimes as little as 5-10 degrees Fahrenheit, between the roof deck and the unheated eaves can trigger ice dam formation.
When that water reaches the roof overhang—the eaves—it hits a section of the roof that extends past the exterior walls. Because there is no heated living space below the eaves, this section of the roof is freezing cold. The meltwater immediately refreezes upon hitting the cold eaves, creating a small ridge of ice. As this cycle repeats day after day, the ridge grows into a massive dam. Subsequent meltwater pools behind this dam, works its way under the shingles, and drips into your home.
Ice dams aren't a roofing problem—they are an attic temperature problem.
To stop this process, we have to stop the roof from warming up. That means keeping the heat inside the living space and keeping the attic freezing cold.
Step 1: Hunt Down and Seal Attic Air Leaks
Many homeowners assume that adding more insulation is the first step. That is a mistake. Fiberglass and cellulose insulation filter air; they do not stop it. If you have gaps in your ceiling, warm air will push right through your expensive new insulation like wind through a sweater. You must seal the air leaks first.
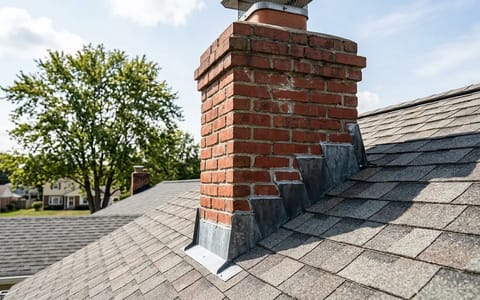
An attic bypass is any hole, crack, or gap where the living space connects to the attic. Common culprits include the gaps around plumbing vent pipes, electrical wires, ceiling light fixtures, bathroom exhaust fans, and the attic hatch itself. The worst offender is usually the chimney chase—the large gap framed around a masonry chimney to keep wood framing away from the hot bricks.
A few years ago, I spent a miserable February chipping away a massive ice block on my own 1980s colonial. Water was actively dripping through the master bedroom ceiling. The following summer, I finally took a flashlight and a can of fire-blocking foam up into the attic. I discovered a massive, two-inch gap around the central chimney chase hidden under old fiberglass batts. Warm air had been pouring out of that gap all winter. Sealing that single bypass with sheet metal and high-temperature caulk stopped the bedroom leak permanently.
Take a couple of cans of expanding polyurethane foam into the attic. Rake back the existing insulation and look for dirty spots. When air flows through fiberglass, it leaves behind dark dust. Wherever you see dirty insulation, there is an air leak directly below it. Fill all small gaps around pipes and wires with the expanding foam. For larger gaps around flues, use metal flashing sealed with high-temperature silicone.
Step 2: Clear Blocked Soffit Vents and Install Baffles
Once you stop the warm air from entering the attic, you need to ensure cold outside air can freely circulate to sweep away any residual heat. This is done through a passive intake and exhaust system. Cold air enters through the soffit vents underneath your roof overhang and exits through the ridge vent at the peak of the roof.
Unfortunately, many homes have blocked soffit vents. Sometimes they are painted shut on the outside, but more commonly, they are buried under attic insulation on the inside. If the insulation touches the roof decking at the edges, the air path is completely choked off.
- Inspect the exterior. Walk around your house and look up at the eaves to ensure your perforated aluminum or wood soffit vents are not painted shut or clogged with dirt and cobwebs.
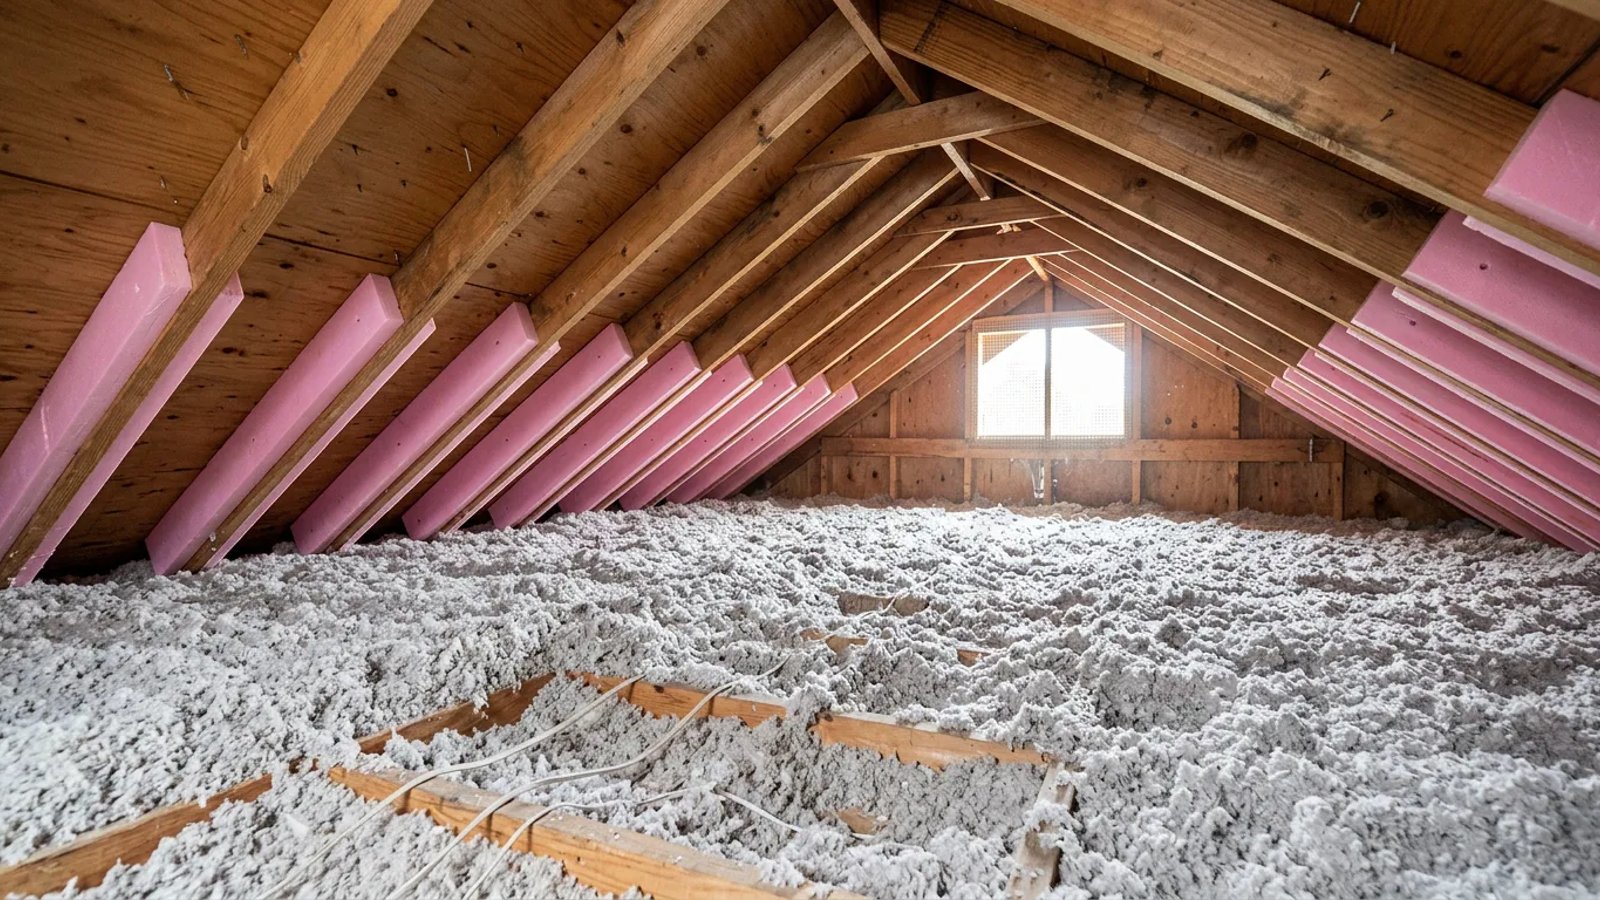
- Pull back existing insulation. Up in the attic, use a rake or gloved hands to pull insulation away from the very edge where the roof meets the floor.
- Slide the baffle into place. Push a plastic or foam ventilation baffle down into the gap, ensuring it creates a clear channel from the soffit vent up past the insulation level.
- Staple to the roof decking. Use a heavy-duty staple gun to secure the baffle flanges directly to the underside of the roof decking.
Installing baffles in every single rafter bay ensures that no matter how much insulation you add later, the cold air will always have a clear, protected highway to travel from the soffit to the ridge.
Step 3: Measure and Upgrade Your Attic Insulation
With the air leaks sealed and the ventilation protected by baffles, you are finally ready to insulate. Insulation is measured in R-value, which stands for resistance to heat flow. The higher the R-value, the better the material prevents your home's heat from radiating into the attic space.
According to the Energy Star guidelines, homes in cold climates prone to ice dams should have attic insulation rated between R-49 and R-60. If you currently have blown-in cellulose or fiberglass, you need roughly 14 to 18 inches of depth to hit this target. A simple rule of thumb: if you can clearly see the tops of your wooden attic floor joists, you are severely under-insulated.
Renting a blower machine from your local home improvement store is surprisingly easy. In many cases, if you purchase 10 or more bags of cellulose insulation, the store will let you use the blower machine for free for 24 hours. It is a two-person job—one person feeds the compressed bales into the hopper in the driveway, while the other person stands in the attic directing the hose. In a single afternoon, you can add 10 inches of fresh insulation over your entire house for a fraction of the cost of hiring a contractor.
Should You Install Roof Heating Cables?
When homeowners get desperate, they often look for quick fixes. Zigzagging electrical heating cables along the roof edge is one of the most common band-aids. Hardware stores sell them by the dozens in November and December. While they can melt small tunnels through the ice to let water escape, they are highly inefficient.
Heating cables treat the symptom, not the disease. They cost money to operate, they look unsightly from the street, and they do absolutely nothing to stop the massive heat loss occurring inside your home. Even worse, the meltwater created by the cables often flows down into the unheated gutters and immediately freezes solid, ripping the gutters right off the fascia board under the sheer weight of the ice.
Similarly, tossing calcium chloride salt pucks onto the roof is a terrible idea. The harsh chemicals will aggressively corrode your aluminum gutters, kill your foundation plants when the water washes down, and prematurely degrade the asphalt granules on your roof shingles. Stick to the permanent fix.
Working Safely in a Warm Attic
Because you are doing this preventative maintenance during the warmer months, you must respect the heat. Unfinished attics can easily reach 130 degrees Fahrenheit or higher by mid-afternoon on a sunny day. This kind of heat can cause severe dehydration and heat exhaustion rapidly.
Plan to start your attic work at sunrise. Bring a large jug of ice water up with you, and set an alarm on your phone to remind yourself to take a break every 30 minutes. Always step carefully on the wooden joists, or better yet, bring up a few pieces of scrap half-inch plywood to lay across the joists so you have a safe platform to kneel on. One misplaced foot on the drywall ceiling between the joists will send your leg crashing straight into your living room.
Tackling your attic ventilation and insulation while the weather is favorable is sweaty, dirty work. But putting in those few hours of labor now means you can spend next winter comfortably inside, knowing your roof is ready long before the first snowflake falls.
- Seal all attic bypasses around pipes, wires, and fixtures with expanding foam.
- Install foam baffles in your rafter bays to ensure insulation doesn't block soffit airflow.
- Upgrade attic insulation to R-49 or higher depending on your climate zone.
- Avoid temporary fixes like roof salt pucks or heating cables that don't address the root cause.