How to Seal an Asphalt Driveway and Prevent Cracks
Learn how to prep, crack-fill, and seal your asphalt driveway to protect it from water and sun damage. This weekend DIY project saves money and significantly boosts curb appeal.
Asphalt driveways take a relentless beating from ultraviolet rays, fluctuating seasonal temperatures, and heavy vehicle traffic. Over time, that rich, dark black surface oxidizes and fades to a dull, porous gray, while micro-fissures begin to form across the slab. Left untreated, rainwater and melting snow seep into these tiny cracks. When that moisture freezes, it expands, blowing out chunks of asphalt and eventually causing deep potholes or foundation-adjacent water pooling that requires an expensive professional repaving job.
Learning how to seal an asphalt driveway is one of the most cost-effective and visually satisfying weekend projects a homeowner can tackle. By replenishing the binders in the asphalt and creating a waterproof barrier, you drastically extend the lifespan of your driveway while instantly boosting your home's curb appeal. The process is entirely manageable for a budget-conscious DIYer, provided you respect the golden rule of exterior maintenance: the final result is only as good as the preparation.
Understanding Why Asphalt Fails
Before mixing the sealer, it helps to understand what you are actually repairing. Asphalt is essentially a mixture of sand and crushed stone held together by a tar-like petroleum binder. When exposed to the sun's UV rays over several years, this binder oxidizes, dries out, and loses its flexibility. The stones begin to loosen, which is why older driveways feel rough and sandy underfoot.
Once the binder degrades, water intrusion becomes the primary enemy. A driveway that is properly sloped and sealed sheds water efficiently. A neglected driveway absorbs it like a sponge. By applying a high-quality asphalt emulsion or coal tar sealer, you are replacing the oxidized surface layer, locking the aggregate stone back into place, and sealing the pores against moisture.
Assessing the Damage and Gathering Materials
A successful sealing project requires a continuous workflow once you start pouring. Stopping halfway through to run to the hardware store guarantees visible seams and uneven drying lines. Walk your driveway with a notepad and assess the square footage, the number of oil stains, and the linear feet of cracking.
Standard 5-gallon buckets of asphalt sealer typically cover between 250 and 300 square feet, though highly porous, unsealed driveways will absorb more and yield lower coverage rates. Always purchase at least one extra bucket. Unopened buckets can usually be returned, but running out of sealer with ten feet of driveway left is a frustrating ordeal.
When selecting your sealer, you will generally choose between asphalt emulsion and coal tar. Asphalt emulsion is more environmentally friendly, emits fewer volatile organic compounds (VOCs), and is easier to work with, making it the preferred choice for most modern residential applications. Coal tar is highly resistant to oil and gas spills but is banned in some municipalities due to environmental concerns. Check your local regulations before purchasing.
The Secret to Success: Meticulous Prep Work
If you take away nothing else, remember this: meticulous prep work is the absolute secret to a professional-looking, long-lasting finish. Applying sealer over dirt, moss, or motor oil is a waste of time and money; the coating will simply peel off the first time you turn your car's steering wheel.
Start by tackling the perimeter. Use an edger or a string trimmer to cut back grass and weeds that have encroached onto the asphalt. Use a screwdriver or a specialized crack-weeding tool to scrape out any vegetation growing inside the fissures. Once the organic material is gone, use a stiff wire brush to aggressively scrub out loose dirt and crumbling asphalt from inside the cracks.
Next, address the oil stains. Motor oil degrades asphalt rapidly and prevents the new sealer from bonding. Apply a commercial driveway degreaser directly to the stains, let it sit for the manufacturer's recommended time (usually 15 to 30 minutes), and scrub vigorously with a stiff brush. Rinse the area thoroughly. If the water still beads up on the surface of the stain, repeat the process. The water must sheet off the area evenly to confirm the oil is gone.
Finally, clean the entire surface. A power washer equipped with a 25-degree tip is the most efficient tool for this job. Keep the wand about 12 inches from the surface, working in sweeping motions from the highest point of the driveway down to the street. If you do not have a power washer, a high-pressure nozzle on a standard garden hose and a stiff push broom will suffice, though it requires significantly more elbow grease. Once clean, the driveway must dry completely—usually requiring a full 24 hours of sunlight.
Filling Cracks and Letting Them Cure
With a clean, dry canvas, you can begin repairing the structural defects. Hairline cracks (under 1/8-inch wide) will generally be filled by the main liquid sealer. Anything between 1/8-inch and 1/2-inch requires a dedicated elastomeric crack filler. This product comes in pourable squeeze bottles and is formulated with rubberized compounds that expand and contract with the driveway through seasonal temperature changes.
Snip the tip of the crack filler bottle to match the width of your cracks. Slowly pour the liquid into the fissure, slightly overfilling it. Because the filler shrinks as the water evaporates, overfilling ensures it dries flush with the surrounding asphalt. Use a V-shaped squeegee or an old putty knife to scrape the excess flat, feathering the edges so you do not leave a noticeable ridge.
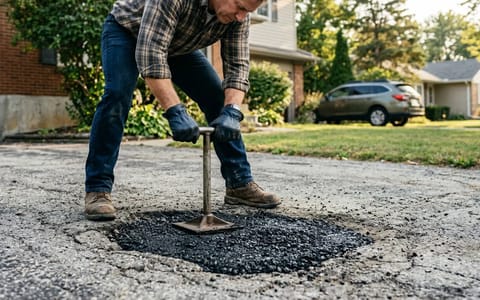
Deep potholes or cracks wider than 1/2-inch cannot be fixed with liquid filler. These require cold-patch asphalt. Clean the hole, pour in the loose cold-patch material, and tamp it down firmly using a hand tamper or by driving over a piece of scrap plywood laid over the hole. Both crack filler and cold patch need time to cure before you apply the topcoat. Liquid filler usually cures in 4 to 8 hours, while cold patch may require several days. Always read the label on your specific product.
Applying the Sealer Smoothly and Evenly
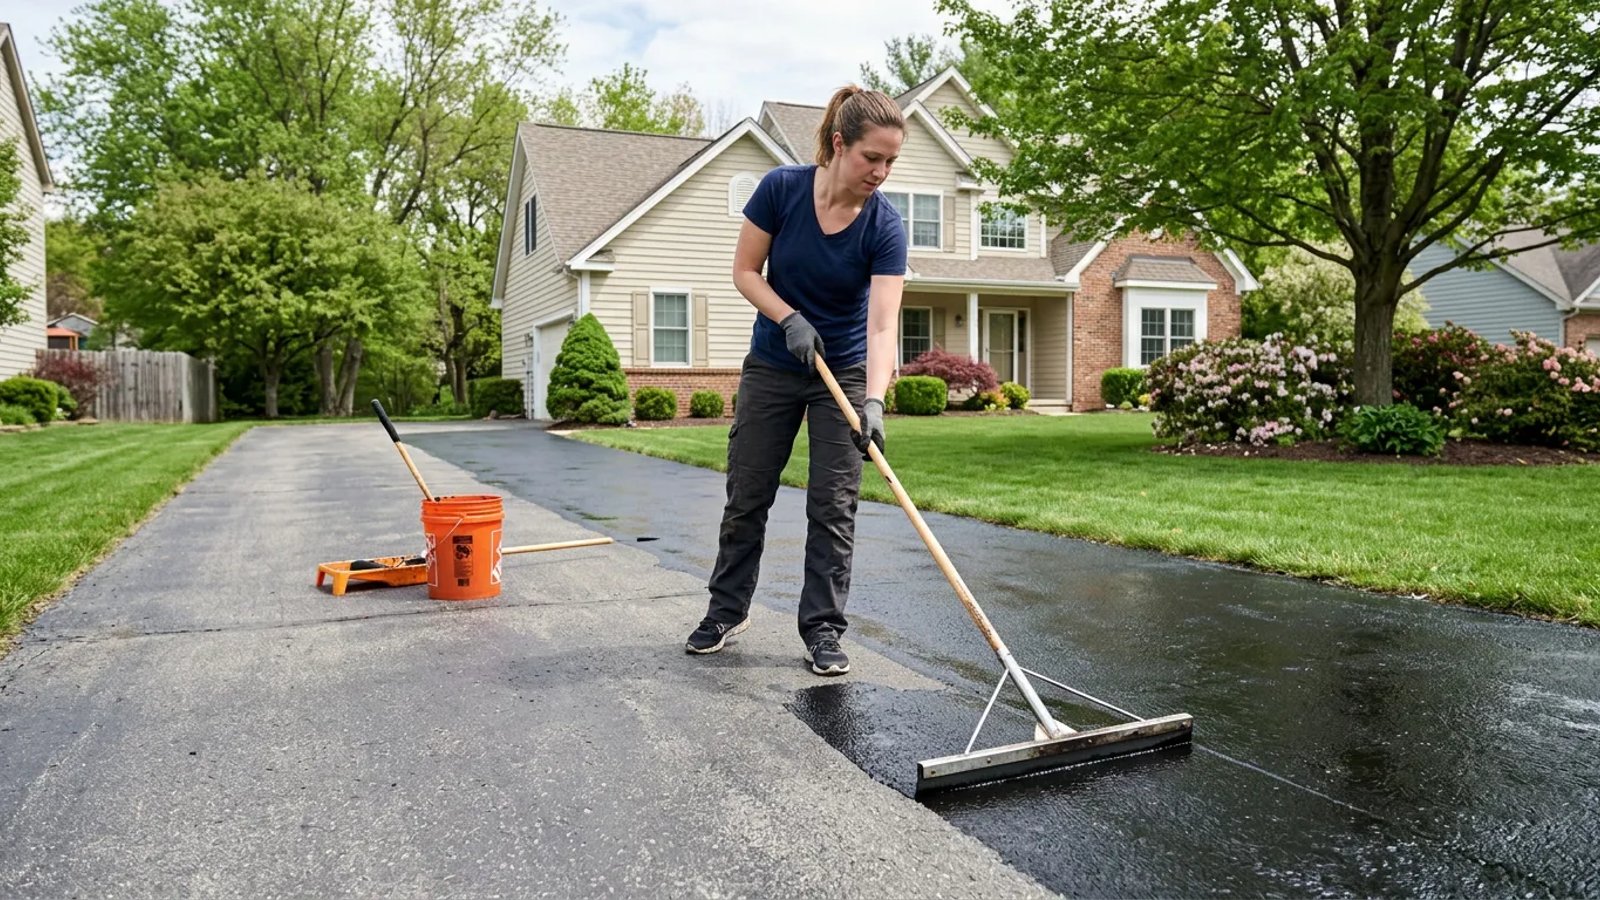
You are finally ready to seal. Turn all your buckets of sealer upside down the night before; this helps dislodge the heavy solids that settle at the bottom. Right before opening, flip them upright and stir thoroughly with a heavy wooden paddle or a drill-mounted mixing attachment. The consistency should resemble thick pancake batter.
Working methodically from the top of the driveway down to the street ensures you never paint yourself into a corner.
Begin by "cutting in" the edges. Use a large, inexpensive masonry brush or a small handheld squeegee to apply a neat border of sealer along your garage floor lip, sidewalks, and any retaining walls. This prevents you from accidentally splashing black tar onto your concrete or brickwork when making broad strokes with the large squeegee.
- Pour a ribbon. Starting at the highest point of the driveway (usually near the garage), pour a 6-inch-wide ribbon of sealer across the width of the pavement.
- Pull and spread. Place your U-shaped squeegee behind the ribbon. Walk backward, pulling the sealer toward you at a slight angle. This angled approach allows the excess liquid to roll off the side of the squeegee, creating a continuous bead for the next pass.
- Apply firm pressure. You are not painting a wall; you are forcing material into the pores of the asphalt. Press down firmly so the squeegee leaves a thin, even coat. Thick puddles of sealer will dry poorly, track onto your shoes, and eventually peel.
- Overlap your passes. As you pour the next ribbon, overlap your previous pass by about two inches to ensure no gray streaks are left behind.
- Work quickly but carefully. Sealer begins to set up fast, especially on a sunny day. Maintain a wet edge to prevent visible seam lines.
Curing Time and Long-Term Maintenance
Once you reach the end of the driveway, use your brush to neatly finish the edge where the asphalt meets the street. Immediately set up empty buckets, traffic cones, or string caution tape across the entrance. Delivery drivers and neighbors turning around will ruin hours of hard work in a matter of seconds.
The surface will likely look dry and turn matte black within a few hours, but do not be fooled. The layers beneath the surface are still soft. Keep all foot traffic off the driveway for at least 24 hours. Keep vehicles parked on the street for a full 48 to 72 hours. If your driveway is heavily shaded by trees, lean toward the 72-hour mark to be safe.
Once fully cured, your driveway will boast a deep, uniform black finish that resists water, repels oil, and beautifully frames your landscaping. To maintain this protective barrier, plan to repeat the process every two to three years. Sweeping away abrasive dirt regularly and promptly cleaning up automotive fluid spills will ensure your newly sealed surface remains resilient and pristine for seasons to come.