How to Troubleshoot a Well Pressure Tank (And Save Your Pump)

Is your well pump clicking on and off rapidly? Learn how to diagnose short cycling, test your tank's bladder, and recharge the air pressure to save your well pump.
Homeowners on well water often experience a moment of sheer panic when their water pressure starts surging, taps begin to sputter, or they hear the well pump clicking on and off rapidly every time a faucet is opened. This rapid clicking is a destructive phenomenon known as short cycling. It is almost always caused by a failing or miscalibrated pressure tank.
If ignored, short cycling forces your well pump to work overtime. A pump is designed to run for several minutes at a time, not to turn on and off every ten seconds. This constant starting and stopping draws massive amounts of electricity, overheats the motor, and can quickly burn out a well pump that costs thousands of dollars to replace.
The good news is that when you know how to troubleshoot well pressure tank issues, you can often fix the problem in an afternoon. Sometimes, the tank simply loses a bit of air over the years and requires a quick recharge with a standard air compressor. Other times, the internal components have failed completely. This guide will walk you through exactly how to diagnose the issue, read your system's gauges safely, and determine whether you need a simple air top-off or a call to your local well professional.
Understanding How Your Well Pressure Tank Actually Works
Before you start turning valves and checking pressures, it helps to understand what is happening inside that large blue or grey steel tank sitting in your basement or pump house. Most modern residential homes use what is called a captive-air pressure tank. Inside the rigid steel exterior is a heavy-duty rubber bladder or diaphragm that separates the inside of the tank into two distinct zones.
Water from your well is pumped into the bottom zone of the tank, which expands the rubber bladder. The top zone of the tank, above the bladder, is filled with a specific amount of compressed air. As water fills the bladder, it pushes upward, compressing the air above it even further. This compressed air acts like a giant coiled spring.
When you open a faucet in your kitchen or step into the shower, the well pump does not turn on immediately. Instead, that compressed air pushes down on the bladder, forcing the stored water out of the tank and through your home's plumbing. Only when the pressure drops to a specific level does the pump kick on to refill the tank.
Your well pump’s worst enemy is starting and stopping too often. The pressure tank's entire job is to provide a buffer that prevents that from happening.
Over time, tanks can become "waterlogged." This happens if the air charge slowly leaks out of the top valve, or if the rubber bladder develops a tear. When the tank is completely full of water and has no air cushion, the pressure drops to zero the second you open a tap, causing the pump to short cycle.
The Telltale Signs of a Failing Pressure Tank
Your plumbing system will usually give you several warning signs before the pump fails completely. The most obvious symptom is a noticeable fluctuation in water pressure. You might be in the shower and feel the water pressure drop significantly, only to surge back up a few seconds later. This surging matches the exact rhythm of your pump turning on and off.
Another common sign is sputtering taps. If air is escaping from a torn bladder into the water line, it will travel through your pipes and cause your faucets to spit and sputter when you turn them on. You might also notice a sudden spike in your electric bill, as the heavy electrical draw of a pump starting dozens of times an hour consumes a massive amount of power.
I once spent a panicked Saturday morning convinced my well pump had died completely because of these exact symptoms, only to realize the pressure switch was clogged with a tiny piece of sediment. A 25-dollar part and a quick cleaning saved me a 2,000-dollar pump replacement. Always check the simple things first.
Step 1: How to Troubleshoot a Well Pressure Tank Gauge and Switch
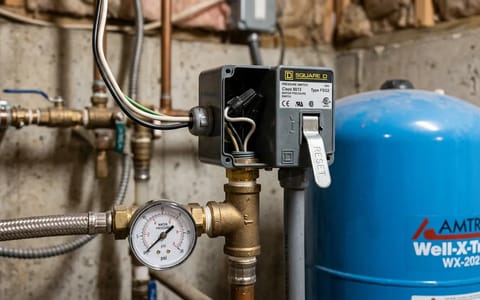
To properly troubleshoot your system, you first need to know your system's operating pressures. Look at the plumbing pipes directly connected to the bottom of your pressure tank. You will see a small, round pressure gauge, usually reading from 0 to 100 PSI. Nearby, you will see a small grey or black plastic box with electrical wires running into it. This is the pressure switch.
The pressure switch controls when the pump turns on (the cut-in pressure) and when it turns off (the cut-out pressure). You need to find out what these numbers are. Have a helper go to a nearby sink and run the cold water at a steady stream while you stand in front of the gauge.
Watch the needle on the gauge carefully. As the water runs, the pressure will slowly drop. Listen for a loud "click" from the grey pressure switch. Note the exact number on the gauge when it clicks and the pump turns on. This is your cut-in pressure. Continue watching as the pump runs. The pressure will rise until the switch clicks again and the pump shuts off. This is your cut-out pressure.
Most residential well systems are set to operate on either a 30/50 PSI cycle or a 40/60 PSI cycle. Write these two numbers down. You will need the lower number (the cut-in pressure) for the next steps. If the gauge is stuck, filled with water, or the needle bounces erratically, the gauge itself is broken and must be replaced before you can proceed.
Step 2: The Schrader Valve Test (Checking for a Ruptured Bladder)
Before you go through the effort of draining the tank, you need to perform a vital diagnostic check. Look at the very top of your pressure tank. You will find a small air valve covered by a plastic cap. This is called a Schrader valve, and it looks exactly like the valve stem on a car or bicycle tire.
Unscrew the plastic cap. Take a small flathead screwdriver, a pen, or even just your fingernail, and briefly press down on the small metal pin in the center of the valve. You only need to press it for a split second.
If only clean, dry air hisses out when you press the pin, your bladder is likely still intact. This means your short cycling issue is probably due to a simple loss of air pressure over time, and you can fix it by recharging the tank.
Step 3: Draining the Tank to Test the Air Pre-Charge
You cannot check the air pressure in a well tank while the system is under water pressure. If you put a tire gauge on the valve while the tank is full, you are just reading the water pressure of the plumbing system, not the actual air pre-charge. You must empty the tank entirely.
- Turn off the power. Locate the breaker box and flip the 240-volt breaker for the well pump to the OFF position. This is a critical safety step.
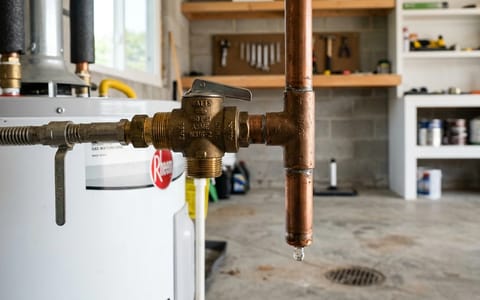
- Attach a drain hose. Connect a standard 5/8-inch garden hose to the brass boiler drain valve located at the bottom of the pressure tank plumbing.
- Route the water safely. Run the other end of the hose to a floor drain, a sump pit, or out the basement door into the yard.
- Break the vacuum. Go to the highest floor in your house and open a cold water faucet. This allows air into the pipes so the water can drain smoothly.
- Drain the tank. Open the boiler drain valve and let all the water empty out. Wait until the water completely stops flowing.
Once the tank is completely empty, give it a gentle push or tap the side. It should feel light and sound hollow. If the tank still feels incredibly heavy or sounds solid when tapped, the bladder may be stretched and trapping water, which is another sign of a failing tank.
Step 4: Checking and Recharging the Air Pressure
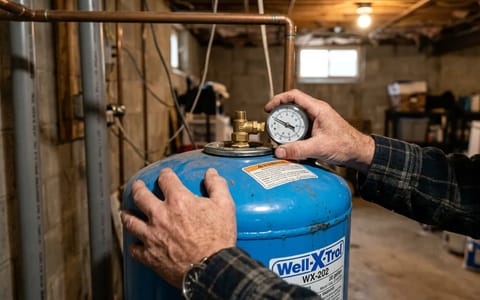
With the tank empty and the drain valve still open, take a standard automotive tire pressure gauge and press it firmly onto the Schrader valve at the top of the tank. Read the pressure. To prevent short cycling, the air pressure inside the empty tank must be exactly 2 PSI below your pump's cut-in pressure.
For example, if you determined in Step 1 that your pump clicks on at 40 PSI, your empty tank should have exactly 38 PSI of air. If your system is a 30/50 setup, your empty tank needs 28 PSI of air. If you check the gauge and find only 10 or 15 PSI, you have found the root cause of your waterlogged tank and short cycling.
To fix this, grab a standard air compressor or a heavy-duty bicycle floor pump. Attach the air chuck to the Schrader valve and begin adding air. Because these tanks hold a large volume of air, a small compressor might take 10 to 15 minutes to reach the desired pressure.
Once you hit the magic number (2 PSI below cut-in), remove the compressor. Close the boiler drain valve at the bottom of the tank, disconnect the hose, and close the faucet you opened upstairs. Finally, flip the 240-volt breaker back on. The pump will start running. Watch the gauge to ensure it climbs steadily to the cut-out pressure and shuts off properly.
When to Call a Well Professional
While checking the air charge is a straightforward DIY task, well systems involve high voltage electricity and critical plumbing infrastructure. There are several scenarios where you should skip the DIY route and call in a licensed well contractor or plumber.
If you perform the Schrader valve test and find water, the tank is dead. Similarly, if you try to add air with a compressor but the tank refuses to hold pressure, the steel casing has likely rusted through or the valve assembly has failed. Additionally, if your pressure switch is visibly sparking, heavily corroded, or smells like melting plastic, do not touch it. The 240 volts powering that switch can be lethal.
Taking 30 minutes to check your pressure tank's air charge once a year can literally add a decade of life to your well pump. Keep an eye on that small pressure gauge, listen for the rapid clicking of short cycling, and keep your air pre-charge dialed in. A healthy pressure tank means a happy, long-lasting well system.