Oven Temperature Off? How to Calibrate It Yourself
Tired of burnt cookies and undercooked casseroles? Learn how to accurately test and calibrate your oven's temperature settings in just 10 minutes with this complete DIY guide.
You follow the recipe perfectly. You measure the flour by weight, you chill the dough, and you set the timer exactly as instructed. Yet, when you pull the pan out, the edges of your cookies are burnt to a crisp while the centers remain completely raw. Or perhaps your famous Thanksgiving turkey takes an extra hour and a half to reach a safe internal temperature. It is incredibly frustrating to feel like you are failing in the kitchen when, in reality, your appliance is lying to you.
If your oven temperature is off, you might assume you need to start shopping for a brand-new range or prepare yourself for a $200 minimum service call from a local repairman. Fortunately, that is rarely the case. Ovens, both digital and analog, naturally drift out of calibration over years of use. The internal temperature sensor ages, the control board's resistance interpretations shift, and suddenly a 350-degree setting is only delivering 315 degrees of actual heat. The good news is that realigning this system is a simple, 10-minute DIY fix that requires nothing more than a cheap thermometer and a little bit of patience.
Why Your Oven Temperature is Off (And Why It Matters)
To understand why calibration is necessary, it helps to understand how your oven measures heat. Inside the oven cavity—usually in the top back corner—is a small metal rod called a temperature sensor or RTD (Resistance Temperature Detector) probe. As the oven heats up, the electrical resistance inside this metal probe changes. The oven's main control board reads this resistance and calculates the temperature.
Over years of enduring extreme high-heat cycles, self-cleaning modes, and general wear and tear, the physical properties of that metal probe can change slightly. When the probe's baseline resistance shifts, the control board's math becomes flawed. It might think the oven has reached 350 degrees Fahrenheit, but the actual ambient air is only 320 degrees.
In cooking, a 30-degree discrepancy is the difference between success and disaster. Baking is a precise chemical reaction. If the temperature is too low, leavening agents like baking powder won't activate quickly enough, leaving your cakes flat and dense. If the temperature is too high, the exterior sugars will caramelize and burn long before the internal structure has time to set. Getting your oven temperature off the guesswork track and back to reality is essential for consistent cooking.
Common Mistakes When Testing Oven Temperature
Before we dive into the actual testing process, we need to clear up a few persistent internet myths about how to check an oven's accuracy. If you search for ways to test an oven, you will undoubtedly stumble across the "sugar test." The theory claims that because pure white sugar melts at exactly 366 degrees Fahrenheit, you can put a pile of sugar on a baking sheet, set the oven to 350 degrees, and slowly inch the heat up until it melts to find your baseline.
Another common mistake is attempting to use an infrared thermometer gun. These laser-guided tools are fantastic for checking the surface temperature of a pizza stone or a cast-iron skillet, but they are entirely useless for measuring ambient air. If you shoot a laser into your oven, you are measuring the temperature of the steel wall at the back of the cavity, which will always be vastly different from the air circulating around your food.
Finally, do not trust the "preheat beep." When you turn your oven on, it blasts the heating elements at full power. The air temperature spikes rapidly, and the oven beeps to tell you it has reached the target. However, the heavy metal walls and racks are still cold. The moment you open the door to put your food in, that hot air escapes, and the cold walls suck the remaining heat out of the environment. You must give the oven time to thoroughly saturate with heat before taking any real measurements.
The Right Way to Test Your Oven Temperature
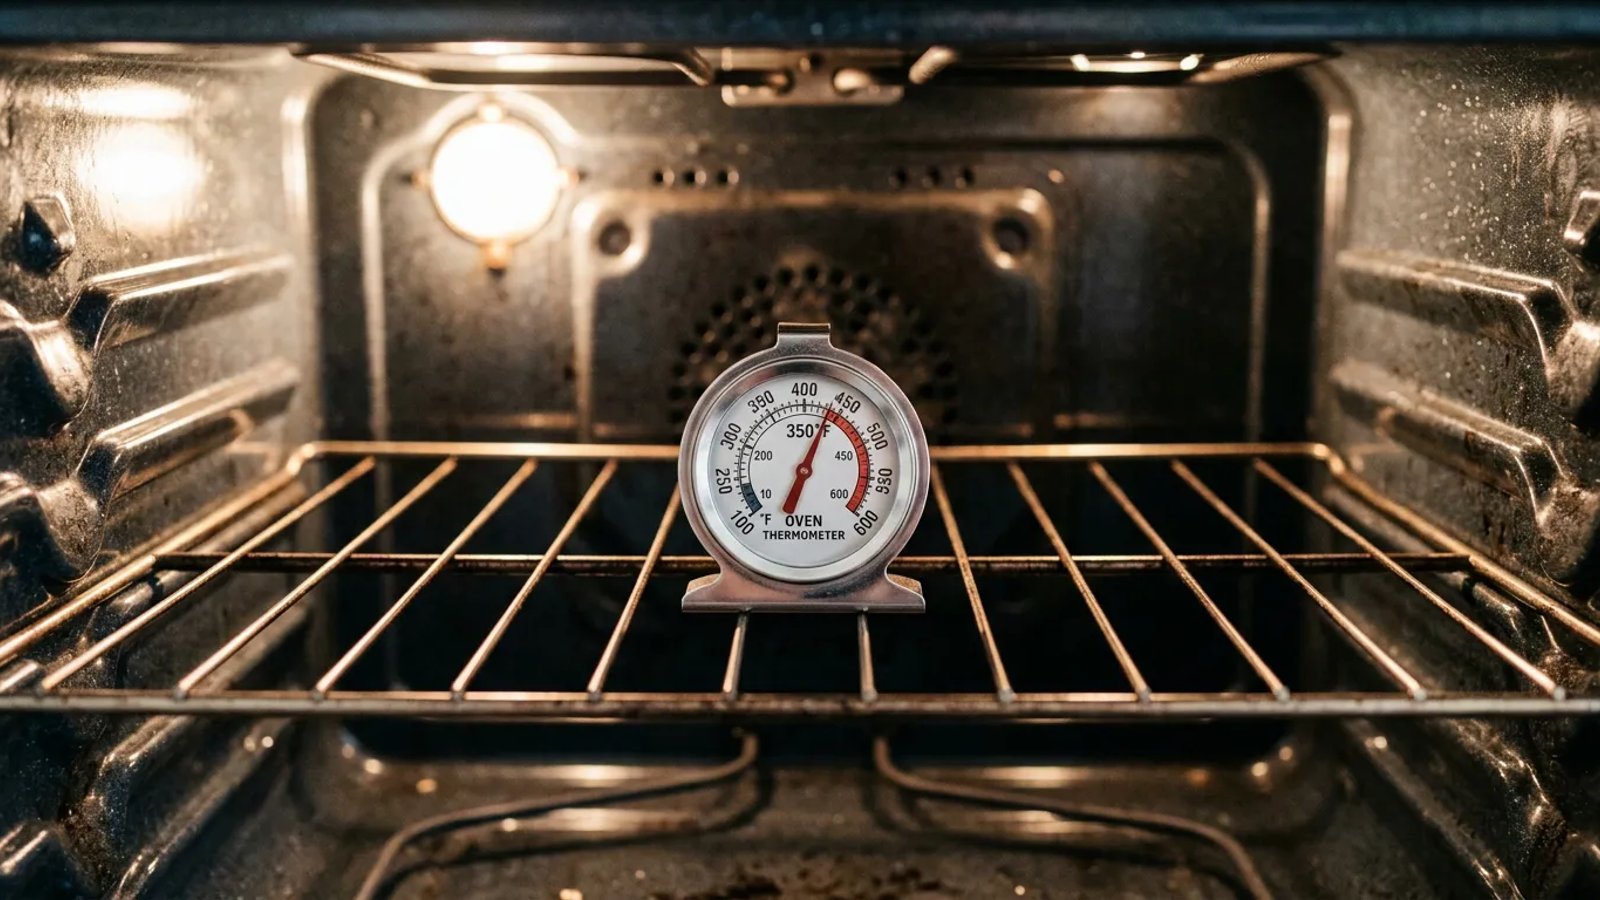
To get an accurate reading, you need to purchase a dedicated analog oven thermometer. These are incredibly simple, spring-operated devices that cost between $10 and $15 at any hardware store, grocery store, or online retailer. They are designed specifically to measure ambient air temperature slowly and steadily.
Once you have your thermometer, you need to follow a strict testing protocol to find your oven's true baseline. This requires a little bit of time, so plan to do this on a day when you don't need to cook anything immediately.
- Position the thermometer. Make sure your oven is completely empty. Place the analog oven thermometer dead center on the middle rack. This is where the heat distribution is most even.
- Preheat the oven. Set the oven to exactly 350 degrees Fahrenheit. Let it run until it beeps, indicating it has reached the target temperature.
- Wait for stabilization. Ignore the beep. Leave the oven running for an additional 20 minutes to allow the metal walls and racks to fully absorb the heat and stabilize the environment.
- Take the first reading. Turn on the oven light and look through the glass door to read the thermometer. If your glass is too dirty, open the door very quickly, read the dial, and shut the door immediately to prevent heat loss. Write this number down.
- Take three more readings. Wait 10 minutes and take a second reading. Wait another 10 minutes for a third, and a final 10 minutes for a fourth. Write all four numbers down.
- Calculate the average. Add your four temperature readings together, then divide by four. This final number is your oven's true average temperature.
If your average comes out to 350 degrees, your oven is perfectly calibrated. If the average is 325 degrees, your oven is baking 25 degrees too cold. If the average is 380 degrees, it is baking 30 degrees too hot. Write down the exact difference—this is the offset you will need to apply.
Understanding the Natural Baking Cycle
You might be wondering why we have to take four separate readings and average them out. Why wouldn't the thermometer just sit at a steady 350 degrees? The answer lies in how electric and gas ovens manage heat. Ovens do not output a constant, steady stream of warmth. Instead, they operate on a thermostat cycle, much like the central air conditioning in your house.
When you set the oven to 350 degrees, the bottom heating element kicks on at full power. It stays on until the air temperature climbs past the target—often reaching 370 or 380 degrees. At that point, the thermostat clicks off. The oven slowly cools down as heat escapes through the vents. Once the temperature drops to around 320 or 330 degrees, the thermostat clicks back on, and the cycle repeats.
Your oven's digital display isn't a live thermometer—it's just a target destination. The actual temperature is constantly riding a 40-degree rollercoaster.
This natural swing is exactly why a single glance at a thermometer is useless. If you happen to check the dial at the very top of the heating cycle, you might panic and think your oven is running 30 degrees too hot. If you check it at the bottom of the cycle, you'll think it's broken and running cold. By taking multiple readings over a 40-minute window, you capture the highs and the lows, allowing you to find the true mathematical center of that rollercoaster.
How to Calibrate a Modern Digital Oven
If you have determined that your oven temperature is off by a consistent amount—say, it averages 320 degrees when set to 350—you can easily fix this using the appliance's hidden calibration menu. Almost all modern ovens with digital keypads allow the user to adjust the factory calibration offset.
The exact button combination required to access this menu varies by brand (Whirlpool, GE, Samsung, LG, etc.), so checking your specific owner's manual is always the best first step. However, the vast majority of digital ovens use one of a few standard access methods.
- Access the hidden menu. On many models, you simply press and hold the "Bake" button for 3 to 5 seconds until the digital display changes to show a two-digit number (usually "00"). On other models, you may need to hold the "Settings," "Options," or "Broil" button.
- Read the current offset. The screen will display the current calibration. If you have never adjusted it, it will likely read "0" or "00".
- Input your adjustment. Use the arrow keys or the numeric keypad to enter the temperature difference you calculated earlier. If your oven was baking 25 degrees too cold, you need it to be hotter, so you will enter "+25". If it was baking 20 degrees too hot, you will enter "-20".
- Save the setting. Press the "Start" or "Save" button to lock in the new calibration.
From now on, when you type in 350 degrees, the control board will automatically adjust its internal math to deliver the true temperature you requested. It is important to note that most manufacturers limit this user calibration to a maximum of 35 degrees Fahrenheit in either direction. If your oven is off by more than that, a simple software offset will not fix the underlying mechanical issue.
Adjusting the Hidden Set-Screws on Analog Ovens
If you have an older oven, or a commercial-style gas range that uses physical analog knobs rather than a digital keypad, you obviously cannot punch in a software offset. Instead, you have to physically adjust the relationship between the plastic knob you turn and the internal thermostat valve it controls.
This sounds complicated, but the manufacturers designed these knobs specifically to be adjusted by homeowners. All you need is a standard Phillips-head screwdriver.
- Remove the knob. Make sure the oven is turned off. Grab the temperature control knob firmly and pull it straight out toward you. It should slide right off the metal "D" shaft.
- Inspect the back of the dial. Turn the knob over. On the back, you will see a metal plate or skirt attached to the plastic knob with one or two small screws. You will also see a series of hash marks, often with words like "Hotter" or "Cooler" stamped into the metal.
- Loosen the screws. Use your screwdriver to slightly loosen the screws holding the metal plate. Do not remove them completely; just loosen them enough so the plate can slide.
- Adjust the alignment. Rotate the metal plate in the direction you need. Generally, each hash mark represents a 10-degree adjustment. If your oven is baking 20 degrees too hot, rotate the plate two hash marks toward the "Cooler" side.
- Retighten and replace. Tighten the screws back down firmly, taking care not to strip the plastic housing. Push the knob back onto the metal shaft.
By rotating that plate, you have slightly changed where the knob sits on the shaft. Now, when you point the dial at 350 degrees, the internal valve is actually resting in the 330-degree position, perfectly countering your oven's tendency to run hot.
Inspecting the Bake Element Before You Calibrate
While calibration solves the vast majority of temperature discrepancies, it is not a magic cure-all. Sometimes, an oven that refuses to heat properly isn't just confused—it's physically broken. Before you spend an hour taking temperature averages, you should perform a quick visual inspection of the primary heat source.
In an electric oven, the bottom heating element (the bake element) is responsible for generating the vast majority of the heat during a normal baking cycle. Turn the oven on to 350 degrees and watch the bottom element as it heats up. Within a few minutes, the entire dark grey tube should glow a uniform, bright orange.
Replacing a bake element is a relatively straightforward DIY task that involves unscrewing two bolts at the back of the oven and sliding a new $30 part into place, but it does require shutting off the high-voltage breaker. If you are uncomfortable working with 240-volt electrical connections, this is the perfect time to call an appliance repair professional.
Dealing with an oven that constantly ruins your baked goods can make you want to swear off cooking entirely. But by understanding how your appliance measures heat, taking the time to find its true average temperature with a reliable analog thermometer, and making a simple 10-minute adjustment to the control board or the analog dial, you can completely restore your oven's accuracy. It is one of the most satisfying, zero-cost home maintenance tasks you can perform, ensuring that your next batch of cookies comes out perfectly golden brown every single time.