Dryer Takes Two Cycles? 3 Hidden Causes (Besides the Vent)

If your dryer takes two cycles to dry clothes but the main vent is clean, the culprit is likely a crushed hose, dirty sensors, or a stuck exterior flapper.
You pull a load of heavy towels out of the washing machine, toss them into the dryer, and set the dial. An hour later, the chime goes off. You open the door expecting warm, fluffy towels, but instead, you are greeted by a damp, heavy pile. You set the dial for another hour. Sound familiar? Homeowners everywhere waste countless hours and hundreds of dollars in electricity every year dealing with a dryer takes two cycles to finish a single load.
The standard advice is always the same: clean your lint filter and vacuum out your main dryer vent. But what happens when you have done both of those things, and your clothes are still coming out wet? The reality is that a dryer is a deceptively simple machine. It relies entirely on a delicate balance of heat and airflow. If that balance is disrupted, the machine cannot evaporate moisture, and your laundry day stretches into eternity.
If you have already confirmed that your main wall duct is clear, the problem lies elsewhere. Here are three hidden culprits causing your dryer to underperform, and exactly how to fix them yourself this weekend.
The Physics of Drying: Why Airflow is King
Before pulling out any tools, it is crucial to understand how your dryer actually works. A clothes dryer does not just bake your clothes; it evaporates water and forces that humid air out of your house. An average electric dryer reaches internal temperatures between 135 and 160 degrees Fahrenheit. As the drum tumbles, a blower wheel pulls air across the heating element, through the wet clothes, and pushes the resulting steam out the exhaust vent.
A dryer is basically a simple machine that breathes. If it can’t exhale, your clothes stay wet.
If anything restricts that exhaust path, back-pressure builds up inside the cabinet. The hot, moist air cannot escape. Consequently, the internal temperature spikes rapidly. To prevent a catastrophic fire, a safety device called the high-limit thermostat trips, shutting off the heating element. The drum keeps spinning, but it is now tumbling your clothes in cold, humid air. This is why your dryer takes two cycles: it is spending most of its runtime with the heat turned completely off.
Hidden Culprit #1: The Crushed Transition Hose
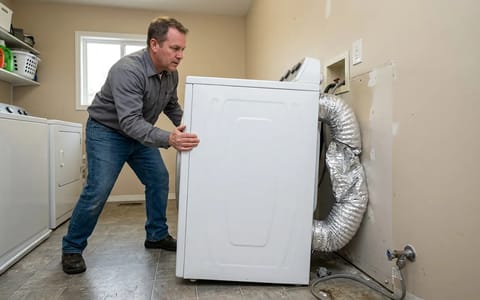
The most common hidden restriction is not inside the wall; it is right behind the machine. The transition hose is the flexible duct that connects the back of your dryer to the wall vent. Because laundry rooms are often tight spaces, homeowners naturally want to push the dryer as close to the wall as possible to save floor space.
If you are using a cheap, flexible foil duct, pushing the dryer back crushes the hose flat against the drywall. A 4-inch round duct suddenly becomes a 1-inch wide slit. The blower motor simply cannot force enough air through that tiny gap.
Worse, the crinkled ridges inside those cheap foil hoses act like speed bumps for lint, catching tiny fibers that bypass the main filter. Over time, a crushed hose becomes a completely clogged hose.
How to Upgrade Your Transition Hose
To permanently solve this airflow restriction, you need to replace the flexible foil or plastic with a 4-inch semi-rigid aluminum duct. Semi-rigid ducting holds its shape, meaning you cannot accidentally crush it by pushing the machine too far back. You can find these at any hardware store for $15 to $25.
- Disconnect the power. Unplug the dryer from the wall receptacle. If it is a gas dryer, turn off the gas valve.
- Remove the old hose. Use a screwdriver or a 5/16-inch nut driver to loosen the worm-gear clamps securing the old hose to the dryer and the wall. Pull the old hose off and discard it.
- Measure and cut the new duct. Stretch the semi-rigid duct out just enough to reach from the dryer exhaust port to the wall connection with a gentle, sweeping curve. Do not leave excess slack. You can cut semi-rigid aluminum easily with tin snips.
- Attach the new hose. Slide a new stainless steel worm-gear clamp over each end of the duct. Slide the duct over the dryer's exhaust collar and the wall pipe. Tighten the clamps until they are snug, but do not overtighten and crush the internal pipe.
- Position the dryer. Gently push the dryer back into place, ensuring the new semi-rigid duct bends smoothly without kinking.
Hidden Culprit #2: Fabric Softener Film on Moisture Sensors
If your dryer takes two cycles when you use the "Auto-Dry" or "Normal" setting, but works perfectly fine when you use "Timed Dry" for 60 minutes, you have a sensor problem. Modern dryers rely on moisture sensors to determine when a load is finished, saving energy by shutting off the machine the moment the clothes are dry.
These sensors are usually two curved metal strips located inside the drum, right next to the lint filter housing. They work by measuring electrical resistance. Wet clothes conduct electricity; dry clothes do not. As the clothes tumble and hit the metal bars, the dryer's control board registers the moisture level.
The hidden issue here is your laundry routine. Liquid fabric softeners and dryer sheets contain animal fats, waxes, and stearic acid to coat your clothes and make them feel soft. Unfortunately, these chemicals also coat the inside of your dryer drum, leaving an invisible, insulating film over the moisture sensors.
Once the sensors are coated in wax, they can no longer feel the moisture in the clothes. The control board assumes the load is bone-dry and shuts the cycle down prematurely. You are left with heavy, damp laundry.
How to Clean the Moisture Sensors
This is the easiest maintenance task you can perform, and it takes less than five minutes.
- Locate the sensors. Open the dryer door and look inside the drum. You will usually find two metal strips, about 2 to 4 inches long, mounted on a plastic housing near the lint screen.
- Apply rubbing alcohol. Dampen a microfiber cloth or a cotton ball with 91% isopropyl rubbing alcohol. Do not use water or all-purpose cleaners, as they will not cut through the waxy residue.
- Scrub the metal bars. Vigorously rub the metal strips with the alcohol-soaked cloth. You might not see any dirt come off, but you are removing the clear chemical film.
- Sand heavily baked-on residue. If you have used dryer sheets for years and never cleaned the sensors, the wax might be baked on hard. Take a small piece of fine 120-grit sandpaper and lightly scuff the metal bars. Wipe them down with alcohol afterward to remove the dust.
Hidden Culprit #3: The Stuck Exterior Exhaust Flapper
You have replaced the transition hose and scrubbed the sensors, but the dryer still takes two cycles. It is time to go outside. The exhaust vent on the exterior of your house features a flapper or a set of louvers designed to open when the dryer is blowing, and close when it is off to keep mice, birds, and cold drafts out.
Over time, the warm, humid air from the dryer mixes with microscopic lint particles, creating a sticky, concrete-like paste. This paste accumulates on the hinges of the exterior flapper. Eventually, the flapper gets glued shut.
If the flapper can only open half an inch instead of fully extending, it creates a massive bottleneck. The air backs up all the way through the ductwork and into the dryer cabinet, causing the high-limit thermostat to trip and shut off the heat.
A few years ago, I spent two hours taking apart a dryer heating element, convinced it was broken, only to realize a bird had built a nest right against the exterior flapper, pinning it shut against the siding. The appliance was fine; the house was the problem.
Testing Your Exterior Vent
Testing this takes just a few minutes of coordination.
- Turn the dryer on. Set your dryer to a high-heat cycle and hit start. (Do not put any clothes in).
- Go outside. Walk to the exterior vent hood. You should feel a strong, steady blast of hot air hitting your hand from about a foot away.
- Inspect the flapper. The flapper or louvers should be blown completely open. If they are barely open, or if they are fluttering weakly, you have a blockage.
- Clean the hood. Turn off the dryer. Use a stiff putty knife to scrape any dried lint paste off the hinges of the flapper. Spray the hinges lightly with a dry silicone lubricant (avoid oil-based sprays like WD-40, as they attract more lint). Ensure the flapper moves freely by hand.
When to Call a Professional Appliance Tech
If you have verified that the transition hose is perfectly round, the sensors are spotless, the main wall duct is clear, and the exterior flapper is blowing a hurricane of hot air, but your dryer takes two cycles, you have exhausted the DIY airflow fixes. At this point, the issue is likely electrical or mechanical.
Taking the time to investigate these hidden culprits does more than just save your sanity on laundry day. A dryer that runs efficiently uses significantly less electricity, saving you $15 to $30 a month on your utility bills. More importantly, ensuring unrestricted airflow prevents dangerous heat buildup, extending the lifespan of your appliance and protecting your home from one of the leading causes of house fires.