Washing Machine Drain Pipe Overflowing? How to Fix It Fast

Don't panic if your washing machine drain pipe is overflowing. Learn how to quickly stop the flood, safely snake the clog yourself, and prevent future backups.
Walking into your laundry room to find a soapy puddle expanding across the floor is a homeowner's nightmare. You hear the rhythmic hum of the spin cycle, but instead of the water safely disappearing into the plumbing, you see a washing machine drain pipe overflowing directly onto your baseboards. It is a messy, stressful situation that demands immediate action to protect your flooring and subfloor from severe water damage.
Fortunately, a backing-up laundry drain is rarely a catastrophic plumbing failure. It is an incredibly common household issue that develops slowly over hundreds of wash cycles. As your machine cleans your clothes, it flushes out millions of tiny fibers, pet hair, dirt, and viscous soap residue. Over time, this mixture creates a dense, sludgy blockage inside your wall pipes. The good news is that you do not need to panic, and you likely do not need to spend hundreds of dollars on an emergency plumber. With a few basic tools and a bit of patience, you can clear the blockage yourself and get your laundry routine back on track.
Anatomy of the Backup: Why Your Drain Pipe is Overflowing
To fix the problem, it helps to understand exactly what is happening behind your drywall. Your washing machine does not just let water trickle out; it actively pumps water out of the drum at a massive volume. A standard machine discharges water at a rate of roughly 15 to 20 gallons per minute. This high-velocity water shoots out of the corrugated discharge hose and drops into the wall's standpipe.
The standpipe is the open-topped vertical pipe—usually 2 inches in diameter—that the hose rests inside. At the bottom of this vertical drop, usually 18 to 36 inches down, sits a curved section of pipe called the P-trap. The P-trap is designed to hold a small amount of water at all times to block foul sewer gases from wafting up into your laundry room. However, that sharp curve is also the perfect place for heavy, wet debris to settle.
When a thick mat of lint, dog hair, and un-dissolved detergent pods builds up in the P-trap or just beyond it, the pipe's internal diameter narrows. The plumbing can no longer handle the 15 gallons per minute rushing out of the machine. The water hits the bottleneck, rapidly fills the vertical standpipe, and gushes over the top, resulting in your washing machine drain pipe overflowing onto the floor.
Immediate Triage: Stop the Flood
Before you worry about fixing the plumbing, you must stop the active leak and mitigate water damage. Laundry room floors are often close to drywall, baseboards, and sometimes adjoining carpeted hallways. Standing water can warp laminate, ruin hardwood, and seep into the subfloor, leading to mold growth in just a few days.
- Halt the machine immediately. Press the pause or cancel button on your washing machine's control panel. This will immediately shut off the discharge pump. Do not simply turn off the water supply valves on the wall, as the machine's drum is already full of water trying to escape.
- Unplug the appliance. Safety always comes first when dealing with standing water near large electrical appliances. Pull the plug from the wall outlet, keeping the cord draped over the machine so the prongs stay dry.
- Extract the standing water. Grab old bath towels, a mop, or ideally a wet/dry shop vacuum. Soak up all the water around the base of the machine and the walls. Pay special attention to the gap between the baseboards and the flooring.
- Set up a fan. Once the visible puddles are gone, point a high-velocity floor fan at the wet area to speed up evaporation and dry out the drywall casing.
The Tools You Need (And What to Avoid)
To clear a dense lint and hair clog, you need mechanical force, not chemical reactions. The most effective tool for this job is a manual plumbing snake, also known as a drain auger. You can purchase a 25-foot, 1/4-inch cable auger at any local hardware store or home center for roughly $15 to $25. You will also need a pair of thick rubber gloves, a bucket, and a few rags.
If you pour chemicals down the drain and they fail to clear the clog, you are now left with a pipe full of highly toxic, skin-burning acid that will splash back at you when you finally try to snake it. Stick to mechanical removal.
Step-by-Step: How to Snake the Standpipe
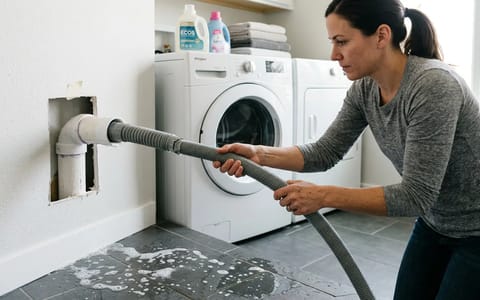
Clearing the standpipe is a straightforward process, though it can be a bit messy. Lay an old towel on the floor beneath the wall box to catch any drips, and put on your rubber gloves.
- Remove the discharge hose. Pull the black corrugated hose up and out of the standpipe. Keep the end pointed upward so any residual water inside the hose drains back into the machine, not onto your shoes. Secure the hose out of the way.
- Feed the auger cable. Loosen the thumbscrew on your plumbing snake and manually push the metal tip down into the open standpipe. Keep feeding the cable by hand until you feel it hit a hard stop. This first stop is usually the bottom of the P-trap, roughly two to three feet down.
- Navigate the P-trap. Tighten the thumbscrew on the snake's housing. Turn the handle clockwise while applying downward pressure. The twisting motion helps the flexible tip bend and navigate around the sharp curve of the trap. Once you feel it slip past the curve, loosen the screw and resume feeding the cable by hand.
- Break the clog. Continue pushing the cable until you hit a soft, spongy resistance. This is your blockage. Tighten the thumbscrew again and crank the handle clockwise vigorously. You are trying to snag the mass of hair and lint like spaghetti on a fork. Push and pull the cable slightly as you twist to break up the sludge.
- Retrieve the debris. Slowly pull the cable back up out of the pipe. As the wet, dirty cable emerges, wipe it down with a rag to keep your hands and floor clean. When the tip comes out, clear off the foul-smelling gray mass of lint and hair and drop it into your bucket.
- Flush the line. Boil a kettle of water, let it cool for just a minute so it is not at a rolling boil, and carefully pour it down the standpipe. The hot water will melt away residual soap scum and verify that the pipe is draining freely.
The $2 Secret to Permanent Prevention
Once you have cleared the clog, you want to make sure you never have to do it again. The easiest and most cost-effective way to protect your laundry plumbing is to stop the debris from ever entering the wall.
A two-dollar mesh lint snare can save you from a two-hundred-dollar emergency plumbing bill.
Head to the plumbing aisle of your hardware store and look for washing machine lint catchers. These are small, silver wire-mesh tubes that look like tiny socks. You simply slip one over the end of your washing machine's discharge hose and secure it tightly with a plastic zip tie. As the water rushes out, the mesh allows the liquid to pass through while trapping all the lint, pet hair, and forgotten tissues.
Check the mesh snare every 30 to 60 days. When it looks about half full of gray fuzz, carefully snip the zip tie, throw the snare in the trash, and attach a new one. A pack of two usually costs less than $5, making it one of the highest-return investments in home maintenance.
Deep Cleaning: Maintaining Your Washing Machine
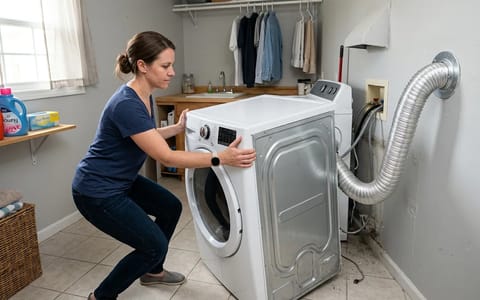
In addition to filtering the discharge, maintaining the washing machine itself reduces the amount of sludge that hits your pipes. Modern high-efficiency (HE) machines, especially front-loaders, have an internal pump filter designed to catch coins, keys, and large clumps of hair before they reach the discharge pump.
Locate the small access door on the bottom front of your machine. Place a shallow baking dish underneath it, unscrew the filter cap, and let the trapped water drain out. Pull out the filter basket, rinse it under the sink, and replace it. Doing this every three months keeps the pump running efficiently.
Additionally, switch to high-quality HE liquid detergent or pre-measured sheets, and avoid using heavy liquid fabric softeners. Fabric softener is notoriously viscous and coats the inside of your drain pipes with a sticky residue that acts like glue for passing lint.
When to Call a Professional Plumber
While a manual plumbing snake will resolve 90% of laundry backups, there are times when the problem lies deeper in your home's infrastructure.
If you notice that flushing a nearby toilet or draining the kitchen sink causes water to bubble up in the laundry room standpipe, you have a main line clog. Stop using all plumbing fixtures immediately and call a licensed plumber.
Dealing with an overflowing standpipe is alarming, but by acting fast, utilizing the right mechanical tools, and adding a simple mesh filter to your setup, you can keep your laundry room dry and your plumbing flowing smoothly for years to come.