How Much Attic Insulation Do I Need? A Quick R-Value Guide
Is your second floor uncomfortably hot during the summer? Learn how to check your attic insulation, understand R-values, and lower your cooling bills before the heat hits.
It starts the same way every year. The mild spring breezes fade, the mid-summer sun starts beating down on your roof, and suddenly your second floor feels like a sauna while your air conditioner runs continuously. You adjust the thermostat, check the vents, and close the blinds, but the upstairs bedrooms remain stubbornly hot. If you find yourself searching online for exactly how much attic insulation you need to fix this problem, you are looking in the right place.
Many homeowners mistakenly believe that insulation is only meant to keep a house warm during the freezing winter months. In reality, a well-insulated attic is your home's primary defense against blistering summer heat. When the sun bakes your roof shingles, the temperature inside a poorly ventilated and under-insulated attic can easily soar past 150°F. Without a thick thermal barrier, all that trapped radiant heat conducts straight down through your ceiling drywall, fighting your air conditioner every step of the way.
Upgrading your attic insulation is one of the highest-return home improvements you can tackle, significantly lowering your monthly utility bills while immediately improving indoor comfort. But before you start buying materials, you need to understand exactly what you currently have, what the numbers mean, and how to measure your space.
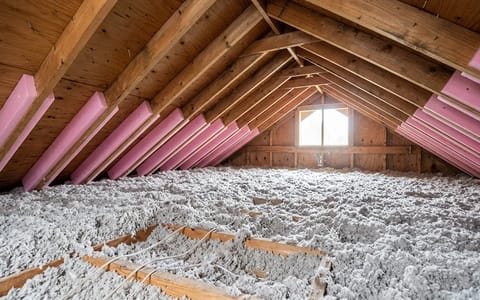
The 5-Minute "Joist Test": A Quick Visual Check
Before worrying about complex calculations or hiring expensive energy auditors, you can perform a highly accurate diagnostic check of your attic in about five minutes. All you need is a stepladder, a flashlight, and a willingness to poke your head through the attic access hatch.
Position your ladder securely under the access panel, push the hatch up and out of the way, and shine your flashlight across the expanse of your attic floor. Look specifically at the wooden floor joists—the parallel beams running across the floor that support the ceiling below.
The rule of thumb here is incredibly simple: if you can clearly see the tops of your wooden floor joists, you definitely do not have enough insulation. Standard attic floor joists are typically constructed using 2x6 or 2x8 lumber. This means they are only 5.5 to 7.25 inches deep. If your insulation is sitting flush with or below the tops of these boards, you are operating with less than eight inches of coverage, which is drastically below the minimum recommendation for any region in the country.
I remember popping my head into my own 1970s-built attic a few years ago and seeing nothing but bare wood and a sad, flattened layer of decades-old yellow fiberglass. Adding a fresh, thick layer over the top dropped my upstairs summer temperature by nearly ten degrees almost overnight.
What Does R-Value Actually Mean?
As soon as you start researching insulation, you will be bombarded with the term "R-value." Contractors use it, building codes require it, and home improvement stores print it in massive letters on their packaging. But what does it actually mean for your home?
The "R" simply stands for Resistance—specifically, resistance to heat flow. Heat naturally wants to move from a warmer area to a cooler area. In the winter, your expensive heated air tries to escape into the freezing attic. In the summer, the oppressive heat trapped in your attic tries to push its way down into your air-conditioned bedrooms.
Think of R-value as your home's thermal sunglasses—the higher the rating, the better it blocks the harsh summer heat from penetrating your living space.
Different materials offer different levels of resistance based on their density, thickness, and composition. For example, solid wood has a very low R-value (about R-1 per inch), which is why heat transfers easily through exposed floor joists. Fluffy materials like fiberglass or cellulose trap millions of tiny air pockets, creating a highly effective thermal break that slows heat transfer to a crawl.
When you see a recommendation for "R-49," that is a cumulative total. You can achieve an R-49 rating by stacking multiple layers of lower R-value materials on top of each other until you reach the target number.
Exactly How Much Attic Insulation Do I Need for My Climate?
The amount of insulation you need is directly tied to the geographic climate zone where you live. The United States Department of Energy (DOE) divides the country into specific zones, ranging from the blazing heat of the deep south to the bitter cold of the northern border.
Here is a simplified breakdown of the current DOE recommendations for uninsulated attics:
- Hot Climates (Zones 1-3): This includes states like Florida, Texas, Hawaii, and the lower parts of California and Arizona. The recommendation is R-30 to R-49. You are primarily insulating against severe summer heat gain.
- Mixed Climates (Zone 4): This covers the middle band of the country, including states like Tennessee, North Carolina, and parts of Missouri. The recommendation is R-38 to R-60. You need balanced protection for hot summers and cold winters.
- Cold Climates (Zones 5-7): This includes northern states like Ohio, Michigan, Maine, and Minnesota. The recommendation is R-49 to R-60. You are heavily insulating against extreme winter heat loss, while still benefiting from summer cooling protection.
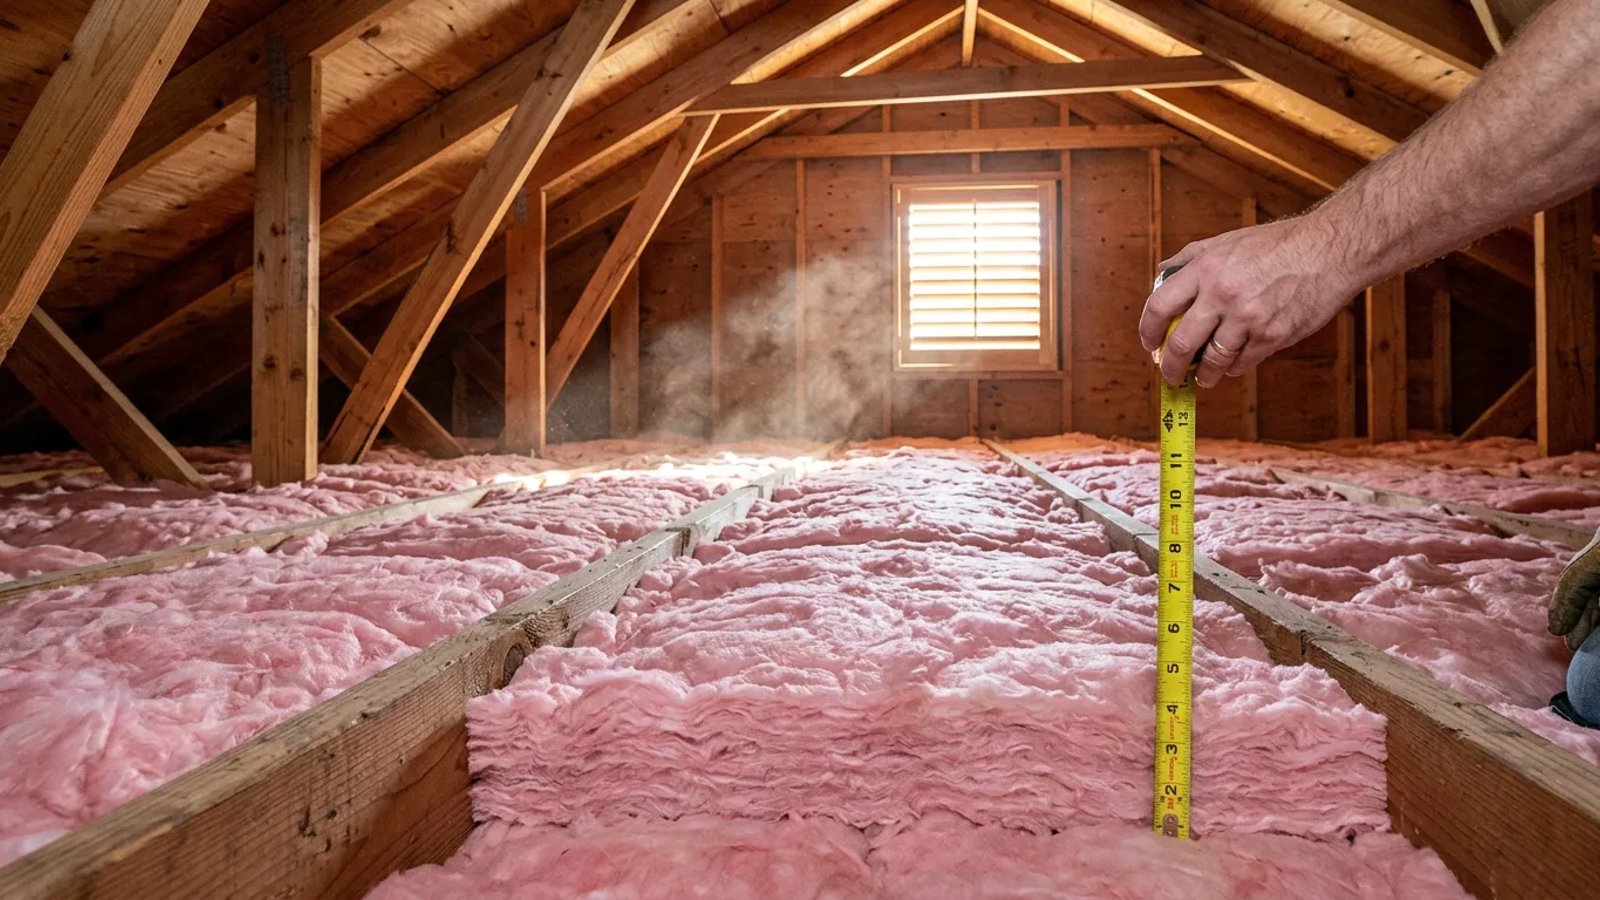
How to Calculate Your Current Insulation Level
If you passed the initial "joist test" and your insulation covers the wood beams, you still need to determine exactly what R-value you are currently working with. You do not need specialized equipment for this—just a standard wooden ruler or a tape measure.
- Gear up and enter safely. Put on your N95 mask, long sleeves, and gloves. Carefully climb into the attic. Never step directly on the drywall ceiling between the joists, or you will fall straight through into the room below. Only step on the wooden joists or lay a sturdy piece of plywood across them to sit on.
- Measure the depth. Plunge your ruler straight down through the insulation until it hits the hard drywall of the ceiling below. Note the depth in inches. Take three or four measurements in different areas of the attic to get a reliable average, as insulation tends to settle unevenly over time.
- Identify the material. Look closely at what you just measured. If it looks like fluffy, loose gray newspaper, it is blown-in cellulose. If it looks like pink, yellow, or white cotton candy, it is fiberglass (either loose-fill or rolled batts).
- Do the math. Multiply your average depth in inches by the material's estimated R-value per inch. Fiberglass batts offer about R-3.1 per inch. Blown-in cellulose offers about R-3.7 per inch.
For example, if you measure 10 inches of blown-in cellulose, your calculation is 10 x 3.7 = R-37. If you live in a cold climate requiring R-60, you are falling short and should consider adding another 6 to 7 inches of material.
Upgrading Your Insulation: DIY vs. Hiring a Pro
Once you know how much attic insulation you need to add, you have to decide who is going to do the heavy lifting. Adding insulation is a highly popular weekend project for ambitious homeowners, but it is not without its physical challenges.
If you choose the DIY route, the most efficient method is renting a blown-in insulation machine from a local big-box hardware store. You will purchase large, compressed bales of cellulose or fiberglass. The process requires two people: one person stays outside or in the garage feeding the bales into the hopper machine, while the second person crawls around the attic aiming the heavy, corrugated hose to distribute the fluffy material evenly across the floor.
While the DIY savings are substantial, the work is incredibly sweaty, itchy, and physically demanding. You must maneuver in cramped, low-clearance spaces while wearing protective gear. Furthermore, professional installers know exactly how to properly install foam baffles in your eaves to prevent the new insulation from blocking your critical soffit vents. They also possess the expertise to safely air-seal around hot recessed lighting fixtures and chimney flues to prevent fire hazards.
Taking an hour this weekend to evaluate your attic's thermal defenses is one of the smartest moves you can make as the seasons change. Whether you choose to rent a blower machine and tackle the job with a friend, or hire a local contractor to handle the messy work, bringing your R-value up to modern standards will reward you with a cooler second floor, a less stressed air conditioning unit, and lower utility bills for decades to come.