How to Measure Attic Insulation (And Find Your R-Value)
Stop guessing why your upstairs is drafty. Learn how to safely measure your attic insulation and calculate your current R-value using a tape measure.
Homeowners often know their house is leaking money. The upstairs bedrooms feel like saunas in July and iceboxes in January, and the HVAC system runs constantly just to maintain a baseline level of comfort. You suspect your attic needs more thermal resistance, but before you rush to the home center to buy dozens of bags of blown-in material, you have to establish a starting point. You need to measure attic insulation depth and calculate exactly what is already sitting above your ceiling.
Guessing your current insulation level is a direct route to frustration. If you overestimate what you have, you will under-buy new material and continue paying exorbitant heating and cooling bills. If you underestimate it, you will waste hundreds of dollars on insulation you simply do not need. Fortunately, getting an accurate read on your attic's current thermal performance does not require a costly professional energy audit. With a standard tape measure, a reliable flashlight, and a little bit of basic math, you can determine your exact thermal resistance in under 30 minutes.
Before You Open the Hatch: Essential Safety and Gear
Attics are rarely pleasant environments. They are dusty, cramped, and filled with materials that can irritate your skin, eyes, and lungs. I still remember opening the hatch of a 1960s ranch house expecting to find a foot of fluffy cellulose, only to discover three inches of compressed, dust-caked fiberglass that offered about as much thermal protection as a light sweater. The dust cloud alone was enough to send me right back down the ladder.
Before you poke your head up there, you need to dress for the occasion. Airborne fiberglass particles and decades-old dust will cause severe itching and respiratory irritation if you go in unprotected. You do not need a hazmat suit, but you do need to cover your bases.
Make sure your ladder is fully secured before climbing. If you have a pull-down attic stair, check the hinges and springs for rust or loose bolts before putting your full body weight on the treads.
How to Measure Attic Insulation Safely
Once you are properly geared up, the physical act of measuring is straightforward. However, you must be incredibly careful about where you place your weight. The floor of your attic is likely just the 1/2-inch drywall of the ceiling below. Stepping between the wooden joists will result in your foot crashing straight through into your living room.
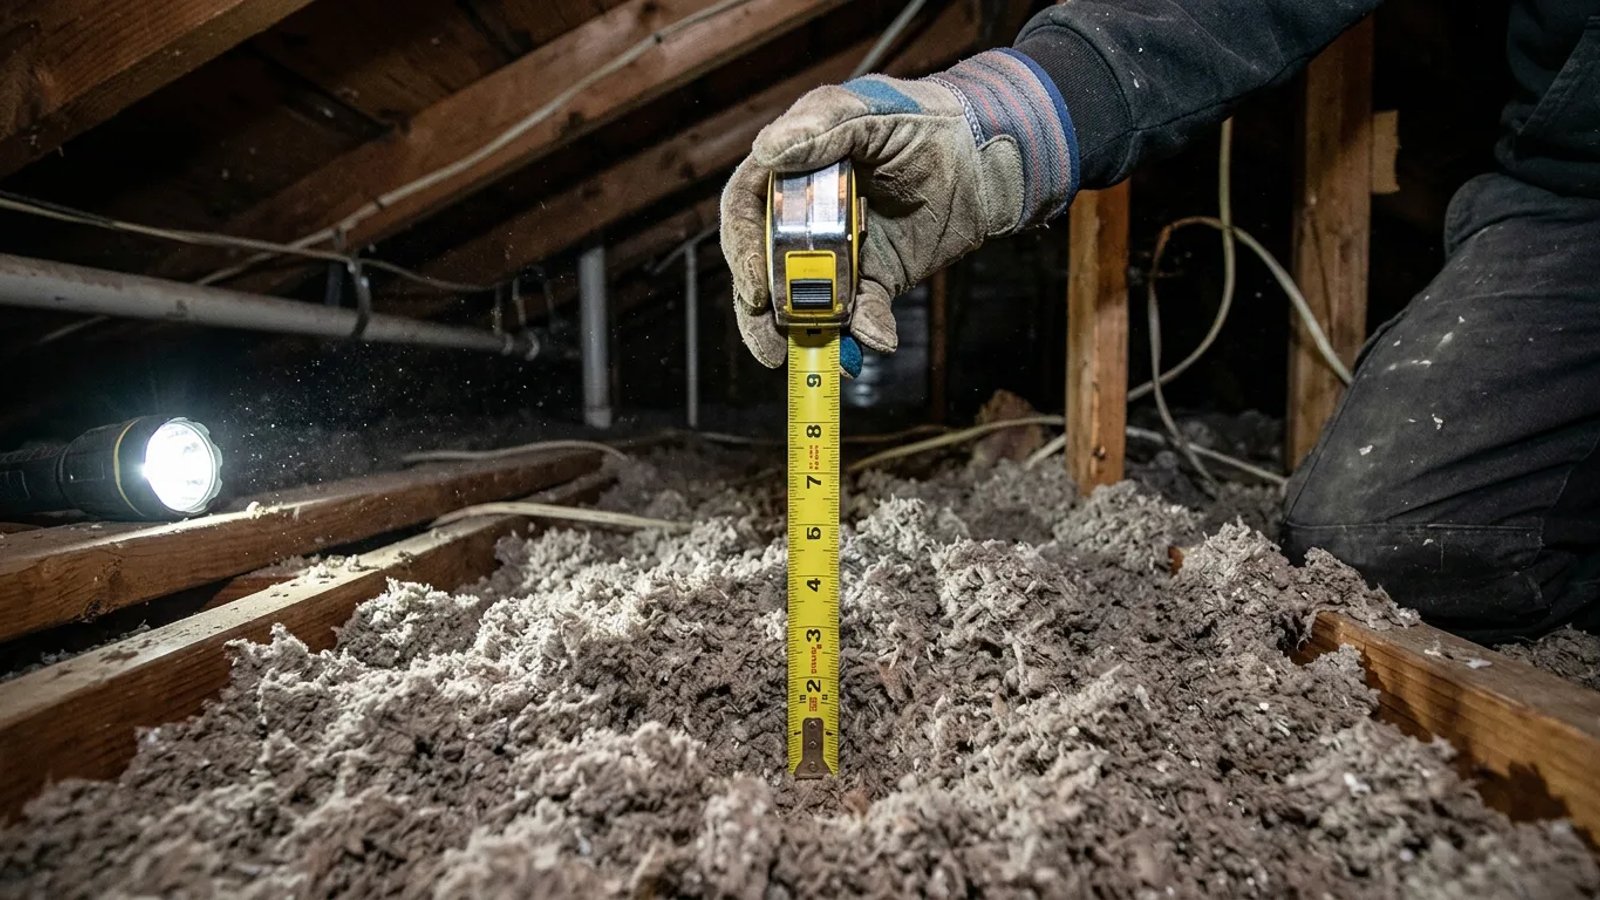
- Find a safe vantage point. Climb high enough to see over the insulation, but try to stay on sturdy plywood decking if your attic has it. If you must move, step only on the exposed wooden joists (usually spaced 16 or 24 inches on center).
- Plunge the tape measure. Extend your steel tape measure and push the metal tip straight down through the insulation until you feel it hit the hard surface of the drywall ceiling below.
- Read the depth. Look at where the top layer of the insulation aligns with the numbers on your tape measure. Note this number down to the nearest half-inch.
- Take multiple samples. Do not rely on a single measurement right next to the attic hatch. Insulation settles unevenly, and wind washing near the eaves can blow loose-fill material toward the center. Take one measurement near the center, one midway to the edge, and one closer to the eaves if you can safely reach it. Average these numbers together.
Identify Your Material to Find the R-Value Multiplier
Insulation is measured in R-value, which stands for thermal resistance. The higher the R-value, the better the material is at resisting the transfer of heat. But an inch of one material does not equal an inch of another. To calculate your total R-value, you first need to identify what type of insulation is sitting in your attic so you can determine its specific R-value per inch.
Loose-Fill Cellulose
Cellulose is made from recycled paper products treated with borate for fire and pest resistance. It is typically matte grey, very fluffy, and looks a bit like shredded newspaper or dryer lint. Because it settles into tight spaces, it is highly effective. Expect loose-fill cellulose to provide roughly R-3.5 to R-3.7 per inch.
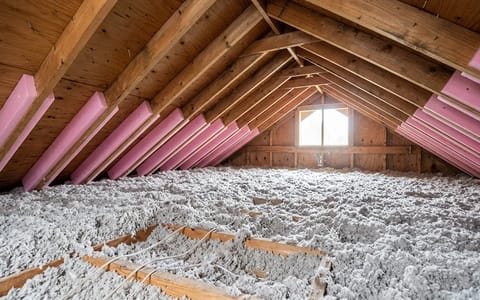
Fiberglass (Batts and Blown-In)
Fiberglass is the most recognizable insulation, often coming in distinct colors like pink, yellow, or white. It has a shiny, glassy texture that looks like cotton candy. If it is laid out in long rectangular blankets, you have fiberglass batts. If it looks like fluffy, colorful chunks scattered everywhere, it is blown-in fiberglass. Fiberglass batts offer about R-3.1 to R-3.2 per inch, while older blown-in fiberglass usually sits around R-2.5 per inch.
Rockwool (Mineral Wool)
Rockwool is spun from molten rock and slag. It is significantly denser than fiberglass, highly fire-resistant, and usually brownish-grey or greenish-grey in color. It comes in batts or loose-fill and feels slightly more rigid and scratchy than other materials. Rockwool provides approximately R-3.0 to R-3.3 per inch.
Doing the Math: Calculate Your Current R-Value
Now that you have your average depth in inches and your material's R-value multiplier, calculating your current thermal resistance is basic multiplication. The formula is simply:
Average Depth (inches) × Material R-Value per inch = Total Current R-Value
For example, let us say you measured your attic in three spots and found depths of 7 inches, 8 inches, and 9 inches. Your average depth is 8 inches. Upon inspection, you identified the material as fluffy grey loose-fill cellulose. Using the multiplier for cellulose (R-3.5), your math looks like this:
8 inches × 3.5 = R-28.
If you have multiple layers of different materials—which is very common in older homes where previous owners simply rolled new fiberglass batts over old cellulose—you calculate them separately and add them together. If you have 4 inches of old rockwool (4 × 3.0 = R-12) with 5 inches of fiberglass batts rolled on top (5 × 3.2 = R-16), your total combined thermal resistance is R-28.
Insulation is the only home improvement that consistently pays for itself, but only if you know exactly what baseline you are starting with.
How Much More Insulation Do You Actually Need?
Knowing you have an R-28 attic is only helpful if you know what your target number should be. The Department of Energy (DOE) divides the United States into climate zones, ranging from Zone 1 (the hottest parts of southern Florida and Texas) to Zone 7 (the freezing northern tips of Minnesota and Maine).
If you live in a hot climate (Zones 1 and 2), the DOE recommends an uninsulated attic be brought up to R-30 to R-49. If you already have R-28, you might only need a slight top-up to hit the minimum, though pushing closer to R-49 will significantly reduce your air conditioning workload.
However, if you live in a moderate to cold climate (Zones 4 through 7), the recommended attic insulation level jumps drastically to between R-49 and R-60. In this scenario, an existing R-28 attic is severely under-insulated. You are losing massive amounts of heat through your roof every winter. To reach the R-60 target, you would need to add roughly R-32 worth of new material. If you plan to blow in new cellulose over the old stuff, that means purchasing enough bags to add an additional 9 to 10 inches of depth across your entire attic floor.
Taking the time to measure your existing setup removes the guesswork from your weatherization projects. Once you have your baseline R-value and know your climate zone target, you can confidently calculate the exact square footage and depth of the new material you need to purchase. You will save money at the hardware store, and more importantly, you will finally stop paying to heat and cool the neighborhood.