Why You Need a Spring Chimney Inspection Before the Summer Heat

Most homeowners wait until fall to book a chimney sweep, but mid-spring is the smartest time to clean out winter ash, prevent summer odors, and block nesting pests.
Most homeowners wait until the brisk days of October to even think about their fireplace. But if you burned wood over the winter, right now is actually the smartest time to deal with the aftermath. A thorough spring chimney inspection and cleanout is the secret to avoiding a host of warm-weather problems. After months of cozy fires, your flue is lined with soot and creosote. Leaving that heavy buildup sitting in your chimney through the upcoming summer heat is a recipe for foul odors, deteriorating masonry, and unwanted wildlife nesting in your home.
By tackling this essential maintenance task in the spring, you get ahead of the curve. You protect your indoor air quality, preserve the structural integrity of your chimney stack, and save yourself from the massive scheduling headaches that plague the chimney sweeping industry every autumn.
The 'Summer Stink': Why Creosote Smells Worse in July
If you have ever walked into your living room on a hot July afternoon and smelled a stale, pungent campfire odor, your chimney is almost certainly the culprit. That smell is the direct result of leaving winter creosote in the flue during the humid months. Creosote is a natural byproduct of burning wood, but it is highly porous and eagerly absorbs moisture from the damp spring and summer air.
When the outside temperature climbs into the 80s and 90s, that damp creosote essentially bakes inside the masonry. At the same time, the air conditioning inside your home creates negative air pressure. Because cold air is heavier than hot air, the draft in your chimney actually reverses. Instead of pulling air up and out like it does in the winter, the chimney acts as a vacuum, sucking the hot, acidic, creosote-tainted air straight down the flue and into your living space.
Getting the chimney swept in the spring removes the source of the odor before the heavy humidity arrives. It also protects your metal damper and firebox components. Creosote is highly acidic. When mixed with spring rain and high humidity, it can accelerate rust on your cast-iron grate and eat away at the mortar joints inside the firebox.
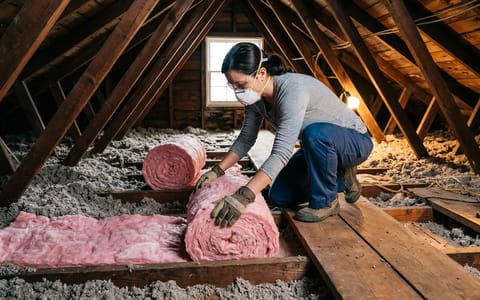
The DIY Ash Cleanout: Prepping Your Firebox for the Off-Season
While cleaning the flue itself is a job for a professional, putting the firebox to bed for the summer is an easy DIY task that takes about 30 to 45 minutes. During the active burning season, it is actually beneficial to leave a one-inch bed of ash on the floor of the firebox to help insulate the coals and start the next fire. In the spring, however, every ounce of that ash needs to go.
Ash pulls moisture from the air just like creosote does. A thick layer of leftover ash will stay damp all summer, promoting rust on your metal grate and deteriorating the porous firebrick. Removing it now extends the life of your fireplace components significantly.
- Suit up and prep the area. Wear an N95 dust mask and safety glasses. Lay a canvas drop cloth over the hearth to protect your flooring from stray soot.
- Scoop the bulk ash. Use a small metal fireplace shovel to scoop the loose ash into a heavy-duty metal ash bucket. Never use a plastic bucket or a standard household vacuum, as fine ash will destroy the motor and blow straight through the filter into your living room.
- Sweep the firebox. Use a stiff-bristled hand brush to sweep the walls of the firebox, the damper door, and the floor, knocking the remaining soot into your metal bucket.
- Scrub the masonry. Mix a solution of equal parts warm water and white vinegar in a spray bottle. Lightly mist the firebrick and scrub with a stiff nylon brush to remove the last layer of grime. Wipe dry with old rags.
The Cap Check: Stopping Spring Wildlife from Moving In
Once the inside is clean, it is time to look at the outside. You do not need to climb onto your roof to do a basic visual inspection. Grab a pair of binoculars, step about 30 feet back into your yard, and look at the very top of your chimney stack.
You are looking for the chimney cap—the metal roof that covers the flue opening. A good cap should have a sturdy top to shed rain and a wire mesh screen, known as a spark arrestor, wrapping around the sides. The mesh should have openings no larger than 5/8 of an inch.
Spring is prime breeding season for neighborhood wildlife. Raccoons, squirrels, bats, and birds are actively looking for dark, safe, and warm places to build their nests and raise their young. An uncapped chimney looks like a luxury hollow tree to a mother raccoon. If the wire mesh is rusted out, missing entirely, or pushed aside, you have an open door for pests.
If you notice the cap is missing, you can measure the outside dimensions of the clay flue tile protruding from the top of the chimney to buy a replacement. However, installing it requires getting up on the roof, which is often best left to a professional sweep during their visit.
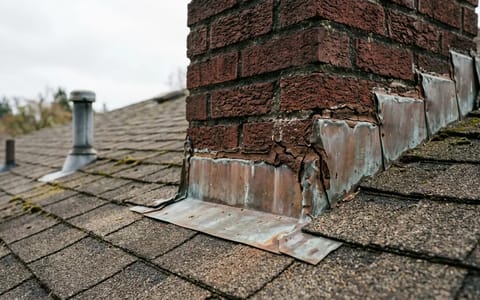
Checking the Exterior Masonry for Freeze-Thaw Damage
While you have the binoculars out, scan the exterior brickwork and mortar of the chimney stack. Winter weather is brutal on masonry. Brick and mortar are porous materials that absorb water from rain and melting snow. When the temperature drops below freezing, that trapped water expands, causing the faces of the bricks to pop off—a destructive process known as spalling.
Look for chunks of brick missing, vertical cracks running through the mortar joints, or a leaning chimney stack. You should also inspect the concrete crown at the very top of the chimney. The crown acts as an umbrella for the masonry below. If the freeze-thaw cycle cracked the crown, spring rain will pour directly into the chimney structure, eventually rotting the surrounding roof decking and ceiling drywall.
Catching a 1/4-inch crack in your chimney crown in May can save you from a $3,000 masonry rebuild in September.
Pay close attention to the roof flashing as well. This is the metal banding where the chimney meets the roof shingles. High winter winds and heavy ice can pry this flashing loose. If you see gaps or rusted metal, spring showers will exploit those weaknesses, leading to attic leaks. If you spot missing mortar, spalling bricks, or damaged flashing, you will need to call a mason or a specialized chimney repair company to address the structural integrity before the heavy spring rains cause severe water damage inside your home.
Pro vs. DIY: Why Booking a Sweep Now Saves You Money
You have cleaned the firebox and checked the cap, but the flue itself still needs attention. The National Fire Protection Association recommends that chimneys be inspected and cleaned at least once a year. Booking a certified chimney sweep for a spring chimney inspection is one of the smartest scheduling moves a homeowner can make.
If you wait until the first frosty morning in October to call a chimney sweep, you will find yourself at the back of a four-to-six-week waiting list. Fall is their absolute busiest season, and prices are at a premium. By booking in May or June, you are hitting the industry's off-season. Sweeps have wide-open schedules, meaning you can easily book a convenient time. Many companies even offer spring discounts, potentially saving you $25 to $50 off the peak-season rate.
A professional sweep will perform a Level 1 inspection, checking the structural soundness of the flue, confirming the damper operates smoothly, and ensuring there are no blockages. They will then scrub the flue liner to remove the acidic creosote. They know how to identify the three stages of creosote buildup. While Stage 1 is a simple sooty dust, Stage 3 is a hard, tar-like glaze that requires chemical treatments or rotary chains to remove safely. A DIY brush kit simply won't cut it for heavy buildup.
Taking care of your fireplace shouldn't be a frantic scramble when the autumn leaves start falling. By spending a little time this spring to scoop out the winter ash, check your exterior masonry, and bring in a professional sweep, you protect your home from lingering odors, moisture damage, and uninvited wildlife. You can enjoy the summer knowing your fireplace is clean, safe, and ready to go the moment the cold weather returns.