Got a Roof Leak Around Your Chimney? How to Fix It Fast
Discovering a brown water stain near your fireplace is alarming, but the culprit is rarely a failing roof. Learn how to diagnose chimney flashing failures and apply a temporary fix.
You are sitting in your living room during a heavy spring downpour when you look up and notice it: a spreading, tea-colored stain on the drywall right next to the fireplace. Panic usually sets in immediately. Homeowners naturally assume that a water stain means the entire roof is failing and a massive replacement bill is imminent. However, if you have a roof leak around your chimney, the shingles are rarely the primary suspect. The real culprit is almost always the chimney flashing.
Chimneys represent a massive interruption in the continuous water-shedding surface of your roof. Because houses settle and shift slightly over time, and because wood roofing expands at a different rate than masonry, the intersection between the two must be bridged by flexible metal. When that metal system fails, water finds a fast track directly into your attic and living space. Understanding how this system works, how to spot the failure, and how to execute a temporary fix can save you thousands of dollars in interior water damage.
The Anatomy of a Roof Leak Around Your Chimney
To fix the problem, you first have to understand what you are looking at. Chimney flashing is not a single piece of metal. It is a two-part system designed to allow independent movement between the roof deck and the brick structure. If these two structures were rigidly attached, the natural expansion and contraction of the house would tear the roof apart.
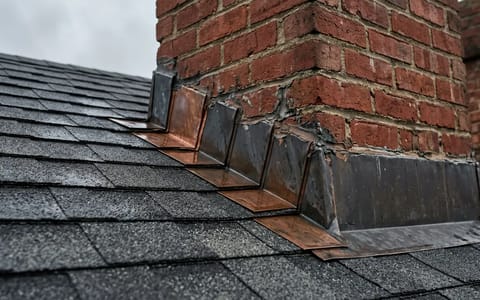
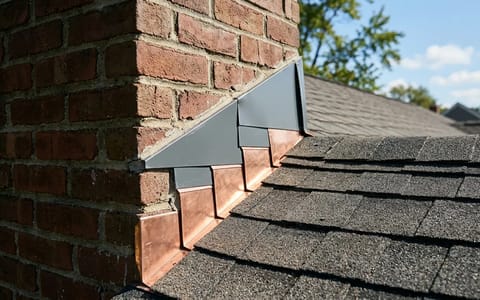
The first layer is the step flashing. These are L-shaped pieces of metal (usually galvanized steel, aluminum, or copper) that are woven underneath the asphalt shingles and bent upward against the brick chimney. Step flashing directs water running down the roof away from the chimney wall.
The second layer is the counter-flashing. This metal is embedded directly into the mortar joints of the brick and folds downward, overlapping the step flashing. It acts like an umbrella, preventing water from getting behind the step flashing. Finally, on the uphill side of wide chimneys, there is often a cricket—a small, peaked roof structure built to divert water around the chimney rather than letting it pool against the flat back wall.
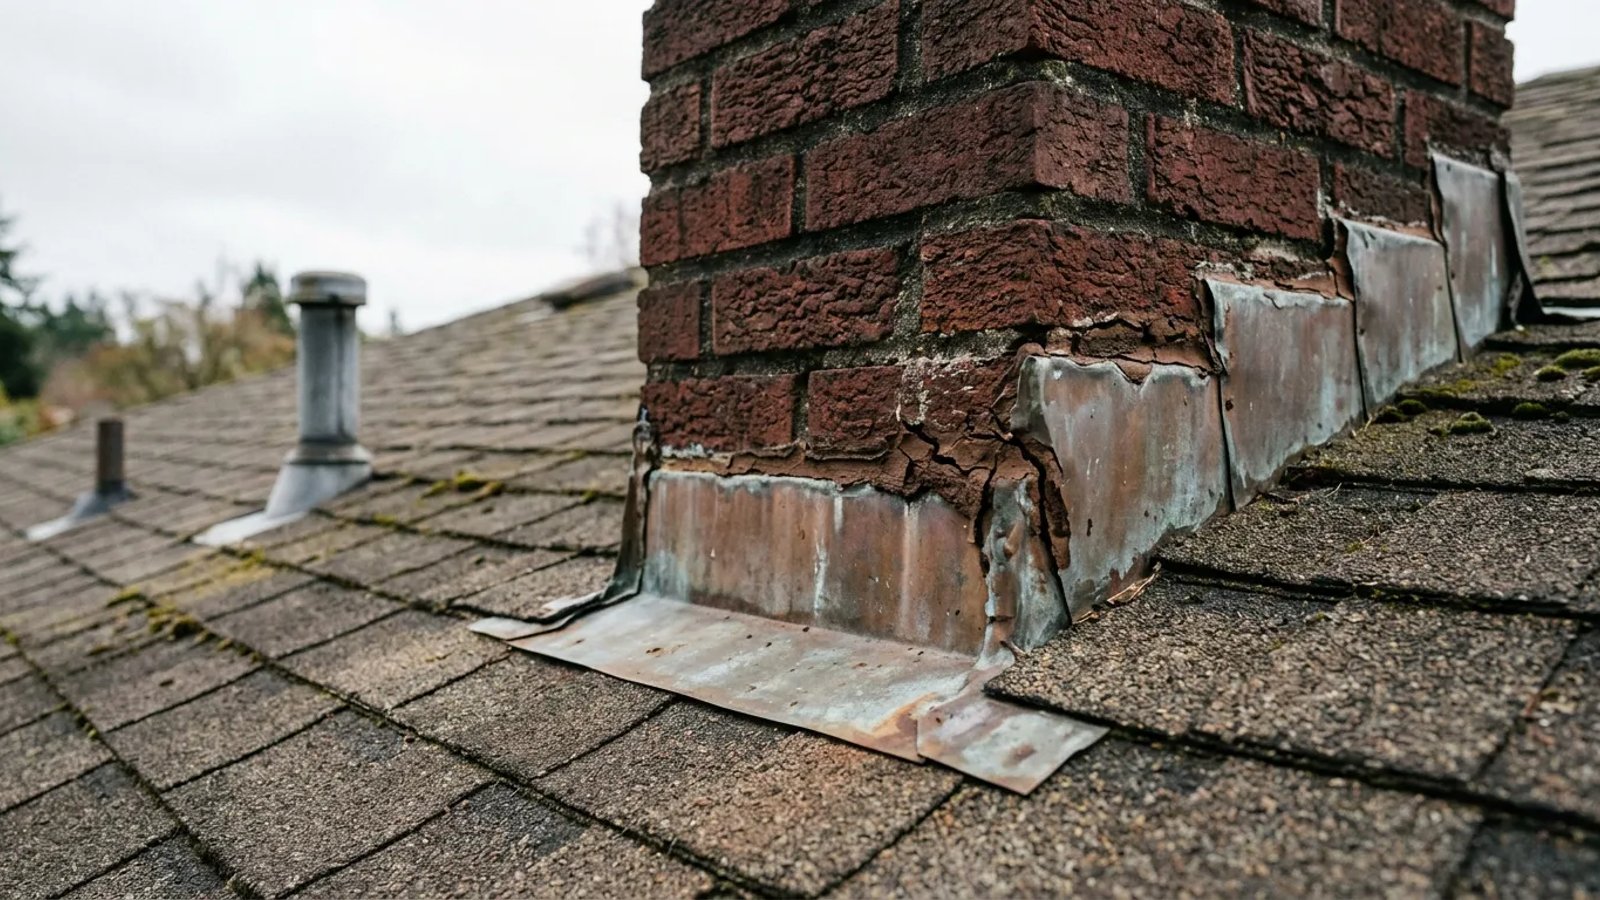
Leaks occur when the seal on the counter-flashing breaks. Over the winter, moisture gets behind the metal and freezes. As water turns to ice, it expands, slowly prying the counter-flashing away from the brick. After a few brutal winter freeze-thaw cycles, the old sealant cracks, leaving a visible gap. When the heavy spring rains arrive, water simply runs straight down the brick, slips behind the metal, and drips onto your ceiling.
Flashing vs. Masonry: Pinpointing the True Source
Before you blame the flashing, you need to ensure the chimney itself is not acting like a giant sponge. Brick and mortar are naturally porous. If the chimney crown (the concrete cap on top) is cracked, or if the mortar joints are severely degraded, water can enter the masonry near the top of the chimney and travel straight down the inside of the structure, manifesting as a leak at the roofline.
I once spent an entire weekend meticulously resealing the flashing on my own house, only to have the leak return during the next storm. The culprit turned out to be a hairline crack in the concrete chimney crown 10 feet above the roofline. Water was bypassing the flashing entirely by traveling inside the brickwork.
How to Safely Inspect the Damage (Without Leaving the Ground)
You do not need to climb onto a wet, slippery roof to diagnose this issue. In fact, the most valuable information you can gather is found inside your house and from your yard.
Start in the attic. Grab a high-lumen LED flashlight and carefully navigate to the area directly beneath the chimney. Turn off your flashlight for a moment and look for daylight shining through around the chimney framing. Any visible daylight is a guaranteed path for water. Turn the light back on and inspect the wooden roof decking (the OSB or plywood under the shingles). You are looking for dark black or brown streaks running downhill from the chimney penetration. Water rarely drips straight down; it usually runs along rafters or decking seams before falling onto your ceiling drywall.
Next, take a pair of binoculars and stand in your yard where you have a clear view of the chimney. Scan the metal flashing at the base. Look for three distinct warning signs: metal that is rusted through, metal that has physically pulled away from the brick, or thick beads of gray or black caulk that look dried out, alligator-cracked, or peeling.
The Temporary DIY Fix: Stopping the Leak Now
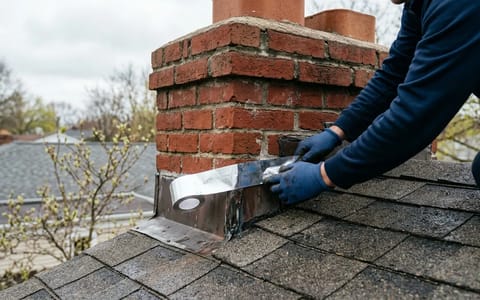
If you have an active leak and more rain is in the forecast, you cannot wait weeks for a roofing contractor to fit you into their schedule. You need to stop the water intrusion immediately to protect your drywall, insulation, and framing from mold and rot. You can execute a reliable temporary patch using roofing cement.
You will need a stiff wire brush, a clean rag, a putty knife, and a 10-ounce tube of polyurethane roofing sealant or asphalt-based roofing mastic (typically $10-$15 at any hardware store). Do not use standard silicone bathroom or exterior window caulk; it will not survive the extreme heat of the roof.
- Wait for a dry window. Roofing cement adheres poorly to wet brick. Wait for the rain to stop and give the chimney at least a few hours of sunlight to dry the surface.
- Scrub the joint. Use the wire brush to vigorously scrub the line where the top of the metal counter-flashing meets the brick. You must remove all loose, flaking old sealant, dirt, and moss. The new sealant needs a clean surface to bond to.
- Wipe it down. Use a dry rag to wipe away all the dust you just created with the wire brush.
- Apply the sealant. Cut the tip of the roofing sealant tube to create a 1/4-inch opening. Run a thick, continuous bead of sealant right along the gap between the metal and the brick. Make sure you extend the bead an inch past the visible crack on both sides.
- Tool the joint. Use your putty knife to press the sealant firmly into the gap and smooth it out. You want the sealant to form a tiny ramp that directs water off the brick and onto the metal, leaving no lip for water to sit on.
A quick tube of roofing cement can save your living room ceiling today, but it is a bandage, not a cure.
Why You Need a Permanent Professional Repair
It is vital to understand that the DIY fix described above is strictly temporary. Smearing roofing cement over a failed joint is what roofers call a "surface patch." Under the brutal summer sun, surface-applied roofing cement will eventually dry out, shrink, and crack again—usually within three to six months. By the time the heavy summer thunderstorms roll in, your temporary seal will likely fail.
A permanent repair requires mechanical integration, not just chemical adhesion. When a professional roofer repairs chimney flashing, they do not rely on caulk to do the heavy lifting. Instead, they use an angle grinder equipped with a diamond blade to cut a horizontal groove, about 1-inch deep, directly into the mortar joints between the bricks.
They then take custom-bent pieces of metal counter-flashing, insert the top edge deep into that freshly cut groove, and secure it by tapping in small lead wedges. Finally, they seal the groove with a high-grade urethane sealant. Because the top edge of the metal is physically buried inside the brick wall, water running down the face of the chimney simply cannot get behind it.
A roof leak around your chimney is stressful, but it is rarely a sign that you need to replace your entire roof. By understanding how the flashing system relies on overlapping layers, you can quickly identify where the seal has broken. Take the time to apply a careful temporary patch with the right materials, and you will buy yourself the necessary time to hire a professional for a permanent, watertight repair before the next major storm season arrives.