How to Inspect Your Roof for Damage (Without a Ladder)

Winter weather can secretly compromise your roof. Learn how to safely spot missing shingles, damaged flashing, and hidden leaks from the ground before spring rains arrive.
Spring showers are fast approaching, and while the warmer weather is a welcome relief, the changing season brings a critical chore to the forefront. Winter is notoriously brutal on your home's exterior. Over the last few months, heavy snow loads, expanding ice, and harsh winds may have secretly compromised your roof. What looks perfectly fine from a quick glance in the driveway might actually be harboring small defects that will turn into massive leaks the moment the spring rains begin.
You know you need to inspect your roof for damage, but you might be rightfully hesitant to climb a twenty-foot extension ladder to do it. Walking on a roof is incredibly dangerous for untrained homeowners; a single slip on a patch of lingering morning dew or loose granules can result in a catastrophic fall. Furthermore, walking incorrectly on asphalt shingles can actually cause damage, breaking the fiberglass matting or dislodging the protective granules.
Fortunately, you do not need to risk life and limb to ensure your home is watertight. You can conduct a thorough, highly effective roof inspection with both feet firmly planted on the ground. By using the right tools and knowing exactly what warning signs to look for, you can spot the vast majority of roof defects safely from your lawn.
The Hidden Dangers of Winter Roof Wear
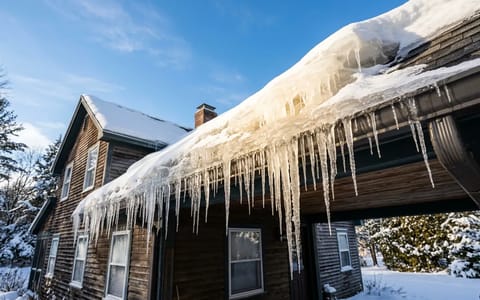
To understand what you are looking for, you first need to understand what winter actually does to a roof. The primary enemy is the freeze-thaw cycle. When snow melts on the warmer upper sections of your roof, the water runs down to the colder eaves and freezes. This creates an ice dam. As more water backs up behind this dam, it has nowhere to go but up and under your shingles.
When that trapped water freezes as temperatures drop overnight, it expands by roughly nine percent. This expansion acts like a miniature pry bar, lifting shingles, popping out roofing nails, and breaking the waterproof seal. Once that seal is broken, the next heavy spring rain will bypass the shingles entirely, soaking into the wooden roof decking below.
Wind is the secondary culprit. Winter gales can catch the edge of a slightly lifted shingle and crease it backward, snapping the brittle asphalt. Even if the shingle falls back into place and looks normal from afar, the structural integrity is gone, and water will easily seep through the crack.
Essential Gear for a Ground-Level Roof Check
Because you will not be up close to the shingles, you need tools that bring the roof to you. You likely already have everything you need in your home to perform a comprehensive visual inspection.
First, grab a pair of binoculars. A standard set of 10x42 binoculars (meaning 10x magnification with a 42mm objective lens) is perfect for this task. They offer enough magnification to see the texture of individual shingles while maintaining a wide enough field of view to keep the image stable in your hands. If you are using stronger binoculars, you may want to lean against a tree or rest your elbows on a fence to steady the image.
Alternatively, a modern smartphone with an optical zoom lens is an incredible inspection tool. Many flagship phones now feature 3x, 5x, or even 10x optical telephoto lenses. You can stand in your yard, zoom in on a suspicious area, snap a high-resolution photo, and then pinch-to-zoom on the screen to examine the finest details. This also gives you a documented record to show a roofing contractor if you find something concerning.
Finally, bring a notepad or use a note-taking app on your phone. When you are looking at a vast expanse of gray or brown shingles, it is incredibly easy to lose track of where you saw a problem. Note the exact location (e.g., "three rows down from the ridge, directly above the master bedroom window").
How to Inspect Your Roof for Damage (The Shingle Check)
When you are ready to inspect roof for damage, do not just glance around randomly. You need to be systematic. Start at the bottom left corner of your roof and slowly scan across the eaves to the right. Then, move your line of sight up a few feet and scan back to the left. Continue this grid pattern until you reach the ridge cap at the very top. Here is exactly what you are looking for through your lenses.
- Look for missing or misaligned shingles. This is the most obvious sign of wind damage. If you see a dark, rectangular patch where a shingle should be, the underlayment is exposed. Also, look for shingles that seem crooked or out of line with the rest of the row, which indicates the nails have pulled loose.
- Spot the curling and cupping. As asphalt shingles age and bake in the sun, the volatile compounds in the asphalt evaporate. The shingle dries out and begins to shrink. This causes the edges to curl upward (cupping) or the middle to bow upward while the edges dig into the roof (clawing). Curled shingles catch the wind easily and allow blowing rain to get underneath.
- Search for bald spots. Asphalt shingles are coated in tiny, crushed stone granules that protect the asphalt from ultraviolet radiation and provide fire resistance. Over time, these wash away. Look for dark, shiny, or completely smooth patches on the shingles. If the asphalt is exposed to the sun, it will degrade and crack very quickly.
- Check the ridge cap. The shingles bent over the very peak of your roof take the brunt of high winds and severe weather. Pay close attention to this area, looking for cracks along the bend or missing pieces entirely.
A twenty-dollar pair of binoculars and thirty minutes of your time can easily save you from a two-thousand-dollar ceiling repair.
While you are checking the shingles, take a moment to look at the ground around your downspouts. If you see a thick pile of black, sandy material, those are the granules from your shingles. While a little granule loss is normal after a heavy storm, a massive accumulation means your roof is rapidly deteriorating and nearing the end of its useful life.
Scrutinizing the Flashing and Penetrations
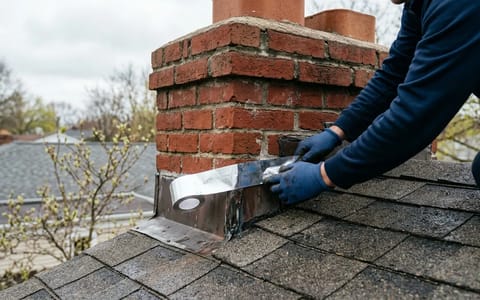
While shingles cover the vast majority of your roof's surface, they are rarely the source of a leak. The vast majority of water intrusion happens at roof penetrations—any place where something pokes through the shingles. This includes chimneys, skylights, plumbing vent pipes, and attic exhaust fans. These areas are sealed with metal and rubber components collectively known as flashing.
Focus your binoculars on the base of your chimney. You should see metal flashing stepping up the sides of the brickwork. Look for any pieces of metal that are bent outward, missing entirely, or heavily rusted. Pay special attention to the caulk or roofing cement where the metal meets the brick; this sealant dries out, cracks, and flakes away over time, leaving a direct path for water to run behind the flashing.
Next, find the plumbing vent pipes—the small plastic or metal pipes sticking up from the roof, usually above bathrooms and kitchens. These are sealed with a rubber or neoprene boot that fits snugly around the pipe. Unfortunately, rubber degrades under constant UV exposure. After ten to fifteen years, these boots will inevitably crack, split, or rot away completely. If you can see torn rubber or a gap between the pipe and the boot, water is running straight down the outside of that pipe into your attic.
Finally, check the valleys of your roof. A valley is the V-shaped intersection where two sloping roof sections meet. Because valleys collect and channel massive amounts of water during a rainstorm, they are high-risk areas. Look for tears in the shingles lining the valley or lifting edges where the water flow may have forced its way underneath.
The Inside Job: Inspecting Your Attic
An exterior inspection is only half the job. To truly ensure your roof survived the winter, you must inspect the underside of the roof deck. Grab a bright LED flashlight, put on a dust mask to protect your lungs from fiberglass insulation, and head up into your attic.
The best time to do this is on a bright, sunny afternoon. Once you are safely in the attic—remembering to step only on the wooden joists, never on the drywall ceiling between them—turn off your flashlight. Let your eyes adjust to the darkness for a minute. Now, look up at the roof deck.
Do you see any tiny pinpricks of daylight shining through? Aside from the intentional vents at the eaves and the ridge, your roof deck should be pitch black. If you see daylight, water can get through that exact same hole.
Turn your flashlight back on and carefully examine the wooden rafters and the plywood or oriented strand board (OSB) decking. You are looking for dark, circular water stains. Water leaves a distinct, dark ring on wood when it dries. Check the nails protruding through the wood; if they are heavily rusted or have water droplets hanging from them, moisture is getting under the shingles and following the nail shaft down.
Finally, look down at your insulation. If you have fluffy blown-in fiberglass or cellulose insulation, look for areas that appear flat, compressed, or discolored. When insulation gets wet, it loses its loft and mats down. Even if the roof deck above looks dry right now, compressed insulation is a telltale sign of an intermittent leak.
When to Call a Professional Roofer
If your ground-level and attic inspections reveal a pristine roof, you can breathe easy and enjoy the spring weather. But what if you spotted some issues? Knowing when to monitor a problem versus when to call a professional is crucial.
If you see a single slightly lifted shingle and your roof is relatively new, you might just keep an eye on it. However, because the premise of this guide is staying off the ladder for safety, any physical repair work should generally be handed off to a pro. Walking on a steeply pitched roof without proper fall protection is simply not worth the risk.
When you do call a roofer, your ground-level inspection will pay off immensely. Instead of vaguely saying, "I think I might have a leak," you can tell them exactly what you found: "I used binoculars and saw the rubber boot on the plumbing vent above the master bath is completely split, and I confirmed a water stain on the decking in the attic directly below it." This level of detail ensures the contractor knows exactly what to address and prevents you from being sold unnecessary repairs.
Taking thirty minutes this weekend to walk your property with a pair of binoculars is one of the highest-return investments you can make in your home's maintenance. By catching winter's hidden damage early, you ensure that the upcoming spring showers stay exactly where they belong—outside your home.