Cheap Home Office Soundproofing That Actually Blocks Noise
Struggling with household noise during important work calls? Learn how to effectively block out kids, dogs, and TVs with budget-friendly, weekend soundproofing projects that don't require tearing down drywall.
Working from home presents a unique set of challenges, but few are as universally frustrating as unwanted noise. You are about to present a critical proposal on a video call, and suddenly the dog starts barking at the mail carrier, or the kids decide the hallway is a bowling alley. If you live in a busy household, that ambient noise easily bleeds right into your workspace, destroying your focus and projecting an unprofessional environment over the microphone.
Often, we assume that true architectural soundproofing—the kind recording studios use—is the only fix. That level of construction requires tearing down drywall, installing resilient channels, hanging mass-loaded vinyl, and completely decoupling the room's framing. That is highly disruptive, incredibly expensive, and completely out of the question for renters or budget-conscious homeowners. Fortunately, you do not need to gut your house to find peace and quiet. By focusing on a few strategic, cheap home office soundproofing techniques, you can drastically reduce the amount of noise that enters your workspace for under $100.
Understanding the Enemy: Sound Blocking vs. Sound Absorption
Before you spend a single dollar at the hardware store, you must understand a critical distinction in acoustics. Most people confuse sound absorption with sound blocking. I once spent an entire weekend taping cheap egg-crate foam squares to my office walls, only to realize I could still hear my dog snoring in the hallway. It was a frustrating, ugly lesson in the difference between the two concepts.
Sound absorption deals with echoes and reverberation inside your room. Hard surfaces like hardwood floors, bare drywall, and glass windows cause sound waves to bounce around, amplifying the noise you make (like typing or speaking). Soft materials absorb these internal sound waves, deadening the echo and making the room sound tighter. However, foam panels do absolutely nothing to stop noise from traveling through a wall.
Sound blocking, on the other hand, prevents noise from entering or leaving the room in the first place. Sound waves are essentially changes in air pressure. To block them, you need two things: mass and an airtight seal. If air can get through a space, sound can get through that space. Therefore, effective soundproofing is less about buying fancy acoustic foam and more about hunting down air leaks and adding dense mass to thin barriers.
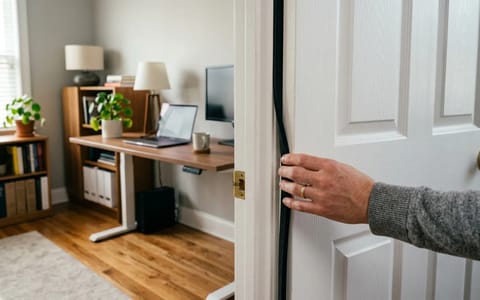
The Biggest Culprit: Your Office Door
Walk into your home office, close the door, and turn off the lights. If it is daytime, look closely at the perimeter of the door frame. You will likely see light shining through the gaps along the sides, the top, and especially the bottom. In the world of acoustics, those gaps might as well be an open window.
Standard interior residential doors are incredibly poor at stopping sound. They are typically hollow-core, meaning they consist of a thin wood veneer stretched over a cardboard honeycomb frame. They lack the mass required to stop sound waves. Furthermore, interior doors are installed with significant undercut gaps at the bottom—often half an inch to a full inch—to allow for return airflow to your home's HVAC system.
If your door is sagging, the gap at the top might be tight while the bottom is wide open. Before applying any seals, check your hinges. Tightening the screws on the top hinge, or replacing a short screw with a 3-inch wood screw that reaches the framing stud, can pull the door back into square. This makes sealing the door much easier and more effective. Your first line of defense is to turn that leaky door into an airtight plug.
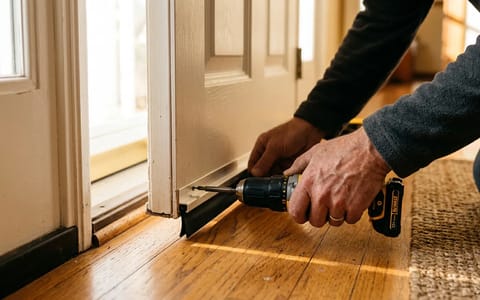
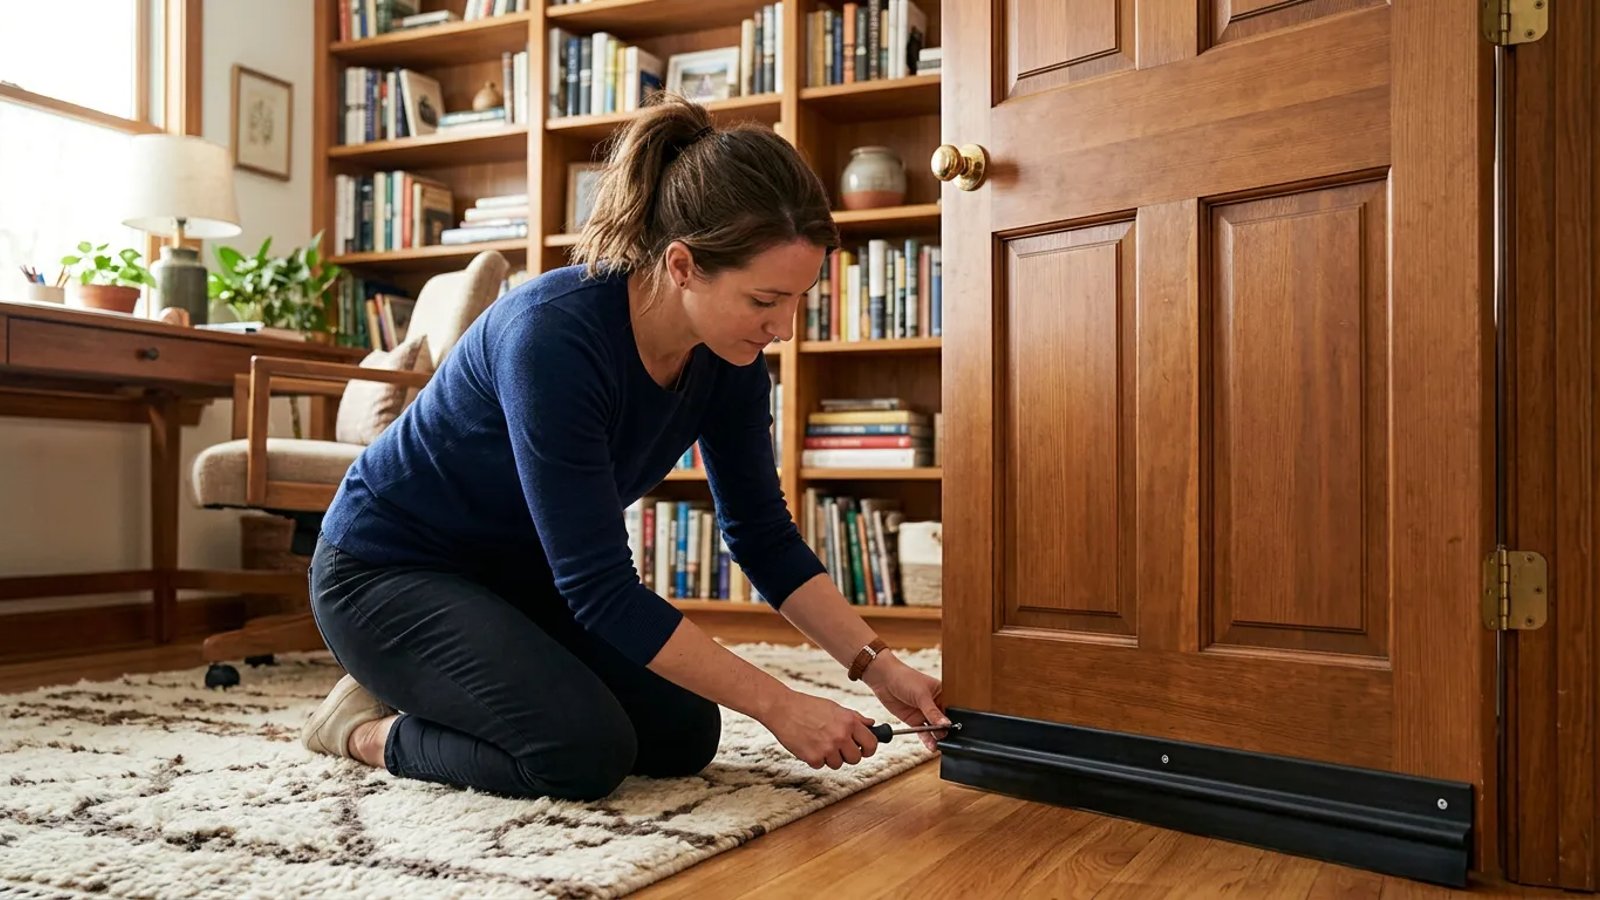
Step-by-Step: Sealing the Door Frame
To create an airtight seal around your door, you need to apply acoustic weatherstripping to the door stop (the small piece of wood trim inside the jamb that the door rests against when closed) and install a heavy-duty sweep at the bottom. When choosing weatherstripping, avoid cheap, open-cell sponge foam. It degrades quickly and is too porous to stop sound. Look for EPDM rubber, silicone bulb seals, or closed-cell neoprene.
- Clean the door jamb. Use rubbing alcohol and a clean rag to wipe down the door stop where you will apply the weatherstripping. Dirt and natural wood oils will prevent the adhesive from sticking properly. Let it dry completely for 10 minutes.
- Measure and cut the weatherstripping. Measure the height of both sides of the door frame and the width of the top. Cut your high-density closed-cell foam tape to match. A 1/4-inch thick by 1/2-inch wide foam strip is usually ideal for interior doors.
- Apply the weatherstripping. Peel back a few inches of the adhesive backing. Starting at a top corner, press the foam firmly against the door stop so that when the door closes, it slightly compresses the foam. Work your way down the sides, peeling the backing as you go.
- Install the door sweep. Measure the width of the door at the bottom. Purchase an automatic acoustic door sweep or a thick surface-mounted silicone sweep. Cut the sweep to length using a hacksaw if it is metal, or heavy scissors for silicone.
- Screw the sweep into place. Close the door. Position the sweep so the bottom rubber seal presses firmly against the floor or threshold, completely blocking any light. Mark the screw holes, pre-drill with a 1/16-inch bit, and drive the screws in tight.
Once installed, you should feel a slight resistance when closing the door. The latch should click firmly into place, compressing the seals. This single afternoon project will yield the most dramatic noise reduction of any DIY method.
The Next Level: Upgrading to a Solid-Core Door
If you have completely sealed the door frame but find that lower-frequency sounds—like the rumble of a television or heavy footsteps—are still penetrating, the hollow-core door itself is the weak link. The thin wood veneer vibrates like a drum head, transferring the sound waves right through to your office.
Replacing a hollow-core door with a solid-core door is one of the most effective upgrades you can make. Solid-core interior doors are made of composite wood or solid MDF and weigh significantly more. This added mass is exactly what you need to block sound transmission.
If air can get through a space, sound can get through that space. Mass and airtight seals are your only true defense against household noise.
You can purchase an unfinished solid-core slab door at most big-box hardware stores for around $100 to $150. If you are comfortable with basic carpentry, you can use your old door as a template to trace and route the hinge mortises and drill the hole for the doorknob.
Adding Mass to Shared Walls Without Opening Them
Often, home offices share a partition wall with a living room, a child's bedroom, or a hallway. Standard interior walls are constructed with half-inch drywall screwed into 2x4 studs with no insulation in the cavity. This essentially creates a hollow drum that allows sound to pass through easily.
Since tearing down the drywall to add fiberglass batt insulation or mass-loaded vinyl is off the table, you have to add mass to the outside of the wall. The most practical and functional way to do this is by using heavy furniture.
A large, floor-to-ceiling bookcase pushed completely against the shared wall serves as an excellent secondary sound barrier. However, an empty bookcase will not help. You must fill it with dense materials. Books, magazines, heavy storage boxes, and filing cabinets add tremendous mass to the wall assembly.
To maximize this effect, pull the bookcase about half an inch away from the wall. This tiny air gap decouples the furniture from the drywall, preventing vibrations from transferring directly from the wall into the wood of the bookcase. If you have a slightly larger budget, you can even tack a layer of mass-loaded vinyl (MLV) to the back of the bookcase before loading it up with books.
Taming the Echo: Sound Absorption Tactics
Once you have blocked as much sound as possible from entering the room, it is time to address the internal acoustics. If your office has hardwood floors, sparse furniture, and bare walls, the noise that does manage to get in will bounce around, amplifying its perceived volume. Furthermore, a highly reverberant room makes your voice sound hollow and distant on conference calls.
Here is where sound absorption comes into play. You want to introduce soft, porous materials that catch sound waves and prevent them from reflecting.
Start with the floor. A thick, high-pile area rug placed under your desk will immediately deaden footfalls and absorb lower-frequency rumbles. To boost its effectiveness, place a dense 1/4-inch felt rug pad underneath it.
Next, look at your windows. Glass is highly reflective. Swapping out thin aluminum blinds for heavy, velvet blackout curtains will significantly reduce sound reflection. Ensure the curtains extend several inches past the window frame on all sides and pool slightly on the floor for maximum coverage.
Finally, you can strategically place acoustic panels. Do not cover the entire room; focus on the reflection points. Have someone sit at your desk and speak while you walk around the room. Place a few fabric-wrapped panels on the walls at head-height where the sound hits first. If you are handy, you can build your own panels using 1x2 pine boards, mineral wool insulation, and breathable fabric like canvas. These DIY panels cost a fraction of commercial treatments and perform significantly better.
The Sneaky Flanking Path: HVAC Vents
You have sealed the door, added mass to the walls, and laid down a thick rug, but you can still hear every word spoken in the kitchen. If this happens, the sound is likely traveling through a flanking path—specifically, your home's ductwork.
Air conditioning and heating vents are essentially metal speaking tubes connecting the rooms in your house. Sound enters the return vent in the living room, bounces along the sheet metal ducts, and exits right over your desk.
You cannot seal your vents, as your room requires airflow to maintain a comfortable temperature and avoid damaging your HVAC system. However, you can create a simple sound maze inside the vent. Remove the vent register from the wall or ceiling. Cut pieces of acoustic foam or rigid fiberglass duct liner and glue them inside the ductwork to create a zigzag pattern. The air can still weave its way through, but the sound waves will strike the absorbent material and lose energy before reaching your room.
Achieving a quieter workspace does not require a massive renovation budget or a contractor. By understanding the physics of sound and systematically addressing the weakest points in your room—starting with the door gaps and moving to the walls and floors—you can create a professional, focused environment. Grab some weatherstripping, rearrange your heaviest furniture, and enjoy the immediate upgrade to your daily video calls.