Dishwasher Standing Water? Check the Air Gap and Loop
Finding an inch of foul-smelling water in your dishwasher is frustrating. Before replacing the drain pump, check your air gap and under-sink drain loop to fix the issue in minutes.
You open the dishwasher door expecting sparkling plates, but instead, a wave of swampy odor hits you. You look down, and there it is: an inch of murky, foul-smelling water sitting in the bottom of the tub. Your first instinct is probably to pull out the bottom filter and scrub it in the sink. But what happens when you run another cycle and the water is still there?
Dealing with dishwasher standing water is incredibly frustrating. Many homeowners immediately brace for a hefty $300 repair bill, assuming the appliance's internal drain pump has failed. They start looking up replacement parts or calling local appliance repair shops. However, the true culprit is frequently outside the dishwasher entirely. The problem usually lies in the plumbing directly under your kitchen sink.
When I replaced the garbage disposal in my own kitchen last fall, I completely forgot to punch out the factory knockout plug. The resulting backup filled my dishwasher with two inches of murky water before I realized the mistake. I spent an hour bailing it out with a sponge. The experience reminded me just how closely the sink and the dishwasher are connected. By checking a few simple plumbing components, you can usually fix this drainage issue in under ten minutes without spending a dime.
Why Is There Dishwasher Standing Water?
To understand why water pools in the bottom of your appliance, you have to understand how the drainage system works. Your dishwasher does not have its own dedicated drain pipe leading into the wall. Instead, it relies on a flexible corrugated plastic hose, typically 1 inch in diameter, that connects to your kitchen sink drain or your garbage disposal.
When the dishwasher finishes a wash cycle, the internal pump pushes the dirty water out through that hose. The water travels up under the sink and dumps into the disposal or the sink tailpiece. Gravity then carries it away into your home's main sewer lines.
The problem occurs when the water decides to travel in the wrong direction. If the sink drain backs up, or if the hose is not routed correctly, gravity will pull dirty sink water backward through the hose. This siphoning effect deposits the foul sink water directly into the lowest point available: the bottom of your dishwasher tub. Because this water comes from the sink, it brings food debris, bacteria, and awful smells with it.
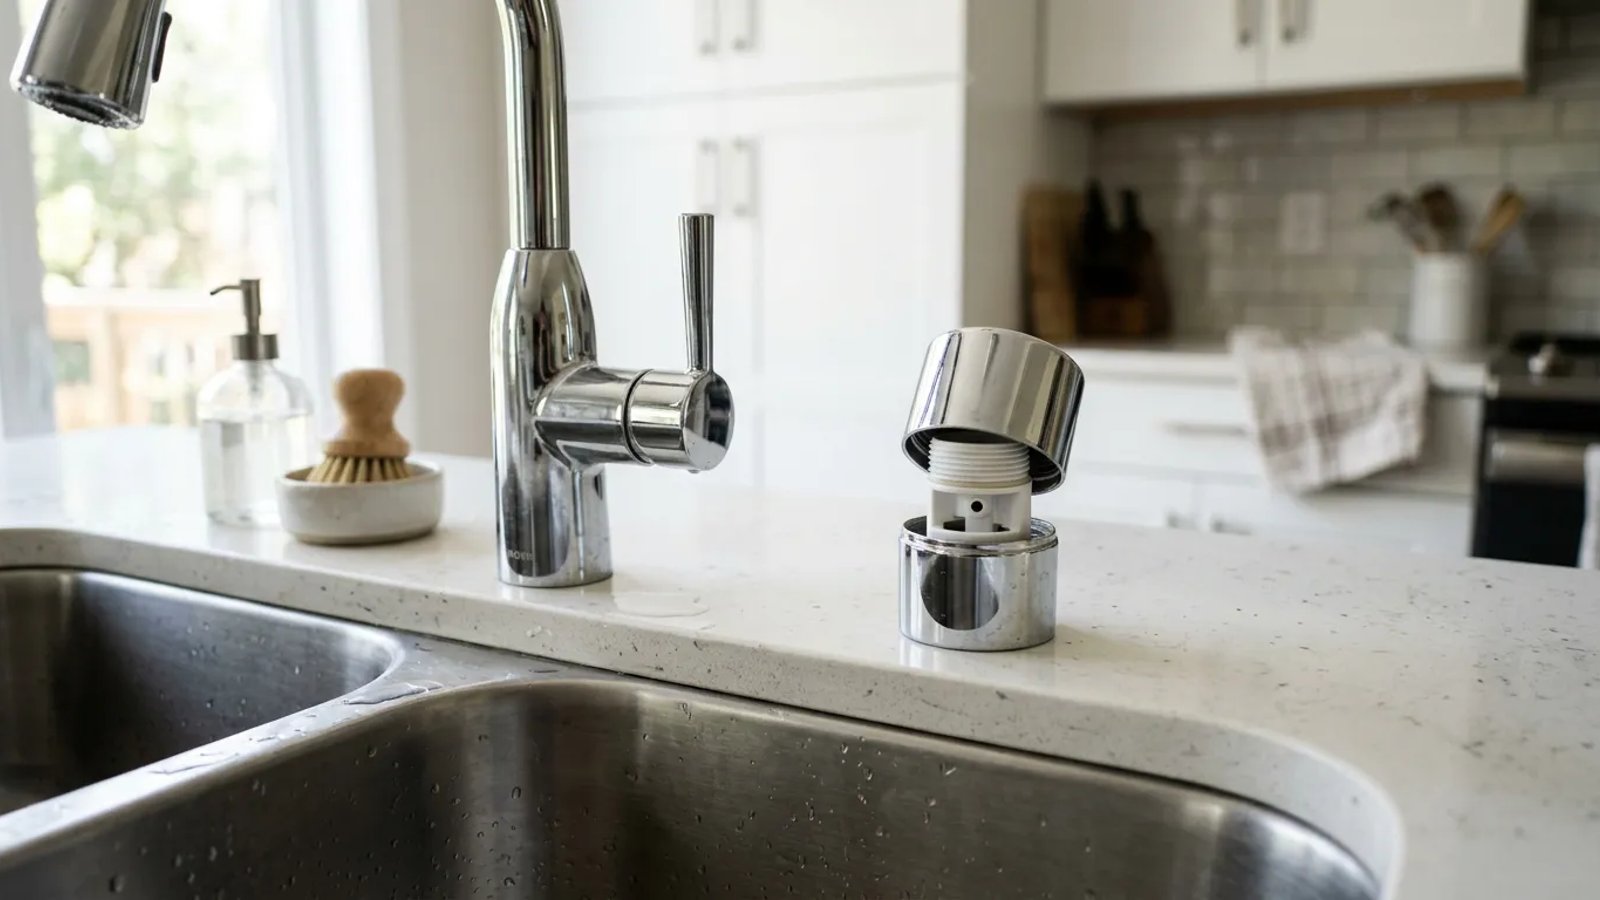
The Countertop Air Gap: Your First Suspect
If you have a small, cylindrical chrome fixture sitting on your sink counter next to the faucet, you have an air gap. This simple device is designed specifically to prevent the siphoning effect. It forces the drain water to jump across a physical gap of air before entering the sink drain. Because water cannot siphon across empty space, dirty sink water cannot travel backward into the appliance.
According to the International Residential Code (IRC), many local jurisdictions require this physical air gap to prevent cross-contamination between the sewer lines and your clean dishes.
However, air gaps are notorious for clogging. When you run your garbage disposal, small bits of food waste can splash upward and lodge inside the air gap's internal plastic tubing. Over time, grease, coffee grounds, and food debris form a solid plug. When the dishwasher tries to drain, the water hits this plug and has nowhere to go. It either spills out of the air gap onto your counter, or it flows right back down into the dishwasher tub.
How Do I Clean a Clogged Air Gap?
Cleaning an air gap is one of the fastest and easiest maintenance tasks in the kitchen. You do not need any special plumbing tools, and you do not need to shut off the water supply to the house. You just need a pair of household tweezers and a paper towel.
- Remove the chrome cover. Grip the chrome cylinder on your counter and pull straight up. It is not threaded, so it should pop right off. If it is stuck due to hard water buildup, wiggle it gently from side to side while pulling.
- Remove the inner plastic cap. Inside, you will see a plastic mechanism. Most models have a small plastic cap that snaps into place with two small tabs. Squeeze the tabs and lift the cap off to expose the vertical tubes.
- Extract the debris. Look down into the tubes. You will likely see a dark plug of grease and food. Use a pair of tweezers, a wooden skewer, or a small bottle brush to dig the debris out. Pull it upward and wipe it on a paper towel.
- Flush the line. Once you have removed the visible blockage, pour a cup of hot water down the larger of the two tubes to ensure it flows freely into the garbage disposal.
- Reassemble the unit. Snap the plastic cap back onto the tabs and push the chrome cover back down until it sits flush against the counter.
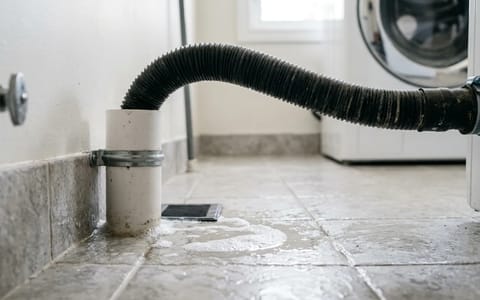
The High Loop Fix: When You Have No Air Gap
Not every kitchen has a countertop air gap. In many regions, plumbing codes allow for an alternative method called a "high loop." If you look at your sink counter and only see a faucet and a soap dispenser, your home relies on a high loop to prevent backflow.
A high loop is exactly what it sounds like. The flexible corrugated drain hose comes out of the dishwasher, travels up to the very top of the sink cabinet (just under the countertop), and is secured there before looping back down to connect to the garbage disposal. This high elevation forces the drain pump to push water up and over the peak. Because the peak of the loop is physically higher than the water level in a full sink, gravity prevents the sink water from flowing backward into the hose.
The problem with high loops is that they frequently fall down. The hose is usually held up by a single plastic zip tie, a metal strap, or even just a piece of tape. Over the years, the adhesive fails, or the zip tie snaps from the vibration of the running water. When the hose drops to the floor of the cabinet, it creates a direct, level path for water to flow straight from the disposal into the dishwasher.
Last year, I helped a neighbor who was about to drop $350 on a new drain pump because his appliance was constantly full of water. We opened the cabinet doors, and sure enough, his drain hose was lying flat on the cabinet floor. We fixed it in five minutes using a single zip tie.
How to Secure a Fallen Drain Hose
Fixing a fallen loop takes just a few minutes and requires minimal effort.
- Locate the drain hose. Open your under-sink cabinet and find the corrugated plastic hose coming from the dishwasher. It is usually white, gray, or black.
- Hoist the hose upward. Grab the hose and pull it up as high as it will go against the underside of the countertop. You want the peak of the loop to be at least 32 inches off the floor.
- Secure the loop. Find a sturdy anchor point near the top of the cabinet. This could be a water supply pipe, a wooden cabinet brace, or the sink mounting hardware. Wrap a heavy-duty zip tie around the hose and the anchor point, and pull it tight.
- Verify the angle. Make sure the hose slopes downward continuously from the peak of the zip tie all the way to the garbage disposal connection. There should be no sags or dips where water can pool.
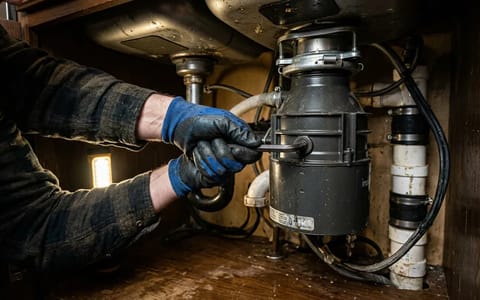
The Knockout Plug: A Common New-Disposal Trap
If you recently replaced your garbage disposal, or if you just moved into a flipped house with brand new appliances, there is one more critical check to make. This specific issue causes immediate and severe standing water in the dishwasher.
Garbage disposals come from the factory with a solid plastic "knockout plug" blocking the dishwasher connection port. This plug exists because some homeowners do not own dishwashers, and leaving the port open would cause sink water to pour out under the cabinet. If you do connect a dishwasher, you must manually punch this plug out with a hammer and a screwdriver before attaching the hose.
If the installer forgot to remove the plug, the dishwasher pump will try to force water into a solid wall of plastic. The water has nowhere to go, so it remains trapped in the appliance.
How to Check for an Intact Knockout Plug
If you suspect the plug was left in, you can verify it quickly.
- Disconnect the hose. Place a small bucket or a thick towel under the disposal connection. Use a 5/16-inch nut driver or a flathead screwdriver to loosen the metal hose clamp. Pull the rubber end of the drain hose off the disposal nipple.
- Look inside the port. Shine a flashlight into the plastic tube extending from the side of the disposal. If you see a solid wall of plastic, the plug is still there. If you see the metal grinding chamber inside, the plug has been removed.
- Punch it out. If the plug is intact, place the tip of a flathead screwdriver against the center of the plastic wall. Tap the handle firmly with a hammer until the plug breaks free and falls into the disposal chamber.
- Retrieve the plug. Reach down through the sink drain (make absolutely sure the disposal switch is off) and pull the loose plastic disc out of the grinding chamber. Reconnect the drain hose and tighten the clamp.
Testing the System and Final Steps
Once you have cleared the air gap, secured the high loop, or verified the knockout plug, it is time to test the system. Use a sponge or a wet/dry vacuum to remove the remaining dirty water from the bottom of the tub. You want to start with a completely empty basin.
Pour a quart of clean water directly into the bottom of the dishwasher. Close the door and press the "Cancel/Drain" button on the control panel. Most modern units will immediately activate the drain pump for about two minutes when a cycle is canceled. Listen closely to the sink drain. You should hear a strong, steady stream of water flowing from the hose into the disposal.
By taking a few minutes to inspect the plumbing under your sink, you can usually solve drainage issues quickly and easily. Keeping that air gap clear and maintaining a proper hose elevation ensures that dirty sink water stays exactly where it belongs: flowing safely down into the sewer, leaving your appliance clean and ready for the next load of dishes.
- Clean your countertop air gap by popping off the chrome cover and removing food debris with tweezers or a bottle brush.
- Secure your under-sink drain hose as high as possible against the underside of the countertop using a simple zip tie.
- Check your garbage disposal connection if you recently replaced the unit; an unremoved knockout plug blocks all drainage.
- Always run your garbage disposal before starting a dishwasher cycle to clear the shared drain pipe.