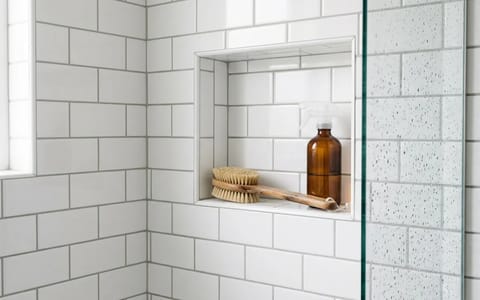
How to Reseal Shower Grout Before Water Damage Starts
Learn how to test, deep clean, and properly reseal shower grout to prevent stubborn mold, crumbling lines, and expensive behind-the-wall water damage.
Take a close look at your shower walls. Are the grout lines looking a little dingy? Do they take hours to dry out after your morning shower, holding onto moisture long after the tiles are dry? If so, you are looking at a ticking clock for water damage. While the ceramic or porcelain tiles on your wall are entirely waterproof, the cement-based grout holding them together is essentially a rigid sponge. When the factory-applied protective seal wears off, water seeps straight through those lines and into the wall cavity.
Most homeowners do not realize that shower grout requires regular maintenance. Left unsealed, water penetrates the porous grout lines, leading to stubborn mildew that no amount of scrubbing can remove. Worse, the constant moisture causes the grout to crack and crumble. Eventually, that water reaches the backer board and framing behind the tile, resulting in expensive, hidden rot. Learning how to reseal shower grout is one of the most cost-effective DIY skills you can master to protect your bathroom.
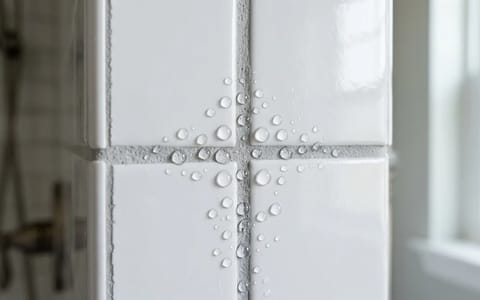
The 10-Second Water Drop Test
Before you run to the hardware store for cleaning supplies and sealers, you need to determine if your shower actually needs to be resealed. Fortunately, this does not require any specialized tools or professional inspections. You can diagnose the state of your grout using the simple water drop test.
Start by ensuring your shower has been dry for at least 12 hours. Take a few drops of water on your fingertips and flick them onto the grout lines in the lower third of your shower—the area that takes the heaviest beating from daily water spray. Now, watch closely. If the water beads up on the surface like rain on a freshly waxed car, your current sealer is intact and doing its job. You can walk away with confidence.
However, if the water absorbs into the grout line within a few seconds, causing the grout to darken in color, your protective barrier is gone. The grout is actively absorbing moisture every time you turn on the faucet. You should also perform this test on the higher sections of the wall. Often, you will find that the upper grout lines still repel water perfectly, while the lower lines are completely compromised by soap, hot water, and daily wear.
Choosing the Right Sealer
If your shower failed the water drop test, your next step is choosing the right product. Walk down the tile aisle at any home improvement store, and you will be confronted with dozens of bottles claiming to be the ultimate grout sealer. Understanding the difference between the two main categories will save you a lot of frustration.
The first type is a topical sealer (often called a membrane-forming sealer). These sit on top of the grout line, forming a physical plastic-like barrier. While they offer excellent stain resistance, they are generally a poor choice for showers. Topical sealers trap moisture inside the grout. Because showers are high-moisture environments, vapor pressure builds up behind the sealer, causing it to peel, flake, and turn cloudy over time.
The second, and highly recommended, type is a penetrating sealer (also known as an impregnating sealer). Instead of sitting on the surface, penetrating sealers soak deep into the pores of the cement grout. The active ingredients—usually silane, siloxane, or fluoropolymers—bond with the grout at a molecular level to repel water and oil. Crucially, penetrating sealers are vapor-permeable, meaning they allow trapped moisture to evaporate out without letting liquid water in. For a shower environment, always opt for a high-quality penetrating sealer. Expect to spend $15 to $35 for a quart, which is more than enough for a standard bathroom.
Deep Cleaning: The Crucial First Step
You cannot seal dirty grout. If you apply a clear sealer over soap scum, hard water deposits, or mildew, you will permanently lock those stains under a protective barrier. Furthermore, dirt and oils clog the pores of the grout, preventing the sealer from penetrating deeply. A thorough deep cleaning is absolutely non-negotiable.
Start by removing surface dirt with your regular bathroom cleaner. Once the superficial grime is gone, it is time to tackle the grout itself. Avoid harsh acidic cleaners or straight chlorine bleach. While bleach might temporarily whiten the grout, it breaks down the cementitious binders over time, leading to premature crumbling.
Instead, mix a solution of oxygen bleach (sodium percarbonate) and warm water. Add two tablespoons of oxygen bleach powder to a quart of warm water and stir until dissolved. Spray this solution generously onto the grout lines and let it sit for 10 to 15 minutes. This dwell time allows the oxygen bubbles to lift dirt and kill organic growth like mildew.
After the solution has had time to work, scrub the lines using a stiff nylon-bristle grout brush. Work in small sections, applying moderate pressure. You will likely see the original color of the grout begin to emerge from under the grime. Once you have scrubbed the entire shower, rinse the walls thoroughly with clean water to remove all lifted dirt and chemical residue.
The Waiting Game: Why Drying is Non-Negotiable
Once the shower is spotlessly clean and rinsed, you must exercise patience. This is the step where most eager DIYers make a critical mistake. The grout must be bone dry before you apply the sealer.
Remember that penetrating sealers work by soaking into the microscopic pores of the grout. If those pores are already filled with water from your cleaning process, the sealer has nowhere to go. It will simply sit on the surface, ineffective and weak. Furthermore, sealing over damp grout traps that moisture inside the wall, creating a perfect incubator for mold.
Sealing over damp grout doesn't protect your shower—it just locks the moisture and mildew inside.
Allow the shower to dry for an absolute minimum of 24 hours, though 48 hours is ideal. To speed up the process, turn on your bathroom exhaust fan to pull humid air out of the room. You can also place a small box fan on the bathroom vanity or floor, pointing it directly into the shower enclosure to keep air circulating over the tiles. Do not use the shower during this waiting period.
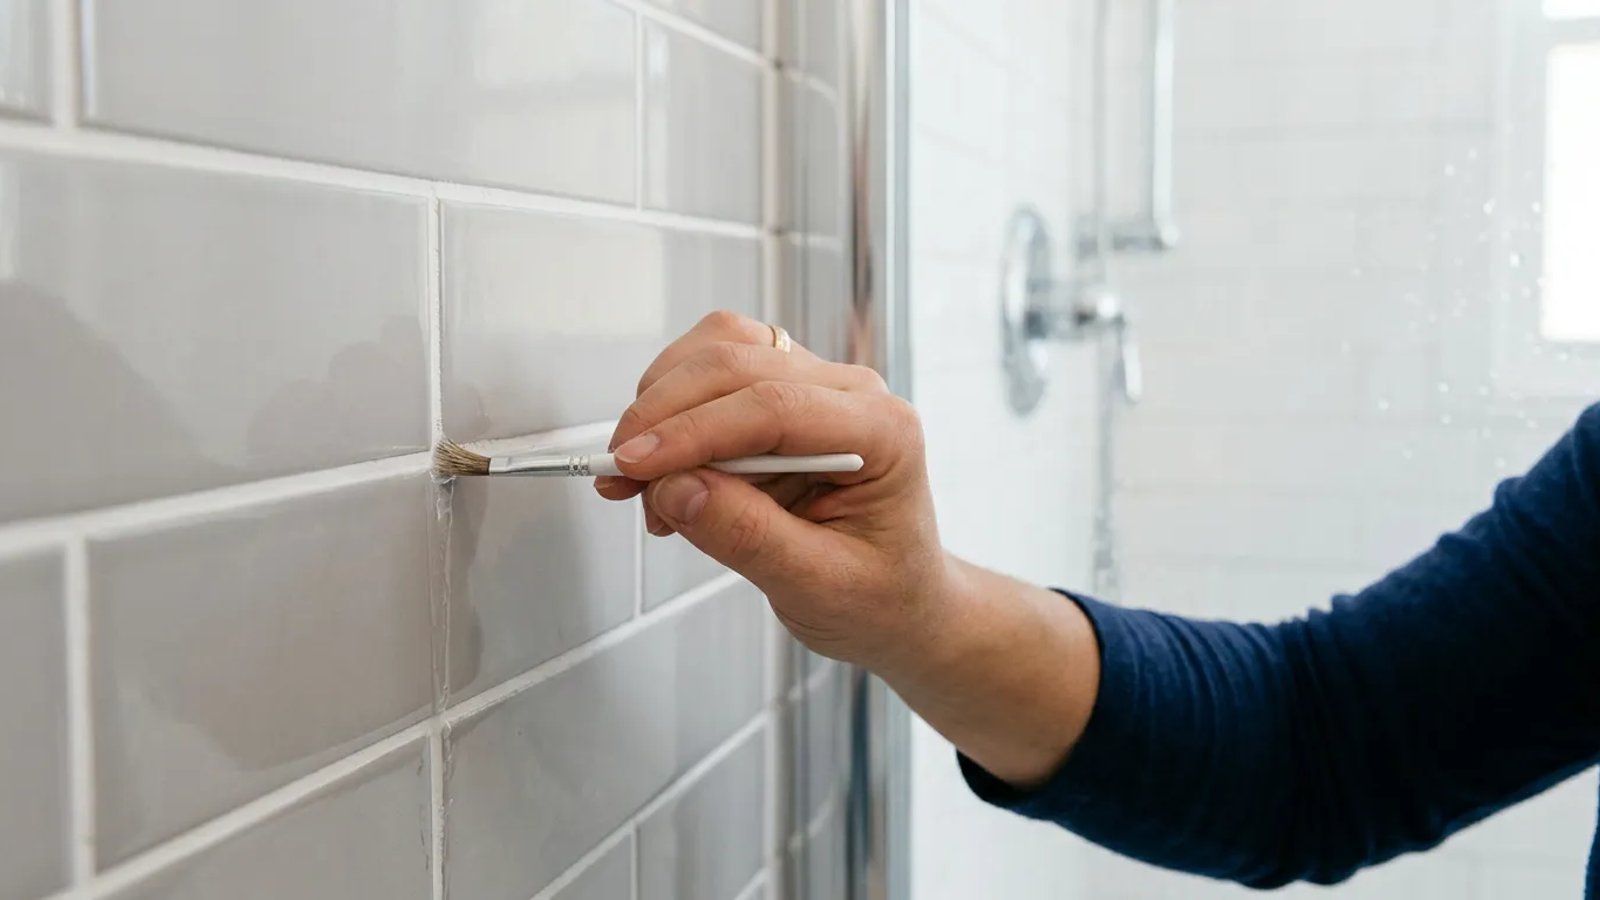
How to Reseal Shower Grout Step-by-Step
With clean, bone-dry grout, you are finally ready to apply the sealer. Ensure the bathroom is well-ventilated by opening a window or running the exhaust fan, as some solvent-based sealers have strong odors.
- Prepare your applicator. You can use a small foam brush, an artist's paintbrush, or a dedicated plastic applicator bottle with a roller wheel on top. Applicator bottles are excellent for keeping the sealer confined to the grout lines and minimizing mess on the tiles.
- Work in small sections. Do not try to seal the entire shower at once. Mentally divide the wall into 3-by-3 foot grids. Start at the top of the wall and work your way down to catch any drips.
- Apply the sealer generously. Paint the sealer onto the grout lines, ensuring they are fully saturated. The grout should look noticeably wet and slightly darker as it absorbs the liquid. If the grout absorbs the sealer immediately, apply a second pass to that same area until the grout stops drinking it in.
- Let it dwell. Allow the sealer to sit on the grout for 5 to 10 minutes (or as directed by the manufacturer). This dwell time is necessary for the polymers to penetrate deeply into the cement.
- Wipe off the excess. This is the most important step for a professional-looking finish. After the dwell time, use a clean, dry microfiber cloth to wipe the entire 3-by-3 foot section. You must remove any liquid sealer resting on the glazed surface of the tiles. If left to dry on the tile, the sealer will cure into a sticky, cloudy haze that is incredibly difficult to remove.
Continue this process—apply, dwell, wipe—moving from grid to grid until the entire shower is completed. Pay special attention to the corners and the bottom row of tiles, as these areas experience the most water exposure.
Curing Time and Future Maintenance
Applying the sealer is only half the battle; the chemical curing process is what actually creates the waterproof barrier. While the surface may feel dry to the touch within an hour, the polymers deep inside the grout need time to cross-link and harden.
Keep the shower completely dry for 24 to 48 hours after application. Do not turn on the water, and try to keep the bathroom humidity low. Once the curing period has passed, you can perform the water drop test one more time. The water should now bead up beautifully, proving that your shower is protected.
To extend the life of your newly sealed grout, get into the habit of using a squeegee on the walls after every shower. Removing standing water drastically reduces the wear on the sealer and prevents hard water buildup. Additionally, avoid highly acidic daily shower sprays, as these can slowly eat away at the protective polymers you just applied. With a little preventative care and an afternoon of DIY maintenance every year or two, your shower will stay waterproof, mold-free, and structurally sound for decades to come.