How to Flush a Water Heater (And Extend Its Lifespan)
Learn how to flush your water heater to remove sediment, boost energy efficiency, and prevent expensive emergency breakdowns. This simple annual chore can double the life of your tank.
Most of us don't give our home's plumbing a second thought until the morning we step into a freezing shower. But deep inside that steel cylinder in your basement or garage, a slow and silent problem is building up. Every gallon of water that enters your home carries trace amounts of dissolved minerals, primarily calcium and magnesium. Over time, these hard water minerals settle to the bottom of the tank, forming a thick, crusty layer of sediment.
This mineral blanket acts as an unwanted layer of insulation between your water and the heat source. Your system is forced to work overtime, burning more gas or drawing more electricity just to reach its normal temperature. Not only does this drive up your monthly utility bills, but the intense, trapped heat can eventually crack the protective glass lining inside the tank, causing it to rust from the inside out. Learning how to flush a water heater is one of the most valuable maintenance skills you can master. It costs nothing, requires no special plumbing experience, and can easily add five to seven years to the lifespan of your appliance.
Recognizing the Signs of Sediment Buildup
Your water heater will usually try to warn you before it fails completely. The most common red flag is a distinct popping, rumbling, or banging noise coming from the tank when it is actively heating. Plumbers call this "kettling." What you are actually hearing is water trapped beneath a heavy layer of sediment turning into steam, bubbling up, and violently popping through the crust. It sounds like a coffee percolator or a pot of boiling rocks.
You might also notice that your hot water runs out much faster than it used to. If your 50-gallon tank has 10 gallons of solid sediment sitting at the bottom, you now only have a 40-gallon tank. Finally, if the hot water coming out of your bathroom faucets looks slightly cloudy, milky, or has a reddish-brown rusty tint, you are seeing suspended sediment making its way into your home's pipes. The first time I flushed my own tank in my 1990s split-level, the water came out looking exactly like rusty milk—a stark reminder of what I had been washing my dishes in.
Ignoring your water heater is the most expensive way to save 45 minutes a year.
A standard water heater typically lasts 10 to 15 years. However, neglected units in areas with hard water can burn out their lower heating elements or develop catastrophic leaks in as little as six years. Flushing the tank annually is your best defense against premature failure.
Tools and Prep: Getting Ready for the Job
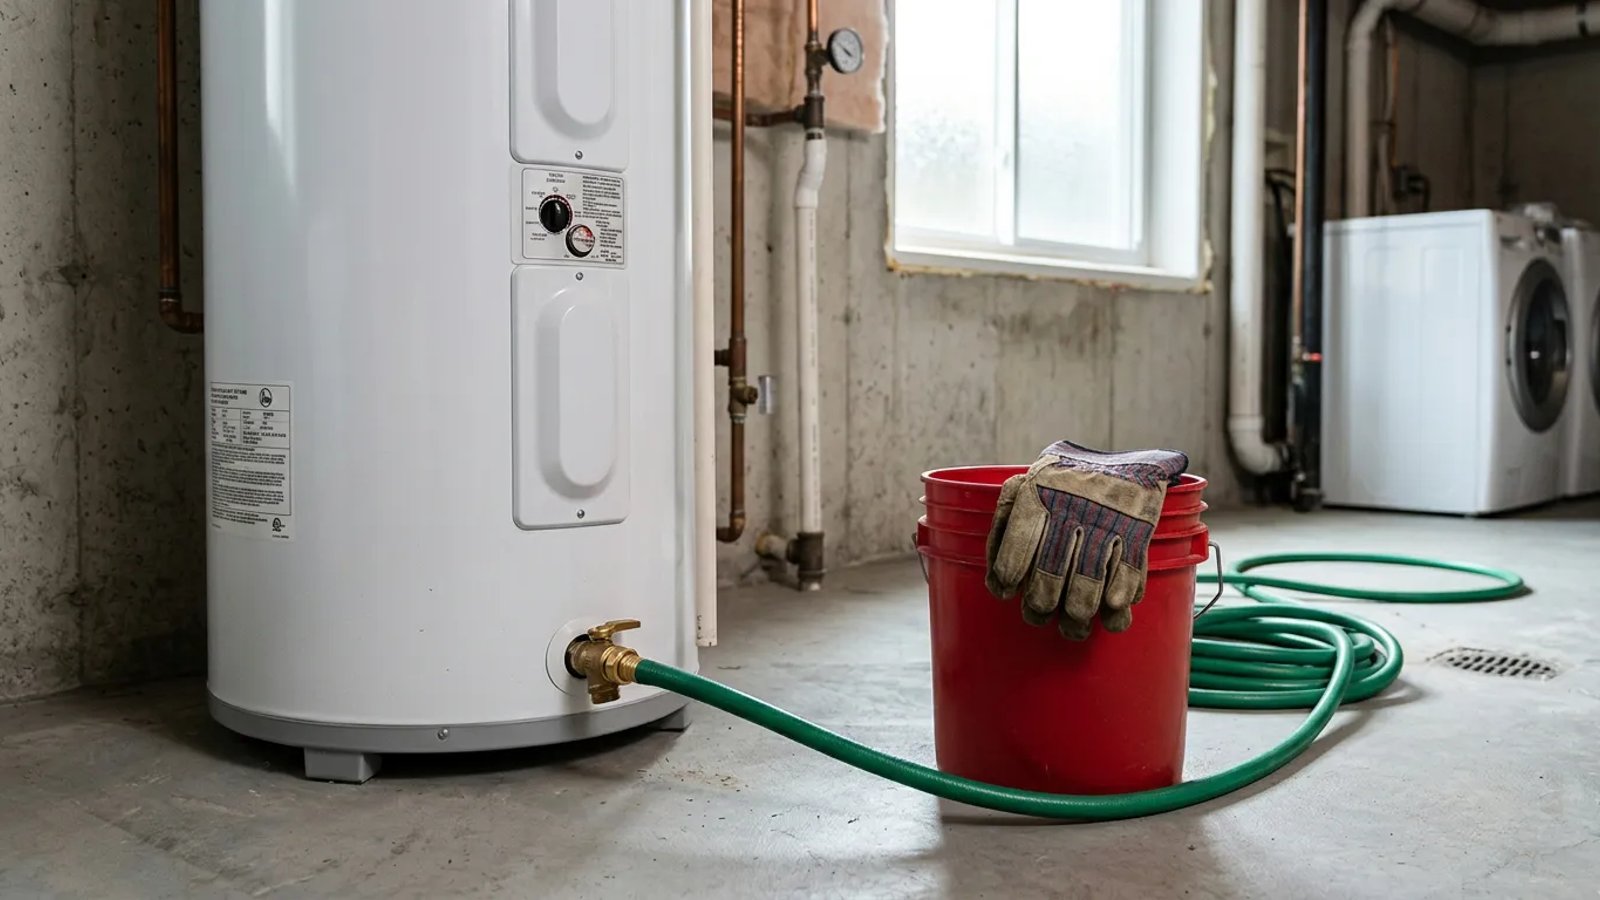
You do not need to be a master plumber or own a truck full of specialized tools to handle this task. You likely already have everything you need sitting in your garage. Set aside about 30 to 60 minutes for the entire process, depending on how slowly your tank drains.
Before you attach a single hose, you must secure the area. The water inside the tank is sitting at around 120 to 140 degrees Fahrenheit. It is hot enough to cause severe scalding if a hose slips or a valve breaks. Wear closed-toe shoes, put on your heavy-duty gloves, and ensure kids and pets are kept out of the utility room until the job is finished.
Step-by-Step: How to Flush a Water Heater
This process is entirely beginner-friendly, provided you follow the steps in the correct order. Skipping the power shut-off step, for example, can instantly ruin your appliance. Take your time and proceed methodically.
- Turn off the power or gas. This is the most critical step. For an electric water heater, go to your main electrical panel and flip the dedicated 240-volt breaker to the "Off" position. For a gas water heater, locate the thermostat dial near the bottom of the tank and turn it to the "Pilot" setting. Never drain a tank while the heat source is active.
- Shut off the cold water supply. Look for the cold water pipe entering the top of the water heater. There should be a shut-off valve (either a lever-style ball valve or a circular gate valve). Turn it completely off so no new water enters the tank.
- Open a hot water faucet inside the house. Go to a sink on the highest floor of your home (or the one furthest from the heater) and turn on the hot water. Leave it running. This breaks the vacuum inside the plumbing system, allowing water to drain out of the bottom of the tank smoothly, much like taking your finger off the top of a drinking straw.
- Attach the garden hose. Thread your garden hose tightly onto the drain valve located at the bottom of the water heater tank. Route the other end of the hose to a floor drain, a utility sink, or out the garage door to the driveway. Ensure the discharge location can handle hot, rusty water without causing damage.
- Open the drain valve. If your valve has a handle, turn it. If it has a slotted stem, use your flathead screwdriver to open it. Water will begin flowing out of the hose. Let the entire tank drain completely. This can take anywhere from 10 to 30 minutes.
Flushing Out the Stubborn Sediment
Simply draining the tank isn't always enough to remove the heavy, compacted sediment at the very bottom. Once the tank is empty and water has stopped flowing from the hose, you need to agitate the remaining debris.
Leave the drain valve open and the hose connected. Reach up to the cold water supply valve at the top of the tank and turn it on forcefully for about 10 seconds, then shut it off again. This blasts cold water into the bottom of the tank, stirring up the settled calcium and rust. Wait for this water to drain out of the hose. Repeat this blast-and-drain process three or four times.
To check your progress, hold your bucket under the end of the garden hose during one of these flush cycles. Let the bucket fill up slightly and inspect the water. If it looks cloudy or contains small, sand-like particles, keep flushing. Once the water runs perfectly clear into the bucket, the inside of your tank is clean.
Restarting Your System Safely
Putting everything back together requires the exact reverse of your teardown process. First, close the drain valve at the bottom of the tank tightly. Disconnect your garden hose and set it aside. Next, turn the cold water supply valve at the top of the tank back to the fully open position.
Because you left a hot water faucet open inside the house, air will now be pushed out of the lines as the tank fills with cold water. Go stand by that open sink. For a few minutes, the faucet will spit, sputter, and hiss as trapped air escapes. Once a steady, solid stream of water is flowing from the faucet, you know the tank is 100 percent full. Turn off the sink faucet.
Only now is it safe to restore the heat. Go back to your electrical panel and flip the breaker back on, or turn your gas thermostat dial back from "Pilot" to your desired temperature setting (usually around 120 degrees Fahrenheit for optimal safety and efficiency). You should have a full tank of hot water ready to go in about an hour.
What to Do If the Drain Valve is Clogged or Leaking
Sometimes things don't go perfectly according to plan. If you open the drain valve and nothing comes out, you likely have a massive blockage of sediment right at the exit point. You can attempt to clear this by attaching your hose, opening the valve, and stepping firmly on the hose a few feet away to create a sudden back-pressure pulse. Alternatively, a stiff piece of solid copper wire can be carefully poked into the valve opening to break up the clog.
Many builder-grade water heaters come with cheap plastic drain valves. Over time, these plastic valves become brittle, and they are notorious for dripping after you open them for a flush. If your valve won't stop dripping, you can temporarily cap it with a standard 3/4-inch brass hose cap (available for about $3 at any hardware store). For a permanent fix, consider draining the tank and replacing the plastic valve entirely with a heavy-duty, 3/4-inch brass ball valve. A brass valve costs around $15 to $20 and provides a massive, unrestricted opening that makes future flushing incredibly fast and clog-free.
Taking an hour out of your weekend to flush your water heater might not be the most glamorous home improvement project, but it is undoubtedly one of the smartest. By clearing out that efficiency-killing sediment, you are ensuring your appliance runs quietly, heats quickly, and stays out of the landfill for years to come. Plus, you will never have to worry about running out of hot water halfway through a Tuesday morning shower again.