Dryer Taking Two Cycles? Fix a Crushed Dryer Vent Hose
If your dryer takes two or three cycles to dry a single load of towels, a crushed dryer vent hose might be the culprit. Learn how to diagnose and fix this hidden airflow issue.
It is incredibly frustrating when you pull a load of heavy towels from the dryer after a full 60-minute cycle, only to find them damp and musty. Many homeowners immediately assume the heating element is broken or begin aggressively scrubbing the lint screen. While those are logical troubleshooting steps, they often overlook a much simpler, incredibly common culprit: a crushed dryer vent hose hidden right behind the machine.
When a dryer is shoved tightly against the wall to maximize laundry room floor space, that flimsy transition duct collapses. This completely chokes off the airflow required to dry your clothes, forcing your machine to work twice as hard for half the result.
Why is my dryer taking multiple cycles to dry?
A dryer operates on a very simple physical principle: it heats air, tumbles your clothes through that hot air to extract moisture, and then exhausts that moisture-laden air outside your home. If the exhaust path is blocked, the moist air has nowhere to go. It stays trapped inside the drum. You end up running the machine for two or three hours, wasting electricity and putting unnecessary wear and tear on the appliance motor, rollers, and belts.
In my experience, a restricted transition vent is the number one cause of long dry times. When I helped my neighbor fix his setup last month, he had already spent $40 on a new heating element and wasted a Saturday taking the machine apart, only to find out the real issue was a $15 piece of squished foil behind the machine. Restoring the airflow cut his drying time from 110 minutes down to 45 minutes.
Beyond the annoyance of damp clothes, a restricted vent is a serious safety hazard. The National Fire Protection Association (NFPA) reports that thousands of home fires are caused by washing machines and dryers each year, with a leading cause being a failure to clean and maintain the venting system. When airflow slows down, lint builds up rapidly inside the crushed folds of the duct. Add the intense heat of a struggling dryer, and you have a perfect recipe for a lint fire.
Diagnosing a Crushed Dryer Vent Hose
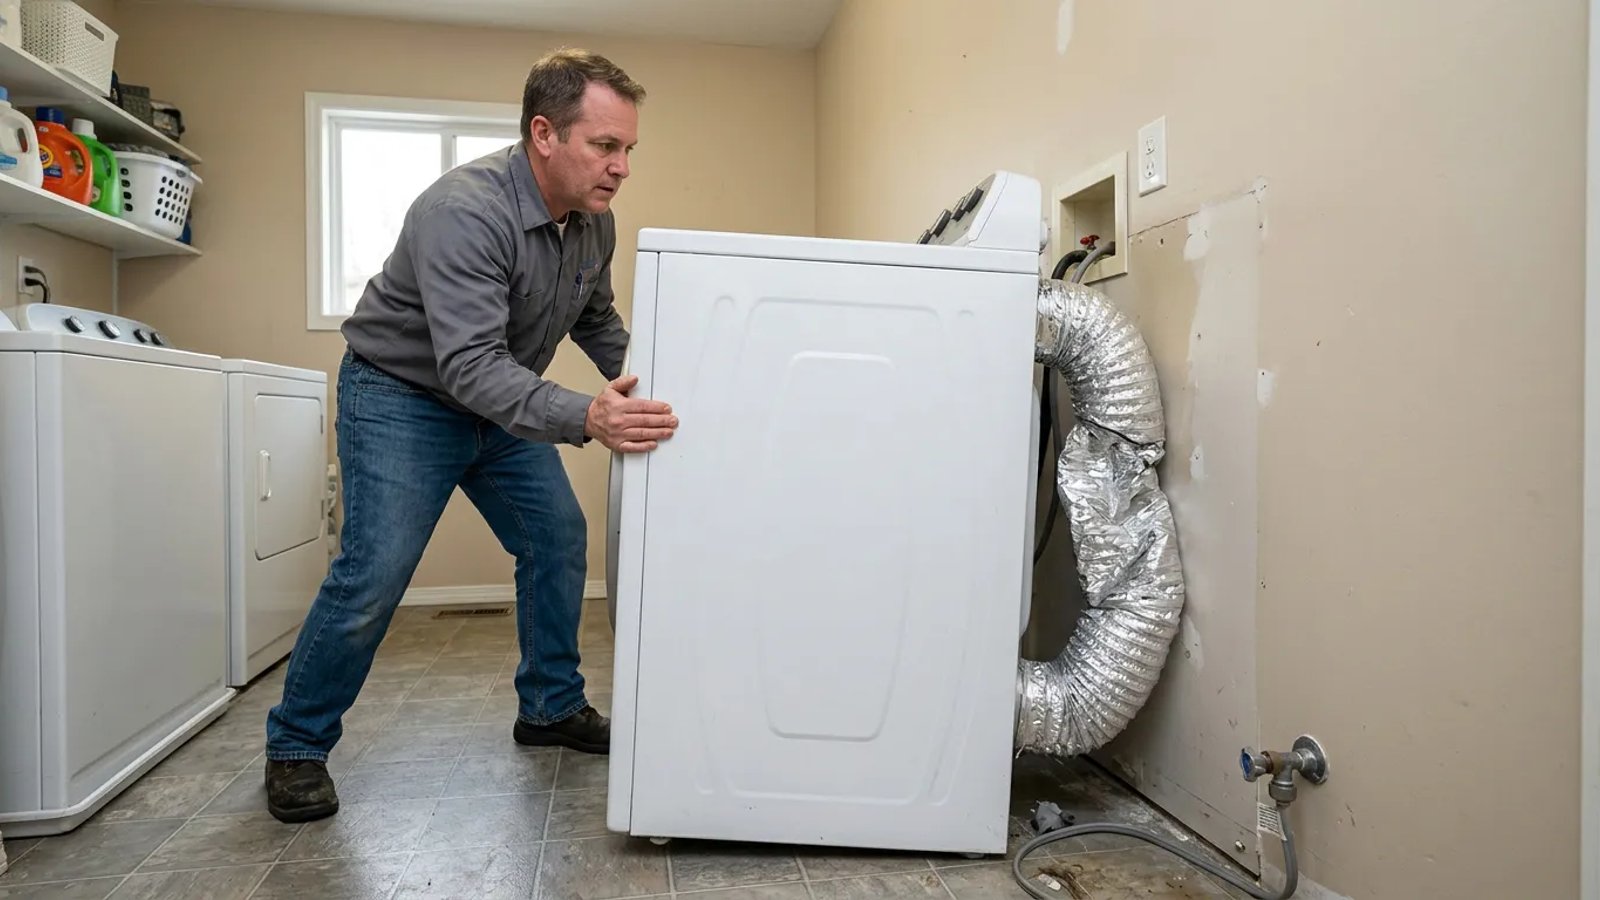
Before you buy any replacement parts, you need to confirm that the transition duct—the short hose connecting the back of your dryer to the wall vent—is actually the problem. This takes about five minutes and requires no special tools. You just need enough physical leverage to move the appliance.
- Unplug the dryer. Always disconnect the power cord from the wall outlet before moving the machine to prevent accidental shocks or cord damage.
- Pull the machine forward slowly. Shimmy the dryer out about 12 to 18 inches, being careful not to yank it.
- Inspect the duct material. Look behind the machine with a flashlight. If the hose is flattened like a pancake against the wall, you have found your problem.
- Check for hard 90-degree kinks. Even if the hose isn't totally flattened, a sharp bend that folds in on itself reduces airflow by more than half.
- Look for tears and holes. Crushed foil often tears along the ridges, venting hot, humid air directly into your laundry room and promoting mold growth.
The Best Replacements for Flimsy Foil Ducts
If you pull your dryer out and find a plastic or thin foil accordion-style hose, throw it away. These materials are outdated, highly prone to crushing, and often violate modern local building codes because they trap so much lint. You have three much better options for a replacement, depending on your laundry room layout.
Semi-rigid aluminum ducting is the most common and practical choice for most homes. It bends just enough to allow you to connect it while the dryer is pulled out, but holds its shape well enough to resist minor crushing when you push the machine back into place. It has a smoother interior than foil, which helps prevent lint accumulation.
Rigid metal ducting is the safest and most efficient option because the completely smooth interior catches zero lint. However, it requires precise measuring and metal elbow joints since the pipe does not bend at all. It is best used for straight runs.
If you are dealing with a microscopic laundry closet where the dryer absolutely must sit flush against the wall, a periscope vent (also called a space-saver duct) is your best bet. This is a flat, rectangular metal box that telescopes to fit the exact vertical or horizontal distance between the dryer exhaust and the wall connection. It maintains full airflow volume while only requiring about 2 inches of clearance.
How to Replace Your Damaged Dryer Duct
Once you have your new semi-rigid aluminum duct or periscope vent, installation is a straightforward process. You will need a pair of 4-inch metal hose clamps, a 5/16-inch nut driver (or a flathead screwdriver), heavy-duty wire cutters if you need to trim the duct, and metal foil tape rated for high heat (look for UL 181B-FX on the label).
- Remove the old crushed hose. Loosen the existing hose clamps or peel away the old tape holding the damaged duct to the dryer and the wall.
- Clean the connection points. Wipe away any lint clinging to the dryer's exhaust port and reach into the wall pipe to pull out any blockages.
- Measure and cut the new duct. Stretch the semi-rigid duct just enough to reach from the dryer to the wall, plus about 6 inches of slack. Cut off any excess length to keep the run as short and straight as possible.
- Attach the duct to the wall vent. Slide a hose clamp over one end of the duct, slip the duct over the wall exhaust pipe, and tighten the clamp securely with your nut driver.
- Connect to the dryer exhaust. Slide the second clamp over the other end of the duct, attach it to the back of the dryer, and tighten it down.
- Seal with foil tape. For extra security and to prevent minor air leaks, wrap a layer of UL-listed foil tape around the joints over the clamps.
The Golden Rule of Dryer Clearance
The most important step happens right at the end: pushing the dryer back into place. If you push it back aggressively until it hits the wall, you will immediately crush your brand-new semi-rigid vent hose, putting you right back where you started an hour ago.
Pushing your dryer flush against the wall might save floor space, but it chokes your appliance and spikes your energy bill.
You must leave adequate space for the duct to curve gently without kinking. For a standard semi-rigid installation, you need a minimum of 4 to 6 inches of clearance between the back of the dryer cabinet and the drywall. I usually recommend placing a 4x4 block of wood on the floor behind the dryer. This acts as a physical bumper, stopping the machine before it can crush the vent, which is especially helpful if your machine tends to vibrate and walk backward during heavy spin cycles.
Taking 15 minutes to inspect the space behind your dryer and upgrading a crushed dryer vent hose is one of the highest-return maintenance tasks you can perform. You will immediately notice shorter drying times, lower electricity bills, and the peace of knowing you have eliminated a major fire hazard from your laundry room.
- Check the space behind your dryer before buying expensive replacement heating elements.
- Never use plastic or thin foil accordion hoses; they are fire hazards and easily crushed.
- Secure new ducts with mechanical hose clamps and high-heat foil tape (UL 181B-FX), never standard duct tape.
- Clean the wall exhaust pipe while you have the dryer pulled out to maximize your efficiency gains.