How to Find Where Mice Are Getting In (And Stop Them)

Hearing scratching in the cabinets? Learn how to find where mice are getting in and permanently seal your kitchen's hidden entry points using simple, chemical-free methods.
Few things make your stomach drop quite like opening a pantry door to find tiny, dark droppings scattered across the shelves, or lying in bed at night and hearing the distinct sound of scratching behind the kitchen cabinets. When the weather shifts in mid-spring, mice often seek out easy, reliable food sources as they enter their breeding season. Your kitchen, with its warmth, crumbs, and water lines, is prime real estate.
Most homeowners immediately reach for traps or bait stations. While traps are necessary to remove the rodents already living in your home, they are only a temporary band-aid. If you don't find where mice are getting in and physically block their access, new mice will simply replace the old ones. True pest control relies on a concept called "exclusion"—the process of finding and permanently sealing the hidden entry points in your home's perimeter and interior walls.
You don't need toxic chemicals or expensive pest control contracts to secure your kitchen. With a flashlight, a few inexpensive materials from the hardware store, and a free Saturday, you can rodent-proof your space for good. Here is exactly how to inspect your kitchen, seal the breaches, and safely clean up the mess left behind.
The Golden Rule: The Pencil Test
Before you start pulling out appliances, you need to understand exactly what you are looking for. Homeowners frequently overlook active entry points because they assume the hole is simply too small for a mouse to fit through. This is a critical mistake.
Mice have incredibly flexible, partially collapsible rib cages. If a mouse can fit its skull through a gap, the rest of its body can stretch and flatten to follow right behind. As a general rule of thumb, an adult house mouse can squeeze through a hole that is just 1/4-inch in diameter.
If you can slide a standard yellow #2 pencil into a gap, a mouse can use it as a front door to your kitchen.
When you are inspecting your kitchen, carry a standard wooden pencil with you. Anytime you spot a crack between the baseboard and the floor, a gap around a plumbing pipe, or a void in the cabinetry, poke the pencil into it. If the pencil goes in easily, that gap needs to be sealed. Don't trust your eyes alone; shadows under cabinets can easily disguise a 1/4-inch gap as a harmless shadow.
Inspecting the Big Three Kitchen Vulnerabilities
Mice rarely chew entirely new holes through the middle of a wall. They are opportunistic travelers that follow existing utility lines. Plumbers and electricians often cut holes in the drywall or subfloor that are significantly larger than the pipes or wires passing through them. These oversized utility cutouts are the primary highways mice use to travel from your crawlspace or basement straight into your kitchen cabinetry.
To find where mice are getting in, you must thoroughly inspect what professionals consider the "big three" kitchen vulnerabilities.
1. Under the Kitchen Sink
Open your sink cabinet and clear out all the cleaning supplies so you have an unobstructed view of the back wall and the floor of the cabinet. Grab a bright flashlight. You are looking for the exact points where the hot and cold water supply lines come through the wall or floor, as well as where the thicker PVC drain pipe exits.
Often, you will find escutcheon plates (the metal rings around the pipes) covering these holes. Give these plates a gentle tap. If they are loose and slide away from the wall, check behind them. You will almost always find a jagged hole cut into the drywall that is much larger than the pipe itself. Mice climb up the outside of the pipe inside the wall cavity and slip right through that gap.
2. Behind the Dishwasher
The dishwasher is a notorious mouse haven. It provides heat, condensation for drinking water, and food debris, all hidden behind a protective kickplate. Worse, the water supply, drain line, and electrical cable for the dishwasher usually run through a large, unsealed hole drilled into the side of the adjacent sink cabinet.
Remove the lower kickplate of your dishwasher (usually held on by two Phillips-head screws). Shine your flashlight underneath. Look for droppings, nesting materials (like shredded paper or insulation), and check the hole where the hoses pass into the sink cabinet. If you see signs of activity, the mice are likely coming up from the floor directly behind the dishwasher.
3. The Stove Gas Line and 220V Cable
Pulling your stove out from the wall is a chore, but it is absolutely essential. Behind the stove, you will find either a thick 220V electrical cable or a gas line emerging from the floor or wall. Just like under the sink, the cutouts for these utilities are rarely sealed by builders.
Because the stove is rarely moved, mice feel incredibly secure running along the wall behind it. When I pulled my own stove out a few years ago, I found a hole around the gas pipe large enough to fit a golf ball, surrounded by a mountain of droppings. It was the main artery for every mouse in the neighborhood.
The Ultimate Barrier: Steel Wool and Silicone
Once you have identified the gaps using the pencil test, you need to seal them. Many homeowners make the mistake of using canned spray foam insulation. While spray foam is great for stopping drafts, it is completely useless against rodents. Mice have constantly growing incisors and can chew through cured spray foam in a matter of minutes, often using the chewed bits as nesting material.
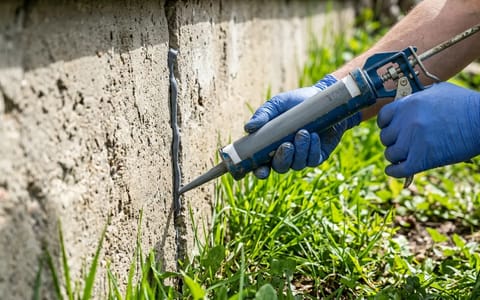
The most effective, affordable, and permanent way to seal mouse entry points is a combination of coarse steel wool and 100% silicone caulk.
Mice absolutely hate chewing on steel wool. The sharp metal fibers poke their gums and lips, deterring them instantly. However, steel wool alone isn't enough; over time, mice can pull loose steel wool out of a hole with their claws. By embedding the steel wool in pure silicone caulk, you create an impenetrable, hardened barrier that cannot be chewed or pulled away.
You will also need a standard caulking gun and a tube of clear 100% silicone caulk. Avoid latex or acrylic caulks, as they can crack over time and don't provide the same waterproof, rubbery hold as pure silicone.
Step-by-Step: How to Seal the Gaps
Armed with your steel wool and silicone, you are ready to close the highways. Dedicate 60 to 90 minutes to tackle all the holes you found during your inspection.
- Cut the steel wool to size. Using heavy-duty scissors or tin snips, cut a piece of coarse steel wool that is slightly larger than the gap you are trying to fill. Wear thick leather work gloves while doing this to avoid cutting your fingers on the metal fibers.
- Pack the gap tightly. Push the steel wool into the hole around the pipe or wire. Use a flathead screwdriver or a wooden shim to ram the wool deep into the gap. You want it packed as densely as possible so there is no give.
- Seal with silicone. Load your silicone tube into the caulking gun and cut the tip at a 45-degree angle. Pump a generous amount of silicone over the exposed steel wool, ensuring it bonds to both the wall/floor and the pipe. Smooth it out with a gloved finger or a caulking tool.
- Check your baseboards. Don't just focus on the pipes. Walk the perimeter of your kitchen cabinets and baseboards. If there is a gap between the floor and the bottom of the cabinets, run a solid bead of clear silicone along the entire length to prevent mice from slipping underneath.
Safe Cleaning Protocols for Existing Droppings
Once the entry points are sealed, you must clean up the mess. This is where many homeowners unknowingly put their health at risk. Mouse droppings, urine, and nesting materials can carry dangerous pathogens, most notably Hantavirus, which causes a severe respiratory disease.
The most important rule of cleaning up after rodents: Never sweep or vacuum dry droppings.
Sweeping with a broom or using a standard household vacuum cleaner kicks up microscopic dust particles contaminated with dried urine and feces, allowing you to easily inhale the virus. Instead, you must use wet-cleaning protocols.
First, open the windows in the kitchen to ensure good ventilation. Put on a pair of disposable nitrile gloves and a well-fitting N95 respirator mask. Do not skip the mask.
Mix a commercial disinfectant or a bleach solution (1 part household bleach to 10 parts water) in a spray bottle. Thoroughly soak the droppings, nesting materials, and the surrounding floor area with the spray. Let the liquid sit for a full 5 minutes. This contact time is crucial; it gives the bleach time to penetrate the organic matter and kill any active viruses.
After 5 minutes, use paper towels to wipe up the wet droppings and debris. Place the soiled paper towels immediately into a plastic garbage bag. Once the visible debris is gone, spray the area one more time and wipe it down clean. Tie the garbage bag shut and take it to your outdoor trash can immediately. Finally, wash your gloved hands with soap and water before carefully peeling the gloves off and throwing them away.
Taking the time to pull out your appliances and crawl under your sink isn't glamorous work, but it is the only way to genuinely solve a mouse problem. By finding where mice are getting in and fortifying those exact spots with steel wool and silicone, you are taking away their access to food and shelter. Keep an eye out for any new signs of activity over the next few weeks, and enjoy the peace of mind that comes with a truly secure kitchen.