Got a Driveway Pothole? How to Patch Asphalt Before Winter
Don't let a small driveway dip turn into an expensive crater this winter. Learn how to properly prep, fill, and tamp cold patch asphalt for a permanent repair.
Late summer is the perfect time to walk your property and look for small signs of wear and tear, especially if you need to repair an asphalt driveway pothole. One of the most common issues homeowners spot is a shallow depression or a small missing chunk of asphalt in the driveway. It looks harmless enough. You might step over it for months without giving it a second thought. But right now is the time to do it.
To effectively repair asphalt driveway pothole, understanding the freeze-thaw cycle is crucial. When autumn rain pools inside these minor depressions and freezes overnight, the expanding ice shatters the surrounding asphalt. By spring, that minor divot will have turned into a massive, expensive crater. Tackling this job before the harsh cold weather hits saves you hundreds of dollars and protects the structural integrity of your entire driveway.
Why Do Winter Freezes Destroy Unpatched Asphalt?
Asphalt is a durable material, but it has a fatal weakness: water. When water seeps into a small hole or crack, it eventually reaches the porous aggregate base layer beneath the pavement. Once winter arrives, that trapped water freezes. Because water expands by about nine percent when it turns to ice, it pushes upward and outward with incredible force.
This freeze-thaw cycle happens dozens of times over a single winter. The ice lifts the asphalt, the ice melts, the unsupported asphalt collapses under the weight of your vehicle, and the hole grows larger.
Last fall, I noticed a shallow, saucer-sized depression near the end of my driveway. I ignored it, figuring I would deal with it the following summer. By March, I was staring down a three-inch-deep crater that had spider-webbed across the pavement. Fixing it early would have taken twenty minutes and a single bag of material. Instead, I spent the better part of a Saturday cutting out a massive section of ruined pavement.
Liquid Crack Filler vs. Cold Patch Asphalt
Before you head to the hardware store, you need to know exactly what material to buy. The aisles are full of buckets, jugs, and heavy bags, and buying the wrong product guarantees your repair will fail within weeks.
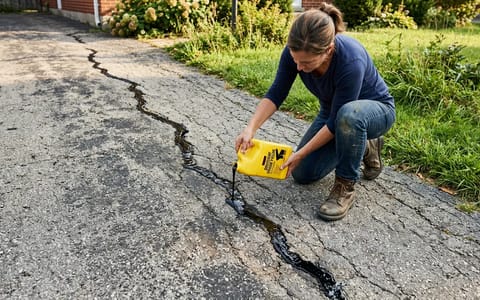
Liquid crack filler is sold in pourable jugs. It is designed exclusively for narrow cracks—typically those under half an inch wide. It contains no structural aggregate. If you pour liquid filler into a wide hole, it will never cure properly. It will remain a sticky, messy puddle that eventually tracks hot tar onto your car tires and into your garage.
For any damage wider than half an inch or deeper than an inch, you need cold patch asphalt. This material comes in 50-pound bags and costs around $15 to $20 at stores like Home Depot or Lowe's. It is a mixture of small gravel and a specialized asphalt binder designed to remain pliable in the bag but harden once compacted.
Prepping the Hole for Maximum Adhesion to Repair Asphalt Driveway Pothole
The biggest mistake DIYers make is dumping cold patch directly into a dirty, crumbling hole. If you do this, the new patch will stick to the loose dirt and debris instead of the solid driveway, and the first snowplow that catches the edge will rip the entire patch out.
Start by cleaning the hole completely. Use a stiff wire brush to aggressively scrub the interior. Remove all loose gravel, chunks of old asphalt, dirt, and weeds. Use a shop vacuum or a leaf blower to blast away the fine dust.
Next, you need to square the edges. Most natural potholes are shaped like a shallow bowl, with sloped sides. Cold patch asphalt does not adhere well to sloped edges because the material thins out too much at the perimeter, causing it to flake away under pressure.
Take a heavy hammer and a metal cold chisel. Drive the chisel into the crumbling gray edges of the hole to break them away until you reach solid, black asphalt. Your goal is to create vertical walls—like a steep cliff rather than a gentle beach. This vertical edge gives the new asphalt a thick, solid boundary to pack against.
The Fill: Pouring and Spreading
Cold patch asphalt is heavy and sticky. Wear old clothes, heavy work gloves, and boots you don't mind getting dirty. Before you open the bag, drop it onto the driveway a few times to loosen the material inside, especially if the bag has been sitting on a store pallet for months.
Always check your specific manufacturer instruction page for exact temperature requirements, but generally, cold patch works best when the outside temperature is above 50°F. If the material is too cold, it becomes a stiff, unworkable block.
- Pour the asphalt into the hole. Overfill the hole slightly so the loose material sits about half an inch higher than the surrounding driveway surface.
- Spread the material evenly. Use a heavy garden trowel or a metal rake to push the asphalt into the corners and against the vertical edges you chiseled earlier.
- Work in layers for deep holes. If your hole requires more than two inches of cold patch, apply it in two-inch increments. Pour two inches, tamp it completely solid, then pour the next layer.
The secret to a permanent driveway repair isn't in the pouring; it's entirely in the tamping.
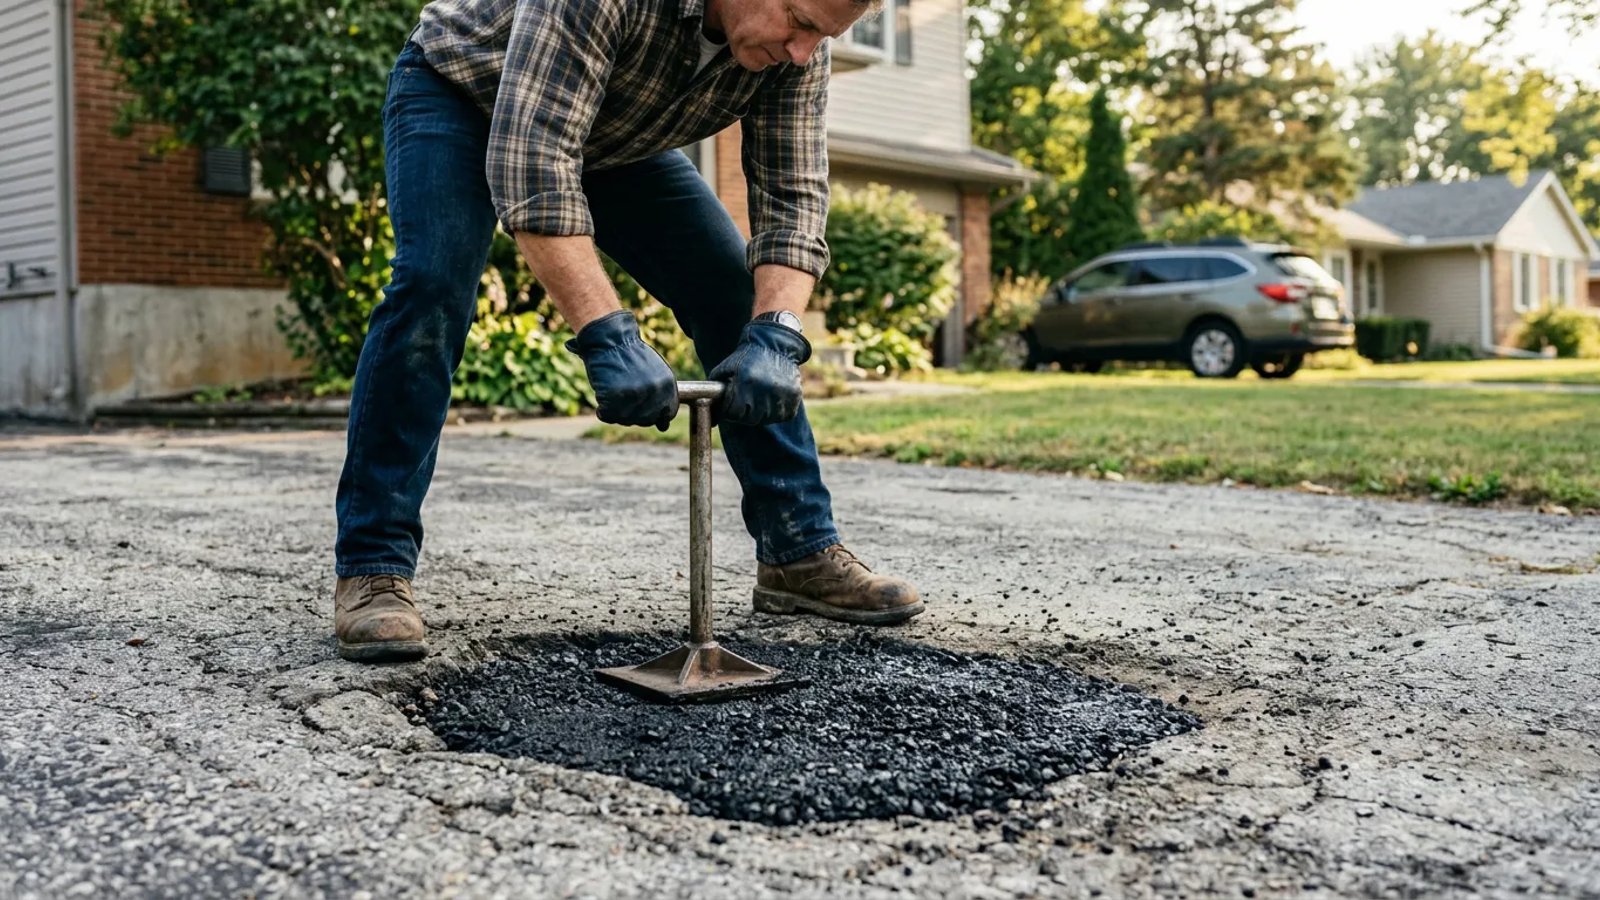
The Tamp: How to Make the Patch Permanent
Cold patch asphalt cures through compaction. The pressure forces the aggregate tightly together and squeezes the binder into the pores of the existing driveway. If you just pat it down with the back of a shovel, the patch will remain loose and wash away in the next heavy rain.
You need serious weight. The best tool for the job is an 8x8 inch steel hand tamper, which weighs about 10 pounds and costs around $35. Strike the patch repeatedly and violently. Start around the outside edges, packing the material tightly against the vertical walls, and work your way toward the center. The patch should eventually sit perfectly flush with the surrounding driveway.
If you don't own a hand tamper, you can use your vehicle. Place a piece of scrap plywood over the overfilled patch. Carefully drive your car's front tire onto the plywood, let it sit for a moment to compress the material, and back off. Repeat this two or three times. The plywood prevents the sticky asphalt from adhering to your tire treads while distributing the vehicle's weight evenly across the repair.
Curing Time and Final Finish
Once the patch is flush and tightly compacted, sprinkle a handful of play sand or fine dirt over the top and sweep it around. This coats the sticky surface binders and prevents the fresh asphalt from sticking to your shoes or tires.
While many cold patch products claim you can drive on them immediately, it is always safer to wait 24 to 48 hours before parking a heavy vehicle directly on the fresh repair. The material needs time to set up and harden.
Do not apply driveway sealer over the new patch right away. The solvents inside the cold patch need time to evaporate. If you seal it too early, you trap those solvents, and the patch will remain soft indefinitely. Wait at least 30 to 60 days before applying any liquid sealer to the driveway.
Taking an hour this weekend to chisel, fill, and tamp those small driveway voids will protect your pavement from the brutal winter freeze. A few bags of asphalt and a heavy tamper are all it takes to keep your driveway smooth, safe, and structurally sound for years to come.
- Clean the pothole completely, removing all loose gravel, dirt, and weeds before patching.
- Square off the edges of the pothole with a hammer and cold chisel to give the new asphalt a solid vertical wall to grip.
- Fill deep holes with crushed gravel up to the final two inches to save money on cold patch material.
- Tamp the cold patch violently. If you don't own a heavy hand tamper, place a piece of plywood over the patch and drive over it with your car.
- Allow the patch to cure for at least 30 days before applying any liquid driveway sealer over the top.