How to Winterize a Swamp Cooler Before the First Freeze
Protect your home from burst pipes and winter drafts. Learn how to winterize your evaporative swamp cooler step-by-step before the first freeze hits.
Full guide HVAC & Climate Control How your home heats, cools, and moves air, and the decisions that matter.As late summer shifts into fall, the mornings start getting crisp. If you live in a dry climate, your evaporative cooler has likely been working hard all season to keep your house comfortable. But leaving it active too long into the autumn months is a gamble. Knowing exactly how to winterize a swamp cooler before that first hard freeze hits will save you from a major plumbing headache and a rusted-out unit next spring.
Winterizing is a straightforward weekend job that requires basic hand tools and about an hour of your time. Handling this preventative maintenance yourself keeps your home sealed against winter drafts and extends the lifespan of your cooling equipment.
What Happens If You Skip Winterizing?
Evaporative coolers rely on a constant supply of water. That water travels through a small, exposed 1/4-inch line—usually copper or plastic—running along your roof or exterior wall. When temperatures drop below 32°F (0°C), any water left in that line, the pump, or the bottom pan will freeze and expand.
A few years back, I waited until late November to drain the copper supply line on my roof unit. A sudden overnight freeze split the tubing right at the shutoff valve. The repair cost me $150 and a Saturday afternoon, completely avoidable if I had just shut it down in October. Beyond burst pipes, leaving standing water in the pan causes the metal housing to rust. Additionally, an uncovered unit acts as a giant open window on your roof, funneling freezing air straight into your living room.
The cooler's pump, often submerged in the pan, is also highly susceptible to freezing damage. Ice expansion can crack the pump housing or damage its internal components, leading to an expensive replacement. Even if the pump survives, stagnant water left in the system can encourage the growth of mold and mildew, which can become an air quality issue when the unit is reactivated in spring.
Beyond the obvious water damage, prolonged exposure to freezing temperatures and moisture can also degrade electrical connections and motor windings, potentially leading to shorts or complete motor failure. This can be a costly and time-consuming repair, often requiring a professional HVAC technician.
Tools and Materials You Need
Before climbing up to the unit, gather your supplies in a bucket. You will need about seven common items:
- Adjustable wrench and pliers
- Shop vacuum (optional, but helpful for tight corners)
- 50/50 mix of white vinegar and water in a spray bottle
- Stiff-bristled wire brush or putty knife
- Heavy-duty canvas or vinyl cooler cover
- Tie-down ropes or bungee cords
Having the right tools on hand streamlines the process and ensures you can tackle each step efficiently. A sturdy ladder, appropriate for roof access, is also crucial for safety. Always ensure your ladder is stable and extends at least three feet above the edge of the roof for secure climbing and descending.
How to Winterize a Swamp Cooler
Follow these steps to safely shut down and secure your evaporative cooler system for the winter months.
- Shut off the power. Unplug the unit if it has a standard plug, or flip the dedicated breaker in your electrical panel so the pump cannot accidentally turn on. This critical safety step prevents accidental startup during maintenance and protects you from electrical hazards.
- Turn off the water supply. Locate the shutoff valve for the cooler's water line. This is usually found inside the house near the water heater, under a sink, or in the crawlspace. Turn it completely clockwise. Confirm the water flow has stopped by briefly checking the line at the unit before proceeding.
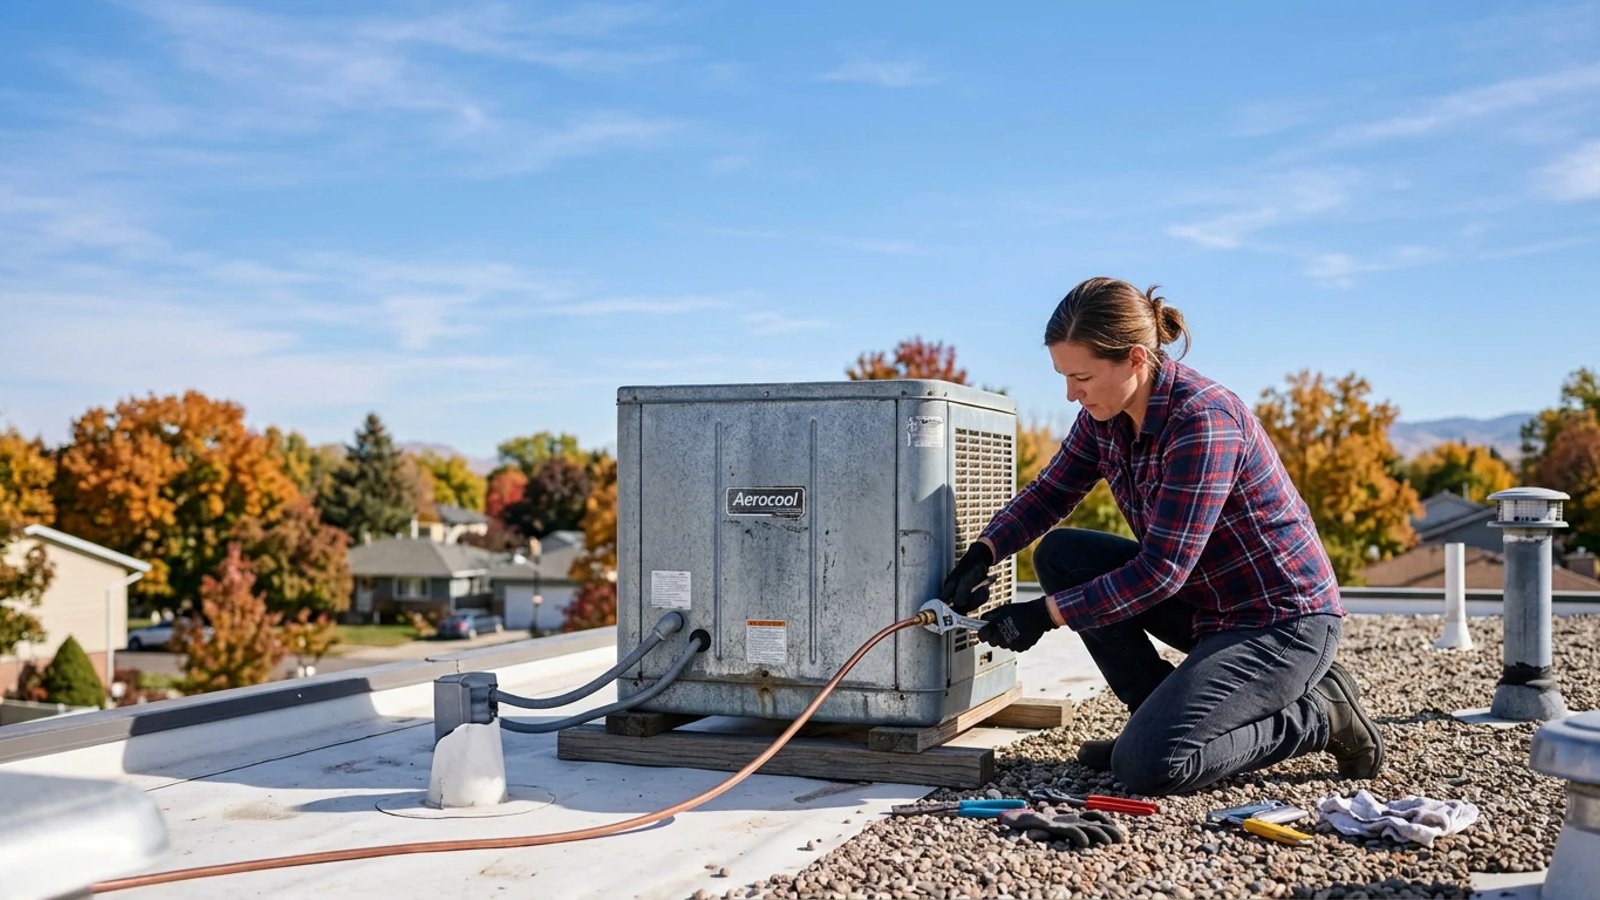
- Disconnect the water line. Use your adjustable wrench to unscrew the 1/4-inch line at the cooler, and then disconnect it at the shutoff valve. Blow gently through one end to force any remaining water out, then coil the line and store it indoors. This prevents any residual water from freezing and damaging the delicate copper or plastic tubing.
- Drain the cooler pan. Remove a side panel to access the interior. Locate the overflow drain tube standing up in the bottom pan. Grip it with pliers and unthread it counter-clockwise to let the water drain out onto the roof. Ensure the pan is completely empty to prevent ice formation and subsequent rust.
Inspect for Wear and Tear
With the unit open and drained, take a moment to visually inspect the internal components. Look for any signs of corrosion on the metal parts, especially around the pump and motor housing. Check the condition of the electrical wiring for fraying or exposed copper. While you’re not performing repairs now, noting these issues can help you plan for spring maintenance or decide if a professional inspection is needed.
Also, check the integrity of the fan belt. If it appears cracked, worn, or overly loose, it might be a good idea to replace it before next season. Addressing these small issues preemptively can save you from bigger headaches and unexpected breakdowns during the next cooling season.
Evaporative Cooler Cleaning and Rust Prevention
Once the water is drained, you need to deal with the mineral scale. Hard water leaves behind thick, crusty calcium deposits. If left over the winter, this scale traps moisture against the metal housing, which guarantees rust.
Spray the bottom pan and the pump housing generously with your 50/50 vinegar solution. Let it sit for 15 minutes to break down the calcium. Use a stiff wire brush or a plastic putty knife to scrape away the buildup. If you have a shop vacuum, suck up the loose debris and remaining puddles of water. Wipe the pan completely dry with old rags.
A thoroughly dry pan is your best defense against rust, which is the leading cause of premature cooler replacement. Consider applying a thin layer of rust-inhibiting paint or sealant to any areas showing minor surface rust, after they are completely dry, to further protect the metal.
The cleaner and drier you leave the metal pan in October, the longer your cooler will survive without rusting out.
Next, pull out the old cooling pads and throw them in the trash. Old pads are full of dirt, minerals, and mold spores. Storing the unit with damp pads inside creates a humid microclimate that rots the metal. Leave the pad frames empty until spring.
Sealing the Unit Against Winter Weather
With the inside clean and dry, replace the side panels. It is time to wrap the unit. Slip a heavy-duty canvas or vinyl cover over the entire cooler. Do not use a cheap plastic tarp; in my experience, the winter wind will shred it within a month. Tie the cover down tightly using the attached grommets and heavy rope or bungee cords.
Ensure the cover fits snugly and is secured tightly against strong winds. High winds can easily rip loose covers, exposing the unit to snow and ice. Double-check all ties and bungee cords, ensuring they are taut and won't loosen over the winter. A well-secured cover also deters pests from nesting inside the unit during its dormant period.
Finally, head back inside your house to block the indoor vent. According to the Department of Energy, evaporative coolers can be a major source of heat loss in the winter. You can buy magnetic vent covers that slap right over the metal grille, or slide a piece of rigid foam board into the duct opening. This simple step stops cold downdrafts and keeps your heating bills low.
Long-Term Benefits of Proper Winterization
Beyond preventing immediate damage, proper winterization significantly extends the overall lifespan of your evaporative cooler. By protecting it from the harsh elements and preventing rust and component degradation, you're investing in years of reliable service. This annual ritual not only saves on costly repairs but also ensures the unit operates more efficiently when it's back in action, potentially lowering your energy bills.
Moreover, a well-maintained and winterized cooler is less likely to develop mold or mildew issues, contributing to better indoor air quality when summer returns. Think of it as putting your cooler into hibernation, ensuring it wakes up refreshed and ready to perform at its best.
Taking an hour to properly drain, clean, and cover your system guarantees it will survive the freezing temperatures undamaged. When the weather warms up again, all you will need to do is drop in fresh pads, reconnect the line, and enjoy the cool air.
- Disconnecting the water line at both ends is the only foolproof way to prevent burst pipes during a freeze.
- Leaving old, damp pads in the cooler over winter promotes rust and mold growth.
- Blocking the indoor vent saves significant money on winter heating bills by stopping cold air downdrafts.