Hot Water Runs Out Fast? Check the Dip Tube First
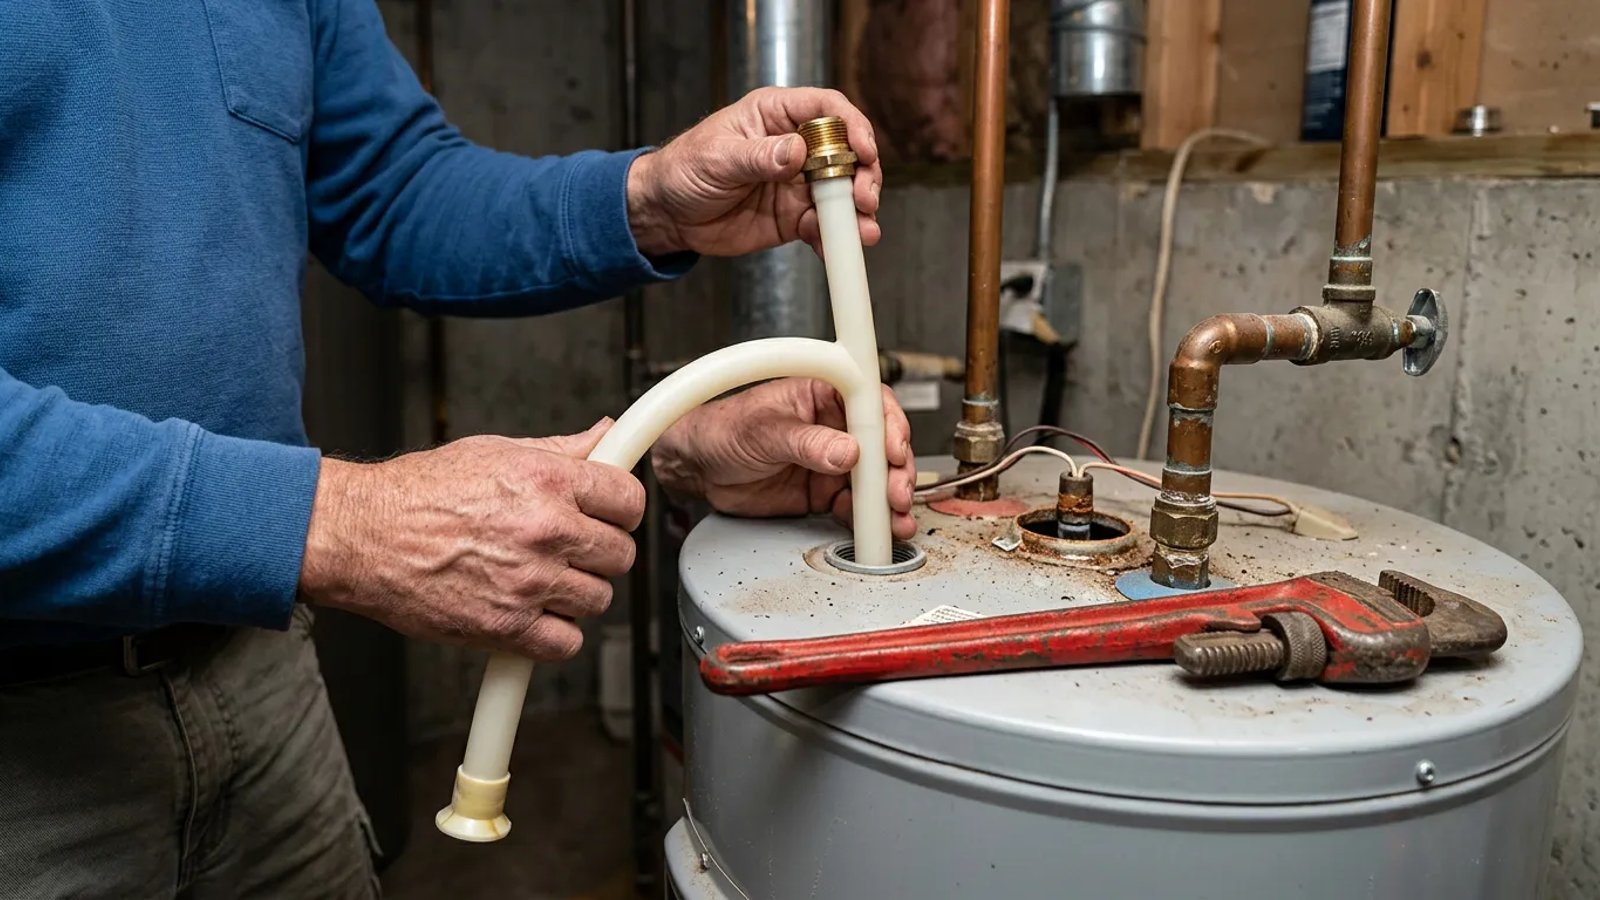
If your water heater suddenly only gives you a 5-minute shower, don't rush to replace the entire tank. The culprit is likely a broken $15 plastic dip tube.
Full guide Plumbing Learn how your home plumbing works and how to stop leaks before they ruin your house.Stepping into a warm shower only to have it turn ice-cold five minutes later is one of the most frustrating experiences a homeowner can face. If your hot water runs out fast, it is easy to assume the worst. Many people immediately start pricing out a brand-new water heater, assuming the tank has failed or the internal components are completely shot. But before you spend hundreds or thousands of dollars on a replacement, you need to check one specific, inexpensive part: the dip tube.
A standard 40-gallon or 50-gallon water heater holds more than enough hot water for multiple consecutive showers. When that capacity suddenly drops to just a few minutes, and you have already ruled out heavy sediment buildup at the bottom of the tank, a broken dip tube is the most frequent offender. Fixing it is a manageable afternoon project that requires only a few basic tools and a cheap replacement part.
The 5-Minute Shower Symptom: Why Your Hot Water Runs Out Fast
To understand why your hot water runs out fast, you have to understand how water moves through the tank. Water heaters are designed to take advantage of a basic principle of physics: heat rises. The hottest water in the tank naturally gathers at the very top, which is exactly where the hot water outlet pipe is located. When you turn on a shower or a sink faucet, you are drawing water directly from the top layer of the tank.
At the exact same time, fresh, cold water from your home's main supply line rushes into the tank to replace the water you just used. If this cold water were allowed to simply dump into the top of the tank, it would immediately mix with the hot water you are trying to use, instantly lowering the temperature of your shower. To prevent this, manufacturers install a dip tube.
The dip tube is a long plastic pipe that connects to the cold water inlet. It runs almost the entire length of the tank, stopping just 3 inches above the bottom. Its sole job is to direct incoming cold water straight to the bottom of the tank, placing it directly next to the gas burner or lower electrical heating element. As this new cold water heats up, it slowly rises to the top, ensuring a steady, continuous supply of hot water for your home.
What Causes a Plastic Dip Tube to Snap?
Because the dip tube is constantly submerged in hot water and subjected to the pressure of incoming cold water, it endures a significant amount of physical stress over its lifespan. Most modern dip tubes are made from a durable cross-linked polyethylene (PEX) or similar high-temperature plastic, but they are not invincible.
A broken dip tube turns your water heater into a lukewarm mixing bowl, forcing your heating elements to work overtime while delivering fraction of the hot water.
Over years of use, the constant thermal expansion and contraction can cause the plastic to become brittle. Water chemistry also plays a major role. Homes with highly chlorinated municipal water or exceptionally hard water often see plastic plumbing components degrade faster. Once the plastic becomes brittle enough, the sheer force of the cold water rushing into the tank can cause the tube to snap off cleanly, usually just a few inches below the cold water inlet.
When the tube snaps, the cold water no longer travels to the bottom. Instead, it dumps directly into the top of the tank, instantly mixing with the hot water heading to your shower. You get a few minutes of the residual hot water sitting in the pipes, followed immediately by a lukewarm, deeply disappointing shower.
How Do You Diagnose a Broken Tube vs. a Burnt-Out Heating Element?
Before you drain the tank and start taking things apart, you need to confirm that the dip tube is actually the problem. A burnt-out lower heating element on an electric water heater can produce similar symptoms, as only the top half of the tank gets heated. Fortunately, there is a very simple temperature test you can perform at any faucet.
A few years ago, I tested a neighbor's 50-gallon electric water heater. They complained that their hot water runs out fast—usually right in the middle of washing their hair. We measured the water temperature at the bathroom sink using a standard digital meat thermometer. When we first turned on the hot water, it hit 120°F immediately. But within four minutes of running the tap, the temperature plummeted to 85°F.
Because the initial temperature was correct, we knew the upper heating element was working perfectly. If both elements were broken, the water would never get hot at all. The rapid drop-off in temperature while the water was running continuously is the classic signature of a broken dip tube. We pulled the cold water nipple, and sure enough, the plastic tube had snapped clean off just two inches below the threads.
Gathering Your Tools and Replacement Parts
If your test points to a broken dip tube, you can fix this yourself in about an hour. You will need to purchase a replacement dip tube from a local hardware store or plumbing supply house. They are universally sized for the most part, but you should measure the height of your tank to ensure you buy one that is long enough. You can always cut a plastic dip tube to length with a hacksaw if it is too long.
You will also need a few basic tools. A heavy-duty pipe wrench (or two) is essential for breaking the cold water nipple loose. You will need a garden hose to drain a few gallons of water from the tank, a roll of Teflon tape to seal the threads when you put everything back together, and possibly a flathead screwdriver to help pry the old plastic lip out of the inlet.
Step-by-Step: Replacing the Broken Dip Tube
Working on a water heater requires strict adherence to safety protocols. You are dealing with high voltage electricity or combustible gas, as well as scalding hot water. According to Department of Energy maintenance guidelines, you must always disconnect the power source before performing any internal maintenance on a water heater.
- Shut off the power and water. For an electric heater, flip the dedicated breaker in your electrical panel to the "off" position. For a gas heater, turn the gas control valve to the "pilot" or "off" setting. Next, locate the cold water shutoff valve on the pipe leading into the top of the heater and turn it completely off.
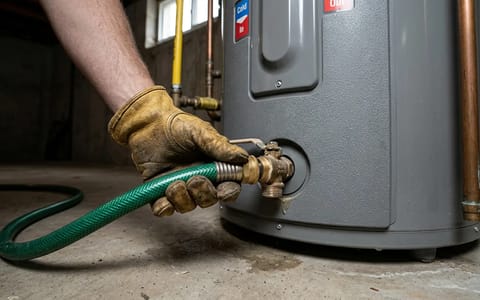
- Relieve the pressure and drain the tank. Open a hot water faucet somewhere in the house to break the vacuum in the lines. Attach a garden hose to the drain valve at the bottom of the water heater and route the other end to a floor drain or outside. Open the drain valve and let about three to five gallons of water out. You only need the water level to drop below the cold water inlet. Close the valve and remove the hose.
- Disconnect the cold water supply line. Use an adjustable wrench to disconnect the flexible or rigid cold water supply pipe from the nipple on top of the water heater. Move the pipe gently out of the way.
- Remove the cold water nipple. This is the hardest part of the job. Use a heavy-duty pipe wrench to grip the metal nipple protruding from the cold water inlet. Turn it counterclockwise to loosen it. It may require significant force, as these fittings are installed tightly at the factory and often develop slight corrosion over time.
- Extract the old dip tube. Look down into the hole where the nipple used to be. You should see a plastic ring sitting on a small ledge inside the port. This is the top of the broken dip tube. Insert a flathead screwdriver into the hole and gently pry the plastic lip upward until you can grab it with your fingers or a pair of needle-nose pliers. Pull the broken section out.
- Insert the new dip tube. Take your new dip tube and drop it straight down into the hole. The flared plastic lip at the top of the tube will rest perfectly on the internal ledge, preventing it from falling into the tank.
- Reinstall the nipple and reconnect the water line. Wrap the threads of the cold water nipple with three to four turns of Teflon tape, wrapping in a clockwise direction. Thread the nipple back into the tank and tighten it securely with your pipe wrench. Reconnect the cold water supply line to the top of the nipple.
- Refill and purge the tank. Double-check that the drain valve at the bottom of the tank is fully closed. Turn the cold water supply valve back on. Leave the hot water faucet inside the house open. As the tank fills, it will push all the trapped air out through that open faucet. Once you get a steady, sputter-free stream of water from the faucet, the tank is full. Turn the faucet off.
- Restore power and test. Only after the tank is completely full of water should you turn the electrical breaker back on or turn the gas valve back to the "on" position. Wait about an hour for the water to heat up, then test your shower. You should have your full capacity back.
When Should You Skip the DIY and Call a Plumber?
While replacing a dip tube is generally a straightforward task, there are a few scenarios where it makes sense to step back and call a professional. The most common roadblock homeowners hit is a severely corroded cold water nipple. If you apply heavy pressure with a pipe wrench and the nipple feels like it is crushing rather than turning, stop immediately. If the nipple snaps off flush with the top of the tank, extracting the remaining threads requires specialized plumbing extraction tools.
Additionally, if you complete the temperature test and determine that the water never gets hot in the first place, you are likely dealing with electrical issues. Testing and replacing high-voltage heating elements or thermostats requires using a multimeter near live wires. If you are not entirely comfortable working with 240-volt electrical circuits, hire a licensed plumber or electrician to handle the diagnosis and repair.
Maintaining your home's plumbing doesn't always require an expensive service call. By understanding how your water heater operates and recognizing the specific symptoms of a broken dip tube, you can quickly diagnose the issue, spend a few dollars on parts, and get your morning routine back to normal.
- Test the water temperature at the tap to confirm the dip tube is the issue before buying replacement parts.
- Drain at least three to five gallons of water from the tank to prevent overflow when removing the cold water nipple.
- Use Teflon tape on all threaded connections during reassembly to ensure a watertight seal.
- Purge all air from the plumbing system by opening a hot water faucet before turning the heater's power back on.