Leaking Water Heater Pressure Relief Valve? How to Test It
A leaking water heater pressure relief valve can be a sign of a worn-out part or dangerously high pressure. Learn how to safely test and troubleshoot your TPR valve.
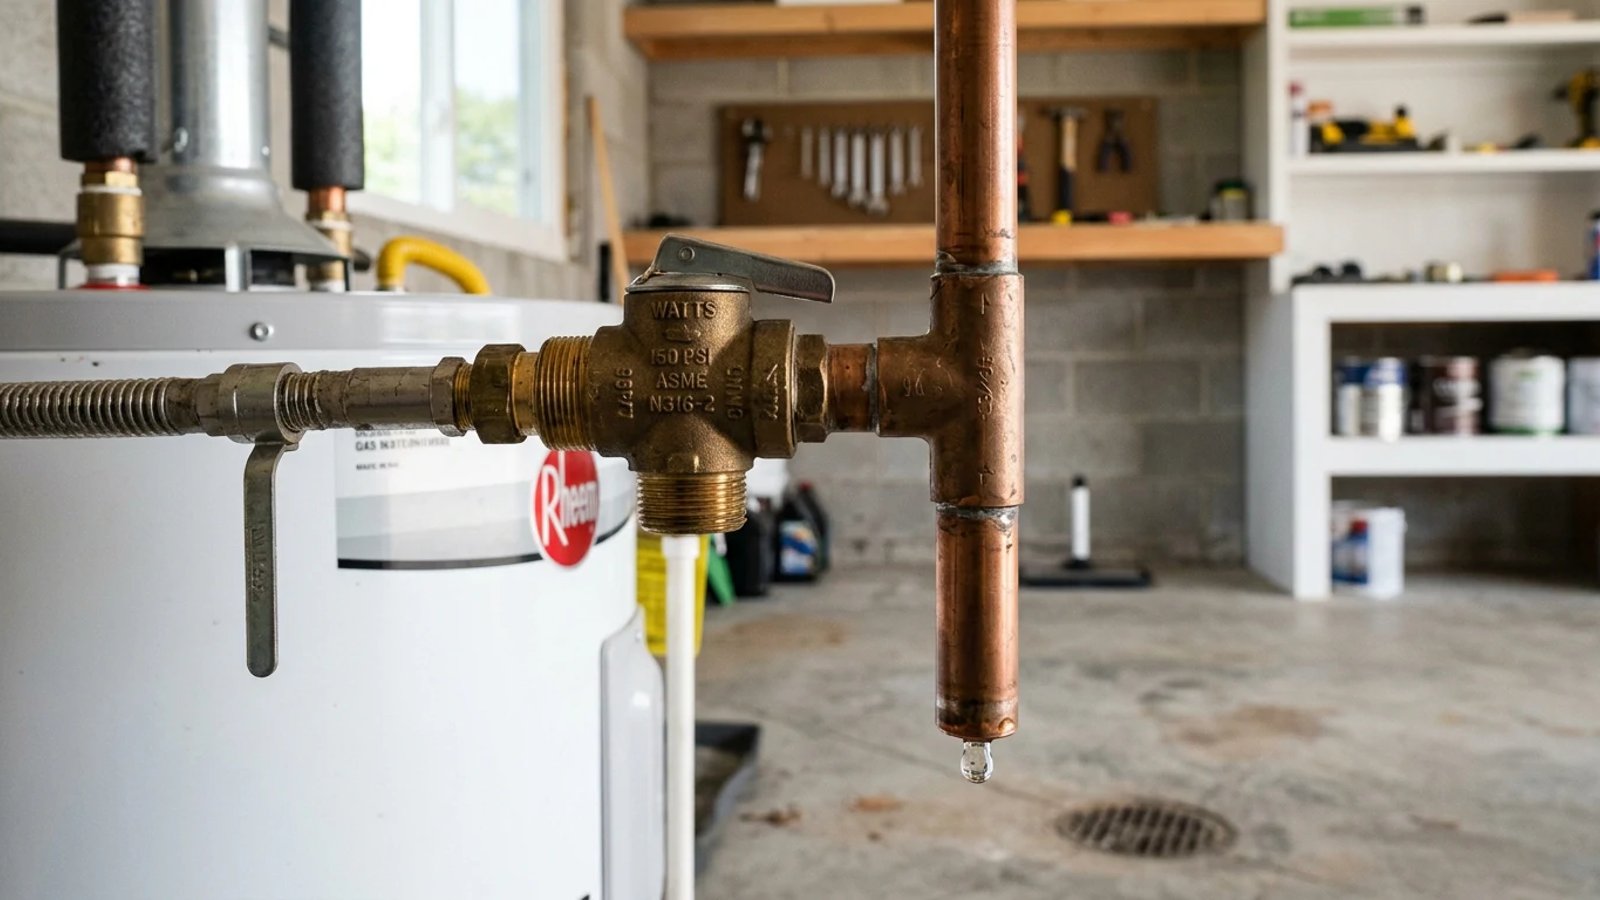
Full guide Plumbing Learn how your home plumbing works and how to stop leaks before they ruin your house.You walk into your basement or garage and notice a small, dark puddle forming near the base of your water heater. Following the trail of water, you find it dripping from a pipe connected to a brass valve on the side or top of the tank. Finding a leak around your plumbing is never fun, but when it involves your water heater, it immediately raises safety concerns.
That brass component is your water heater pressure relief valve. It is arguably the most important safety device on the entire appliance. A leak here does not necessarily mean your tank is rusting out or that you need to buy a whole new water heater. Often, it is a straightforward fix.
Understanding what this valve does, why it leaks, and how to test it will save you from unnecessary panic. We are going to walk through exactly how to diagnose that drip, how to perform a safe manual test, and how to decide if you need a $20 replacement part or a visit from a plumber.
What Is a Water Heater Pressure Relief Valve?
The water heater pressure relief valve—commonly called the TPR valve (Temperature and Pressure Relief)—is a fail-safe mechanism. As your water heater heats cold water, that water expands. Because your plumbing is a closed system, this expansion creates pressure inside the steel tank.
Under normal conditions, this pressure is manageable. But if a thermostat fails and the burner continues to heat the water uncontrollably, the pressure and temperature will spike to dangerous levels. Without a way to vent that energy, the tank would eventually rupture, causing a massive steam explosion.
The TPR valve prevents this. It is calibrated to open automatically if the temperature inside the tank reaches 210 degrees Fahrenheit, or if the pressure exceeds 150 PSI (pounds per square inch). When it opens, it dumps hot water through the discharge pipe, safely relieving the stress on the tank.
Because of its critical role, building codes require every water heater to have one. The Department of Energy recommends checking this valve annually to ensure it remains operational. A valve that is stuck closed is a hidden hazard, while a valve that is stuck open is a frustrating, messy nuisance.
Why Is My Hot Water Heater Pressure Valve Leaking?
When a homeowner sees water coming from the TPR valve discharge pipe, the immediate assumption is that the valve is broken. While a faulty valve is a very common culprit, it is not the only reason for a leak. The valve might actually be doing exactly what it was designed to do.
There are three primary reasons you will find a puddle under the relief valve pipe.
First, you might be dealing with thermal expansion. If your home has a closed-loop plumbing system—meaning there is a check valve or pressure-reducing valve at the main water meter—expanding hot water has nowhere to go. As the tank heats up, pressure builds until the TPR valve spits out a small amount of water to relieve the tension. This often presents as an intermittent drip rather than a steady stream.
Second, your home's overall water pressure might be too high. Municipal water pressure can fluctuate, especially at night when neighborhood usage drops. If your home's incoming water pressure creeps up near 100 PSI, the added thermal expansion can easily push the tank pressure over the 150 PSI threshold, causing the valve to open.
Third, the valve itself is simply worn out. Inside that brass housing is a metal spring and a rubber washer. Over years of exposure to scalding water, the rubber degrades, hardens, or gets coated in mineral deposits. Once that happens, the valve can no longer form a watertight seal, resulting in a continuous, annoying drip.
A few years ago, I noticed a persistent drip on my own 50-gallon electric tank. I spent a week assuming I had a massive pressure problem. After finally taking the valve off, I found the internal spring was completely calcified from hard water. The valve was stuck slightly open. A $15 replacement part solved the issue entirely.
How to Test Your Water Heater Temperature Relief Valve Safely
Testing the valve is the fastest way to determine if the internal seal has failed or if the mechanism is jammed. This is a simple procedure that takes less than five minutes, but you must respect the heat of the water inside the tank.
Before you begin, make sure you are wearing closed-toe shoes and heavy work gloves. The water that comes out of the tank can be as hot as 210 degrees Fahrenheit, causing instant burns.
- Place a bucket under the pipe. Position a large plastic or metal bucket directly beneath the open end of the TPR valve discharge pipe to catch the water.
- Locate the metal lever. Find the small silver lever on the top or side of the brass TPR valve.
- Lift the lever gently. Pull the lever outward and up. You should feel some resistance from the spring.
- Hold for three seconds. Keep the valve open for a few seconds to let a strong stream of hot water rush out of the pipe and into the bucket.
- Snap the lever shut. Release the lever and let it snap back into its original resting position.
As you perform this test, you are looking for two things. First, water should flow freely and forcefully when the lever is lifted. Second, the flow of water should stop completely and immediately when the lever snaps shut.
Diagnosing the Test Results: Pass or Fail?
Once you finish the manual test, the results will tell you exactly what your next steps should be.
If water flowed out forcefully and then stopped completely when you released the lever, your valve is functioning perfectly. If you are still finding puddles on the floor occasionally, the valve is likely doing its job and venting excess pressure. You will need to investigate your home's overall water pressure or consider installing a thermal expansion tank.
If no water came out when you lifted the lever, or if it was just a weak trickle, the valve is clogged with sediment or completely broken. This is a serious safety issue, and the valve must be replaced immediately.
If water came out, but the valve continued to drip or run after you snapped the lever shut, the internal rubber seal is compromised. Sometimes, a piece of sediment gets trapped in the seal during the test. You can try lifting and snapping the lever two or three more times to flush the debris out. If it still drips after a few tries, the valve is dead and requires replacement.
A valve that is stuck closed is a hidden hazard, while a valve that is stuck open is a frustrating, messy nuisance.
Should You Replace the Valve Yourself?
Replacing a water heater pressure relief valve is a very approachable DIY project for a homeowner comfortable with basic hand tools. It does not require soldering copper pipes or specialized plumbing equipment. You are simply unthreading an old part and threading in a new one.
If you decide to tackle this yourself, you will need a heavy-duty pipe wrench, a roll of Teflon tape (plumber's tape), some rags, and a bucket. You will also need to purchase the correct replacement valve. Check the metal tag on your existing valve; it will specify the temperature rating, pressure rating, and the shank length. You must buy an exact match, which you can find at any local hardware store.
Steps to Replace a Faulty TPR Valve
If you are ready to swap out the part, give yourself about 45 minutes to complete the job. The hardest part is usually breaking the old valve loose.
- Turn off the heat source. Switch the breaker off for an electric tank, or turn the gas valve to the "Pilot" setting for a gas tank.
- Shut off the cold water supply. Turn the valve on the cold water pipe leading into the top of the tank clockwise until it stops.
- Drain water below the valve level. Connect a garden hose to the drain valve at the bottom of the tank, open a hot water faucet in the house to break the vacuum, and drain two to three gallons of water.
- Remove the discharge pipe. Unscrew or unthread the discharge pipe connected to the old TPR valve and set it aside.
- Unscrew the old valve. Grip the brass body of the old valve with a pipe wrench and turn it counterclockwise to break it free, then unthread it completely.
- Prepare the new valve. Wrap the threads of the new TPR valve with three to four layers of Teflon tape, wrapping in a clockwise direction.
- Install the new valve. Thread the new valve into the tank by hand, then tighten it with the wrench until the threaded outlet points toward the floor.
- Reattach the discharge pipe. Thread the discharge pipe back onto the new valve.
- Restore water and power. Turn the cold water supply back on, let the tank fill, check for leaks around the threads, and turn the heat source back on.
Once the tank is full and under pressure, keep an eye on the new valve for the next 24 hours to ensure the threaded connection is completely watertight.
When the Valve Isn't the Problem
What if you replace the valve, but a few days later, the new one starts dripping too? This is the classic symptom of a pressure problem, not a valve problem.
If you suspect high pressure, head to the hardware store and buy a water pressure test gauge with a hose bib connection. It costs about $15. Screw it onto an outdoor spigot or your washing machine hookup and turn the water on. If the gauge reads above 80 PSI, your home's water pressure is too high. You will need a plumber to install or replace the Pressure Reducing Valve (PRV) on your main water line.
If your overall house pressure is fine (between 40 and 60 PSI), thermal expansion is the likely culprit. Modern plumbing codes require the installation of a thermal expansion tank—a small tank that sits above the water heater and absorbs the expanding water. If you don't have one, or if yours has failed and filled completely with water, the TPR valve will continue to weep every time the burner fires up.
Dealing with a leaking water heater pressure relief valve can feel intimidating, but it is one of the most straightforward diagnostic tasks in home maintenance. By taking a few minutes to test the valve and observe the symptoms, you can easily figure out if you need a quick trip to the hardware store for a replacement part or a broader look at your home's water pressure.
- Locate your TPR valve on the top or upper side of your water heater tank.
- Never plug or cap a leaking relief valve pipe—this creates an extreme explosion hazard.
- Test your valve annually by lifting the lever for three seconds to ensure water flows and stops completely.
- If the valve continues to drip after testing, the internal rubber seal has likely failed and the unit must be replaced.
- Check your home's overall water pressure; if it exceeds 80 PSI, you may need a pressure reducing valve, not just a new TPR valve.