High Water Pressure? Check Your Pressure Regulator Valve
Mysterious plumbing leaks, banging pipes, and running toilets often point to a single hidden culprit: dangerously high water pressure. Learn how to test, adjust, and replace your pressure regulator valve.
Full guide Plumbing Learn how your home plumbing works and how to stop leaks before they ruin your house.You just replaced the bathroom faucet cartridge, but it is already dripping again. Meanwhile, the toilet runs randomly in the middle of the night, and the pipes bang loudly against the wall every time the washing machine shuts off. These mysterious, recurring plumbing issues often share a single, hidden culprit: dangerously high water pressure entering the house, often due to a failing pressure regulator valve.
Most municipal water systems pump water through street mains at incredibly high pressures—often exceeding 100 to 150 psi (pounds per square inch)—to serve fire hydrants and push water up into tall buildings. However, your home's internal pipes, rubber appliance seals, and plastic toilet valves are not built to handle that kind of force. The only thing standing between your plumbing and a costly blowout is a bell-shaped device on your main water line called a pressure regulator valve.
What is a pressure regulator valve and why do you need one?
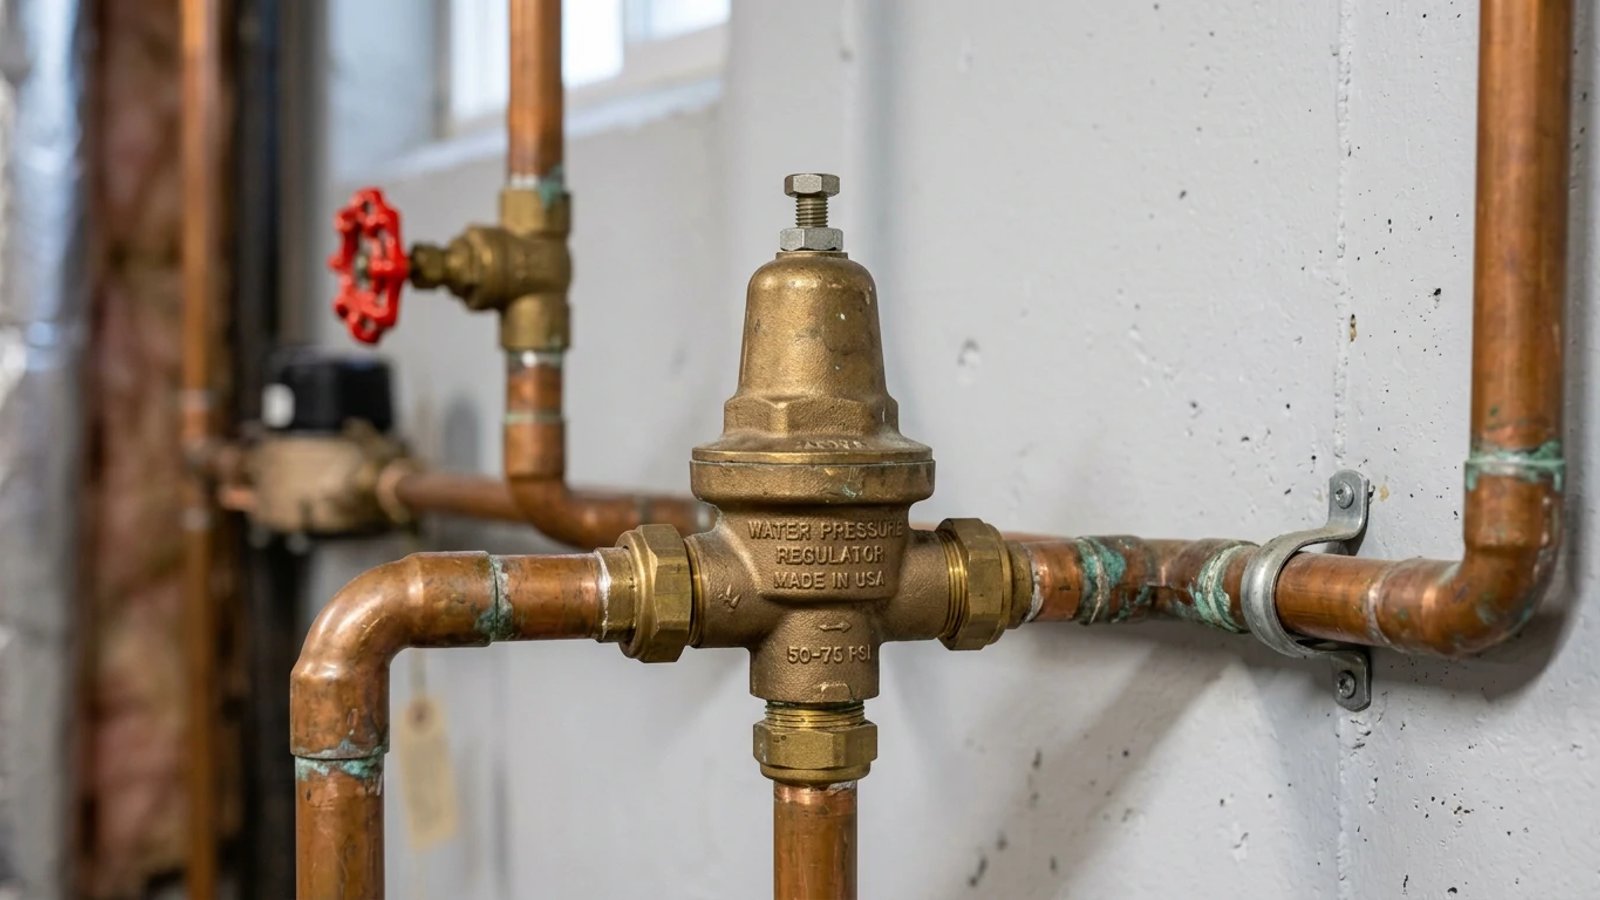
A pressure regulator valve (PRV) is a heavy brass plumbing fixture installed on the main water line, usually right after the main shutoff valve and water meter. Inside the bell-shaped housing sits a spring-loaded rubber diaphragm. As high-pressure city water pushes against this spring, the valve narrows the path for the water, stepping the pressure down to a safe, usable level for the house.
Safe residential water pressure sits between 40 and 60 psi. According to the International Residential Code (IRC), water pressure inside a home should never exceed 80 psi. Anything higher than that voids the warranties on water heaters, washing machines, and dishwashers, because the excessive force destroys their internal seals.
Think of your pressure regulator valve as a shock absorber for your entire plumbing system.
These valves work hard every single time you open a faucet, and like any mechanical part, they eventually wear out. The heavy rubber diaphragm inside becomes brittle from minerals in the water and eventually tears. When that happens, full street pressure slams directly into your home.
How do you know if your pressure regulator valve is failing?
Because the valve is usually tucked away in a basement, crawlspace, or utility closet, most people do not notice it has failed until secondary damage occurs. The symptoms of high water pressure are often misdiagnosed as individual fixture failures.
If you notice any of these signs, you need to test your water pressure immediately to confirm whether the PRV is the source of the problem.
How to test your house pressure with a gauge
Testing your water pressure is one of the easiest diagnostic checks a homeowner can perform. You do not need to cut any pipes or call a plumber to get an accurate reading. All you need is a standard water pressure test gauge with a 3/4-inch female hose thread, which costs about $15 at any local hardware store.
When I tested the water pressure at my own house last fall after the washing machine valves started banging, the gauge immediately pegged at 115 psi. The internal diaphragm on my PRV had completely ruptured, offering zero protection to the house. Seeing that needle swing past 100 psi is a sobering reminder of how much stress the plumbing is under.
Here is how to test your system:
- Buy a pressure test gauge with a lazy hand. A "lazy hand" is a secondary red needle on the gauge that stays at the highest pressure recorded, which helps catch overnight pressure spikes.
- Attach the gauge to an outdoor spigot. Thread it onto a hose bib or the cold-water hookup behind your washing machine. Ensure it is tightly secured so it does not leak.
- Open the valve completely. Turn the spigot handle all the way on to allow full water flow into the gauge.
- Read the primary needle. The black needle shows your current static pressure. Ideally, it should sit between 50 and 60 psi.
- Leave it overnight. Leave the gauge attached and the spigot open overnight. In the morning, check the red lazy hand. If it has jumped to 90 or 100 psi while you were sleeping, your PRV is failing intermittently when municipal street pressure rises at night.
How to adjust a pressure regulator valve
If your gauge reads 75 or 80 psi, the valve might not be broken—it might just be out of tune. As the internal spring ages, it can lose tension, allowing more pressure through. You can often adjust the valve to bring the pressure back down to the 50 psi sweet spot.
To make the adjustment, locate your PRV on the main water line. You will need an adjustable wrench and a flathead screwdriver.
- Loosen the locknut. Use the adjustable wrench to back off the locking nut located at the top of the bell housing, just under the adjustment screw.
- Turn the adjustment screw. Turn the screw counter-clockwise to decrease the water pressure, or clockwise to increase it. Make small adjustments—usually one full turn equals a 2 to 3 psi change.
- Flush the lines. Go to a nearby sink, run the cold water for five seconds to relieve the old pressure, and shut it off.
- Check the gauge. Go back to your test gauge and read the new static pressure. Repeat the adjustment until the gauge reads between 50 and 60 psi.
- Tighten the locknut. Once the pressure is set, hold the screw steady with the screwdriver and tighten the locknut down with the wrench to lock the setting in place.
When to replace the valve vs call a professional
If you turn the adjustment screw all the way out and the pressure gauge still reads 80+ psi, the valve is dead. It can no longer regulate flow and must be replaced. Similarly, if the pressure drops to 50 psi during adjustment but creeps back up to 90 psi an hour later, the internal bypass is failing.
Replacing a pressure regulator valve is a manageable DIY project if the original installer used threaded unions. A union is a specialized plumbing fitting that allows you to unthread the old valve with two large wrenches and drop a new one into place without cutting any pipes. If your system has unions, you simply turn off the main street water, unthread the old valve, ensure the rubber O-rings are seated properly on the new one, and tighten it down.
I always recommend asking your plumber to install threaded unions on both sides of a new PRV if they aren't there already. It slightly increases the upfront cost of the repair, but it turns a sweaty, stressful soldering job into a simple 10-minute wrench swap the next time the valve fails.
Taking five minutes to thread a cheap gauge onto your hose bib can save thousands of dollars in water damage, ruined appliances, and burst washing machine hoses. Make it a habit to check your home's water pressure once a year to ensure your plumbing stays safe, quiet, and leak-free.
- Test your home's water pressure annually to ensure it stays below the recommended 80 psi maximum.
- Banging pipes (water hammer) and constantly running toilets are the first warning signs of a failing pressure regulator.
- Install a pressure gauge with a 'lazy hand' to catch hidden pressure spikes that happen overnight.
- If your valve leaks from the bell housing or fails to hold a steady pressure after adjustment, the internal diaphragm is dead and the unit must be replaced.