How to Build a Sound Resistant Wall to Block Room Noise
Learn how to build a sound resistant wall using mass, decoupling, and acoustic insulation to block noise from traveling between rooms.
Full guide Interior: Paint, Drywall & Trim Learn how to patch drywall, choose the right paint, and update your interior trim.Hearing the living room TV clearly from your home office or a baby's nursery is incredibly frustrating. Standard interior walls are essentially hollow boxes—two sheets of half-inch drywall screwed directly to wood studs with nothing but air in between. Instead of blocking noise, this construction acts like a drum, amplifying vibrations and sending them right into the next room.
Upgrading your home by building a sound resistant wall changes that dynamic entirely. Whether you are gutting a room down to the studs or looking for ways to add mass to an existing partition, understanding the physics of sound transmission will save you from wasting money on ineffective acoustic foams. Real noise reduction happens inside the wall, not on the surface.
What Makes a Sound Resistant Wall Actually Work?
Sound travels in two ways: airborne noise (voices, music) and structure-borne noise (footsteps, slamming doors). To stop both, a noise proof wall relies on a combination of three scientific principles, often aiming for an STC (Sound Transmission Class) rating of 50 or higher. If you skip one, the sound will find a way through.
1. Mass: Heavy, dense objects are harder to move. When sound waves hit a wall, they try to vibrate the drywall. If the drywall is thick and heavy, it takes much more energy to vibrate it. This is why standard 1/2-inch drywall is terrible for soundproofing, while heavy 5/8-inch Type X drywall or specialized sound deadening drywall performs much better.
2. Absorption: The hollow cavity between your wall studs is an echo chamber. Sound that makes it through the first layer of drywall bounces around inside this cavity and hits the drywall on the other side. Filling this void with dense sound proof insulation absorbs those bouncing sound waves, converting acoustic energy into microscopic amounts of heat.
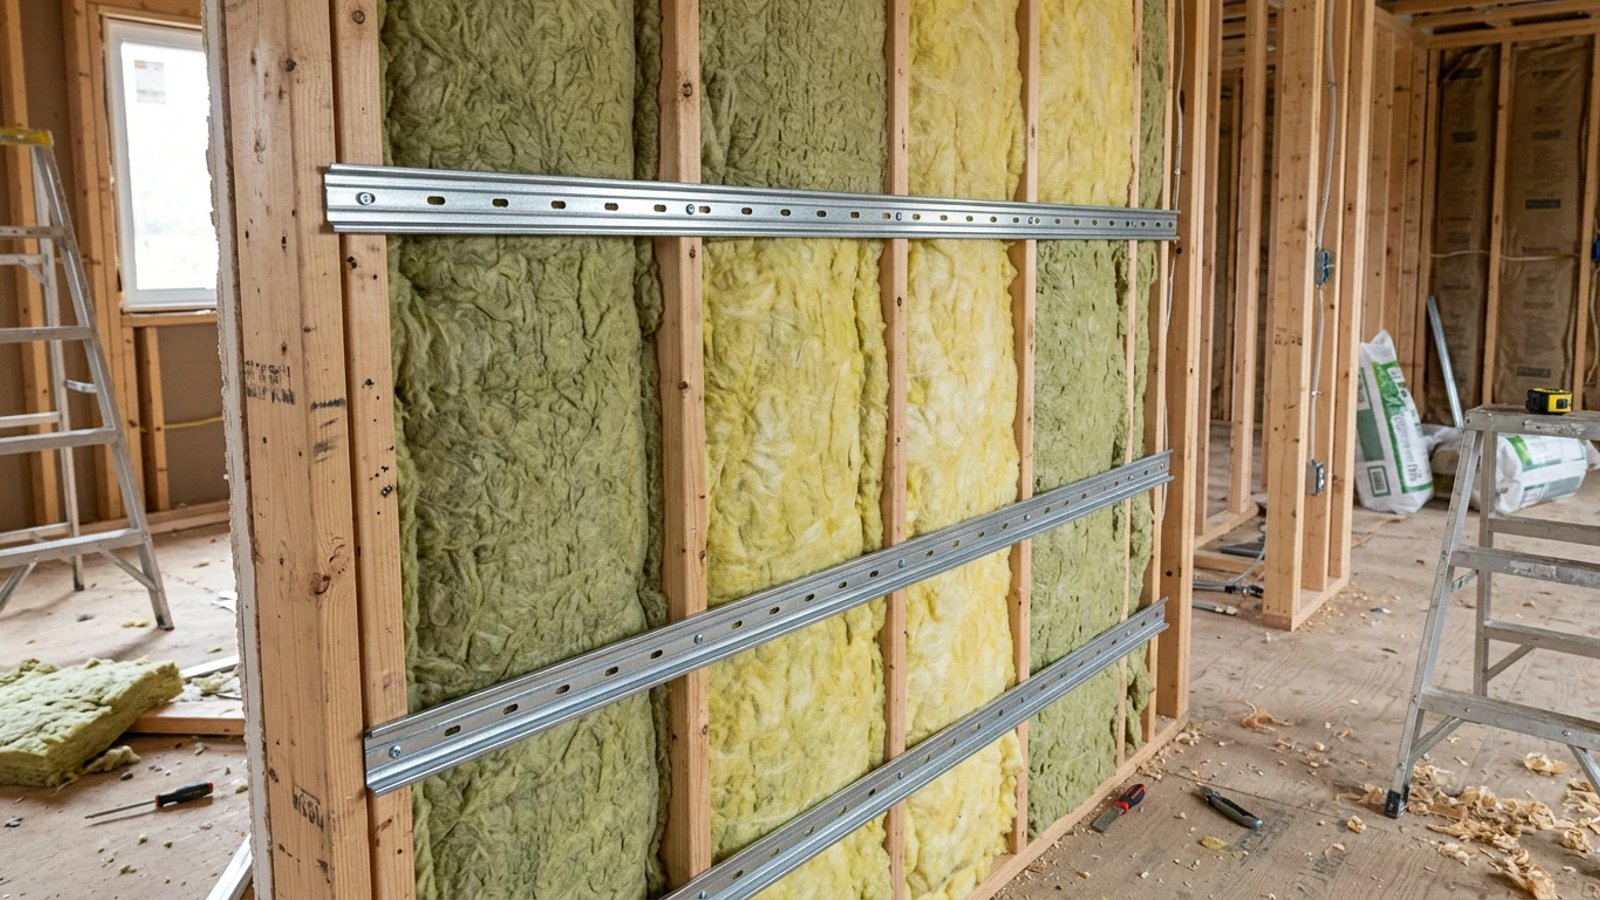
3. Decoupling: This is the secret weapon of professional acoustics. If your drywall is screwed directly to the wood studs, vibrations travel straight through the wood to the other side of the wall. Decoupling involves separating the drywall from the framing using metal resilient channels or isolation clips. This breaks the physical path that structure-borne noise uses to travel.
Real noise reduction happens inside the wall, not on the surface. Acoustic foam panels only reduce echo within a room—they do not stop sound from leaving it.
According to the International Code Council (ICC), a standard interior wall has a Sound Transmission Class (STC) rating of about 33. At this level, loud speech is easily heard and understood through the wall. By applying mass, absorption, and decoupling, you can push that rating past STC 50, making loud speech virtually inaudible.
Choosing the Right Materials for Sound Insulation
Before you swing a hammer, you need the right materials. Buying standard building supplies won't yield the quiet results you want. Here is exactly what you need to source for a successful soundproofing project.
Sound Dampening Insulation: Skip the standard pink fiberglass batts. You need mineral wool insulation, often sold under brand names like Rockwool Safe'n'Sound or Thermafiber. Mineral wool is extremely dense, fire-resistant, and friction-fits tightly between standard 16-inch on-center studs without stapling. Expect to pay around $50 to $70 per bag, which covers about 60 square feet.
Resilient Channels (RC-1): These are long, thin strips of galvanized steel shaped like a hat. You screw one side of the channel to the wood studs, and then screw your drywall to the face of the channel. Because the channel flexes slightly, it acts as a shock absorber for sound waves. They cost about $4 per 8-foot strip.
Sound Deadening Drywall vs. 5/8-Inch Drywall: You have two options for mass. The budget-friendly route is standard 5/8-inch Type X drywall, which costs about $15 per sheet and is significantly heavier than standard 1/2-inch board. The premium route is specialized acoustic drywall (like QuietRock), which features a layer of viscoelastic polymer sandwiched between two layers of gypsum. It performs exceptionally well but costs upwards of $55 to $70 per sheet.
Acoustic Sealant and Putty Pads: Sound acts like water—if there is a hole, it will leak through. Acoustic sealant remains permanently flexible to seal gaps around the perimeter of your wall without cracking over time. Putty pads are heavy, moldable clay-like squares that you wrap around the outside of electrical junction boxes to prevent noise from flanking through the outlet holes.
How to Build a Sound Resistant Wall
If you have basic carpentry and drywall skills, upgrading a wall is a highly rewarding weekend project. This process assumes you are starting with bare studs, either in new construction or after tearing down existing drywall.
- Inspect and seal the bare framing. Look for any gaps where the bottom plate meets the subfloor or where wall framing meets the ceiling, and fill them with acoustic caulk.
- Install acoustic putty pads on electrical boxes. Wrap the outside of every electrical outlet and switch box in the wall cavity with moldable acoustic putty to block sound leaks.
- Install the sound proof insulation. Cut your mineral wool batts with a serrated bread knife and press them firmly into the stud cavities. Ensure there are no gaps, voids, or compressed areas.
- Attach the resilient channels. Screw the metal RC-1 channels horizontally across the wood studs, spacing them 24 inches apart from floor to ceiling. The mounting flange must face downward.
- Hang the drywall. Install your 5/8-inch or sound deadening drywall horizontally. Crucial step: Screw the drywall into the metal resilient channels only. If your screws hit the wood studs behind the channels, you will short-circuit the decoupling and ruin the soundproofing.
- Leave a 1/4-inch perimeter gap. Do not let the drywall touch the floor, ceiling, or adjacent walls. Leave a 1/4-inch gap all the way around the perimeter.
- Seal the perimeter gap. Fill the 1/4-inch expansion gap you left with acoustic sealant before taping and mudding the joints.
- Finish the drywall. Tape, mud, sand, and paint the wall as you normally would. Reinstall your baseboards, nailing them to the wall, not the floor, to maintain decoupling.
How Much Does a Sound Proof Room Cost?
Budgeting for a sound resistant wall depends heavily on whether you do the labor yourself and which tier of materials you choose. Here is a breakdown of what to expect for a standard 10x8 foot interior bedroom wall.
If you opt to use premium sound deadening drywall instead of 5/8-inch Type X, add an additional $150 to $200 to the total material cost. For most residential applications, standard 5/8-inch drywall mounted on resilient channels provides an excellent balance of cost and performance.
Don't Forget the Flanking Noise
You can build a wall with an STC rating of 60, but if the door in that wall is hollow, you will still hear everything happening in the next room. This is known as flanking noise—sound taking the path of least resistance around your soundproof barrier.
When I rebuilt the shared wall between my living room and home office, I spent hours perfecting the drywall layers and acoustic sealants, only to realize sound was still pouring right under the hollow-core door. Replacing that cheap interior door with a heavy, solid-core wood door and installing a rubber bottom sweep finally killed the noise transfer.
Pay close attention to HVAC return vents. If two rooms share the same ductwork cavity in the ceiling or floor, voices will travel right through the vents. You can mitigate this by lining the inside of the metal ducts with acoustic duct liner or installing a sound maze (baffle) inside the vent cavity to force the sound waves to bounce and lose energy before exiting the register.
Building a sound resistant wall takes a bit more planning and heavier materials than a standard partition, but the payoff is immediate. By focusing on adding mass, packing the cavities with dense insulation, and breaking the physical connection with resilient channels, you can finally enjoy a quiet, peaceful home regardless of what is happening in the next room.
- Upgrade to 5/8-inch Type X drywall or specialized sound-deadening drywall to add necessary mass to your walls.
- Pack stud cavities with dense mineral wool insulation to absorb mid-range and high-frequency sounds.
- Decouple the drywall from the wood framing using resilient channels or isolation clips to stop low-frequency vibrations.
- Use acoustic putty pads on electrical outlets to seal hidden sound leaks.