How to Replace a Light Switch (The Safe and Simple Way)
Learn how to replace a standard single-pole light switch safely. This step-by-step guide covers troubleshooting, wiring basics, and essential safety checks.
Full guide Electrical Learn how your home electrical system works and what parts are safe for you to handle.A dead light switch or a fixture that flickers every time you bump the wall can be incredibly frustrating. Many homeowners assume electrical work is entirely off-limits, but learning how to replace a light switch, especially a basic single-pole one, is a straightforward 20-minute job. If you have a screwdriver, a non-contact voltage tester, and $5 for a replacement part, you can safely handle this repair yourself. This guide will walk you through the process, ensuring you understand the necessary safety precautions and the simple steps involved in bringing light back to your room.
Why is the Switch Not Working?
Before you open the wall, confirm the switch is actually the problem. I replaced a perfectly good dining room switch last year, only to realize the LED bulb had simply burned out in a weird, flickering way. Check the bulb first. Next, check your main electrical panel to see if a breaker tripped. If the bulb is fresh and the breaker is on, but the light still refuses to work (or crackles when you toggle it), the internal contacts of the switch, designed for thousands of cycles, have likely worn out.
Single-Pole vs. Three-Way Switches: What is the Difference?
Before buying parts, you need to know what kind of switch you are replacing. A single-pole switch controls a light fixture from one location. It has two brass terminal screws on the side and one green ground screw. If two different switches control the same hallway light, you have a three-way switch. Three-way switches have three terminal screws (two brass, one dark-colored "common" screw) plus a ground. This guide focuses on single-pole switches, which are the most common in bedrooms and bathrooms.
Essential Tools for the Job
Having the right tools prevents stripped screws and dangerous loose connections. You can find all of these at any local hardware store for under $40 total. Investing in quality tools now will save you headaches and potential hazards down the line, making future home electrical projects much smoother.
- Non-contact voltage tester: This $15 pen-shaped tool detects electrical fields without touching bare wire. It is your most important safety device. Always test it on a known live circuit first to ensure it's working correctly before trusting it in your switch box.
- Screwdrivers: You will need both a flathead (for the cover plate) and a Phillips #2 (for the mounting screws). A multi-bit screwdriver can be convenient, but ensure the tips are insulated for extra safety when working near live wires.
- Needle-nose pliers: Perfect for bending the stiff copper wire into a clean hook. These are also invaluable for straightening out wires or retrieving small dropped screws within the electrical box.
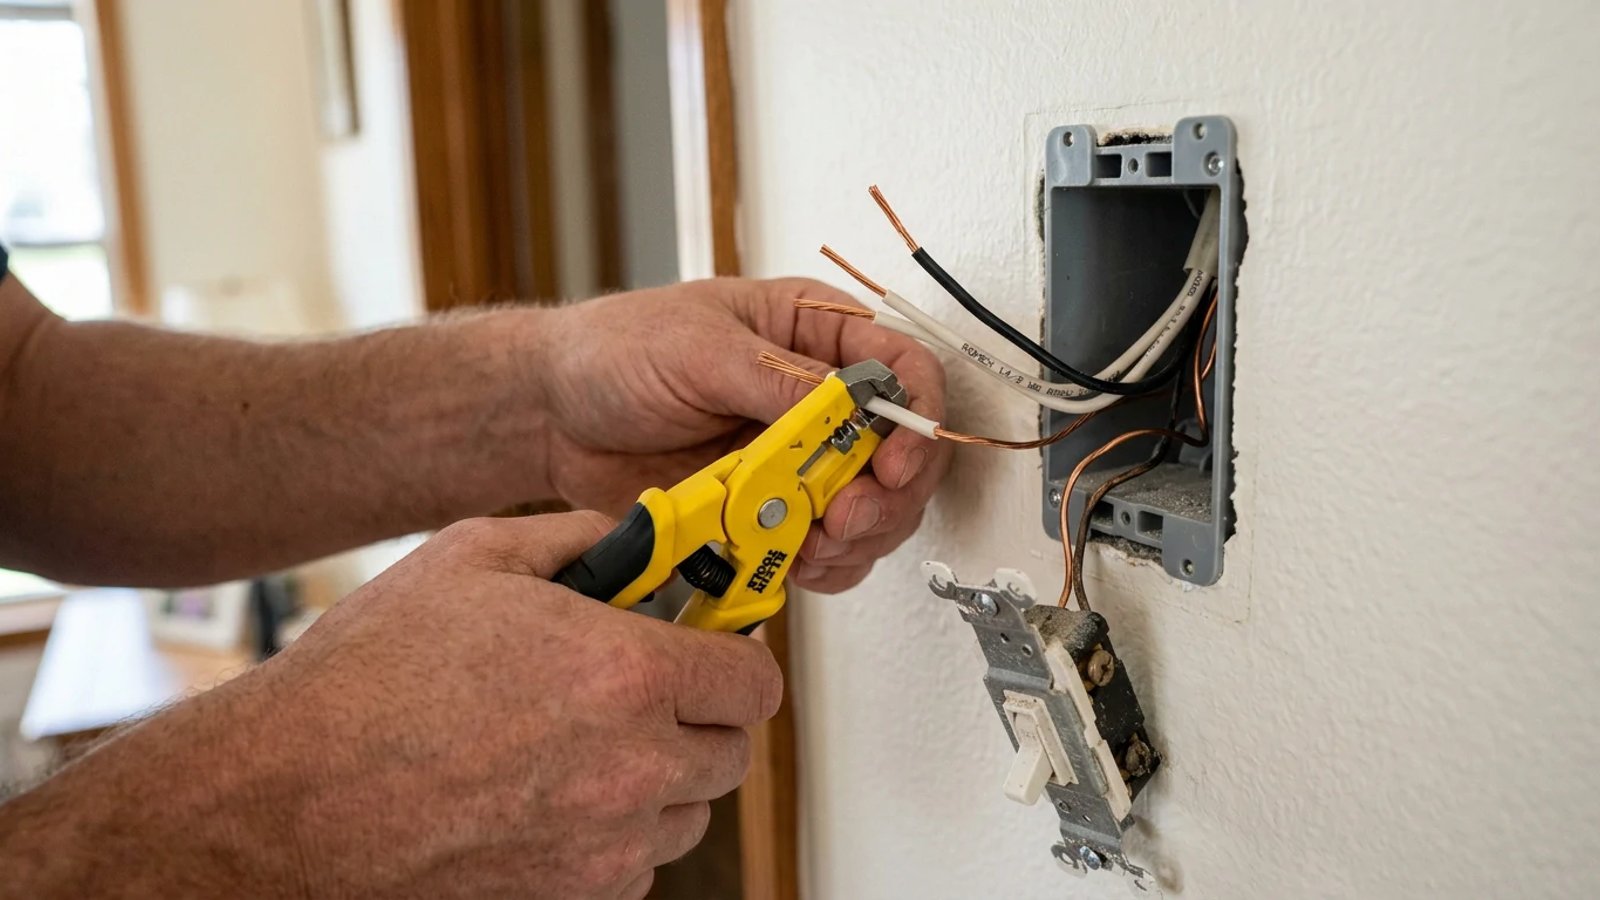
- Wire strippers: If the old wire ends are damaged, you will need to snip them off and strip away half an inch of insulation to expose fresh copper. A good pair of strippers will have multiple gauges, allowing you to cleanly cut and strip wires without nicking the copper strands.
Beyond these essentials, having a roll of electrical tape and a few spare wire nuts can be incredibly handy. Electrical tape can be used to wrap terminal screws for added insulation, while wire nuts are crucial for capping off unused wires or securing connections that might need to be redone. Always use UL-listed electrical tape and wire nuts for safety.
How to Replace a Light Switch Safely
Learning how to replace a light switch starts and ends with safety. You are dealing with 120 volts of electricity, which is enough to cause serious injury. Always verify the power is off before touching bare metal. Even experienced DIYers can make mistakes, so a methodical approach is key to avoiding accidents.
Before you begin disconnecting anything, take a moment to observe the existing wiring. Note which wire connects to which screw terminal on the old switch. Sometimes, the wires are color-coded (black, red, white, bare copper), but their position on the switch is equally important for correct reinstallation. A quick photo with your phone can be a lifesaver if you get confused later.
Once you have your tools ready and the replacement single-pole switch in hand, follow these steps:
- Turn off the breaker. Locate your electrical panel and flip the breaker for that specific room to the "off" position.
- Remove the wall plate. Unscrew the two small flathead screws holding the plastic cover in place and pull it away.
- Test for voltage. Turn on your non-contact voltage tester and stick the tip inside the box near the wires; if it beeps or flashes red, the power is still on.
- Unscrew the old switch. Remove the top and bottom screws holding the switch to the wall box, then gently pull the switch out toward you.
- Disconnect the wires. Loosen the side screws and unhook the wires from the old switch.
- Connect the new switch. Hook the bare copper wire to the green screw, and the two black wires to the two brass screws.
- Tuck and secure. Fold the wires neatly back into the box in an accordion shape, push the switch in, and tighten the mounting screws.
- Attach the plate and test. Screw the wall plate back on, turn the breaker back on, and flip the switch to test your work.
Understanding Hot, Neutral, and Ground Wires
When you pull the old switch out, you will see a cluster of wires. In a standard North American residential setup, black or red wires are "hot"—they carry the live current from the panel to the switch, and from the switch to the light. White wires are "neutral" and carry the current back to the panel. In a basic single-pole switch box, the white wires are usually tied together with a wire nut in the back and do not connect to the switch itself. Understanding the role of each wire type is fundamental to safely working with household electricity and ensures you connect your new switch correctly.
Always hook your wires clockwise around the terminal screws so they tighten as you drive the screw down. This simple trick prevents the wire from pushing out as you secure the connection, ensuring a solid, safe electrical contact.
The bare copper or green insulated wire is your ground. This is a critical safety feature that gives stray electricity a safe path to the earth if something goes wrong. The National Electrical Code (NEC) requires grounding for all new switch installations to prevent shocks. A properly grounded system significantly reduces the risk of electrocution and protects your home's electrical components from damage during power surges.
Troubleshooting Your New Switch
After all your hard work, it can be frustrating if the light doesn't come on or behaves unexpectedly. Don't panic! Most post-installation issues are minor and easily fixable. The first thing to check is always the circuit breaker – it might have tripped during installation, especially if you encountered any accidental shorts. Flip it off and then firmly back on.
If the breaker is fine, re-check your wire connections. Are all the wires securely fastened to the correct terminals? Loose connections are a common culprit for intermittent power or no power at all. Ensure the ground wire is firmly attached to the green screw, and the hot wires are tight on the brass screws. Sometimes, a wire can slip out slightly when pushing the switch back into the box. Carefully pull the switch back out and visually inspect each connection.
Finally, confirm the light bulb itself is still good. It's rare, but sometimes a bulb can blow during the power cycling. If all else fails and you've double-checked everything, it might be time to consider if the new switch itself is faulty (though uncommon) or if there's a deeper electrical issue. In such cases, or if you're ever unsure, it's always best to consult a licensed electrician.
When Should You Call a Licensed Electrician?
While a basic like-for-like swap is simple, opening a wall box can sometimes reveal hidden hazards. If you pull the switch out and see silver-colored aluminum wiring instead of copper, stop immediately. Aluminum wiring was common in the 1960s and 70s, but it expands and contracts differently than copper and requires specialized connectors to prevent fires. Attempting to connect copper and aluminum wires directly without proper connectors (like CO/ALR rated wire nuts) can create serious fire hazards due to overheating.
You should also verify your local building codes. While most municipalities allow homeowners to perform basic electrical maintenance on their primary residence, some require a permit even for minor swaps. Always check with your local authority to understand specific requirements and ensure your DIY project complies with all safety regulations.
Taking care of a faulty switch quickly keeps your home well-lit and eliminates the fire hazard of worn-out electrical contacts. Take your time, double-check your voltage tester, and enjoy the satisfaction of checking another repair off your list.
- A basic single-pole switch replacement takes about 15-30 minutes and costs less than $5 in parts.
- Never trust a wall switch to cut power; always turn off the main breaker for that circuit.
- Loop wires clockwise around terminal screws so they tighten as you turn the screw.