How to Winterize Outdoor Faucets Before the First Freeze
Prevent burst pipes and expensive water damage with this 15-minute guide to winterizing your outdoor faucets before the first hard freeze hits.
Full guide Plumbing Learn how your home plumbing works and how to stop leaks before they ruin your house.As mid-fall approaches and nighttime temperatures begin to drop, a hidden risk sits right outside your house. Frozen outdoor spigots are a leading cause of burst pipes inside walls, often resulting in thousands of dollars in emergency water damage repairs. When water freezes, it expands by about 9 percent, generating enough pressure to easily split heavy-duty copper plumbing.
The good news is that you can completely avoid this disaster with a simple 15-minute weekend project. Learning how to winterize outdoor faucets is a fundamental skill for newer homeowners. It requires no special skills, costs less than $20 in materials, and ensures worry-free protection before the first hard freeze arrives.
Why Do Frost-Free Faucets Still Freeze?
Many modern homes are built with "frost-free" sillcocks. Unlike a traditional spigot where the valve sits right at the exterior wall, a frost-free model has a long metal stem. When you turn the handle outside, the actual mechanism stopping the water is located 8 to 12 inches inside the house, where the ambient temperature keeps it warm.
However, these clever devices have a major vulnerability: the garden hose. If you leave a hose attached to a frost-free faucet, the water inside the stem cannot drain out. It stays trapped against the cold exterior wall. When temperatures plummet, that trapped water freezes, expands, and splits the copper tube inside your wall.
Leaving a garden hose attached in winter is the number one cause of frost damage to exterior plumbing, even on modern frost-free faucets.
The worst part of this specific failure is that you won't know the pipe is broken during the winter. The ice acts as a plug. The damage only reveals itself in the spring when you turn the faucet on to water your lawn, sending pressurized water spraying directly into your basement or wall cavity.
Locating Your Indoor Shut-Off Valve
The most effective way to winterize outdoor faucets is to cut off the water supply from inside the house. Most homes built in cold climates have dedicated isolation valves for exterior plumbing lines. Finding them is the first step.
Head to your basement, crawlspace, or utility room. Look up at the floor joists and try to locate the pipe that leads directly to the outdoor spigot. Follow that pipe back into the house. Within 3 to 5 feet, you should find a valve. It will typically be one of two types:
- Gate valve: This looks like a circular metal wheel. You turn it clockwise to stop the water flow.
- Ball valve: This features a straight lever handle. When the handle is parallel to the pipe, water flows. When you turn it perpendicular to the pipe, the water is shut off.
How to Drain and Winterize Outdoor Faucets
Once you locate the indoor shut-off valve, you are ready to secure the plumbing. Follow this sequence for every exterior spigot on your property.
- Disconnect all garden hoses. Unscrew the hose, drain the water out of it, and store it in a garage or shed so the rubber doesn't crack over the winter.
- Close the interior shut-off valve. Turn the wheel clockwise until it is hand-tight, or push the lever so it sits perpendicular to the pipe.
- Open the exterior spigot. Go outside and turn the faucet handle all the way on. You should see a small amount of residual water drain out.
- Leave the exterior handle open. Keep the valve open for the entire winter. If any moisture remains inside the pipe and freezes, the open valve gives the expanding ice room to move without cracking the metal.
- Drain the bleeder cap. Go back inside to the shut-off valve. Look for a small brass cap on the side of the valve housing. Place a bucket underneath and unscrew this cap to drain the short section of pipe trapped between the inside and outside walls. Once the water stops dripping, screw the cap back on tightly.
Choosing and Installing an Insulated Faucet Cover
Even with the water turned off and the pipes drained, the metal spigot acts as a thermal bridge. It conducts freezing outside air directly into your home's exterior wall. To stop this, you need to add a layer of thermal protection. Insulated faucet covers cost between $3 and $10 at any local hardware store and take seconds to install.
There are two main types of covers available:
- Hard foam covers: These look like small styrofoam domes with a rubber gasket around the edge. They use an internal rubber loop that hooks over the faucet spout. You pull a plastic slide tight against the outside of the dome to cinch it flush against the wall.
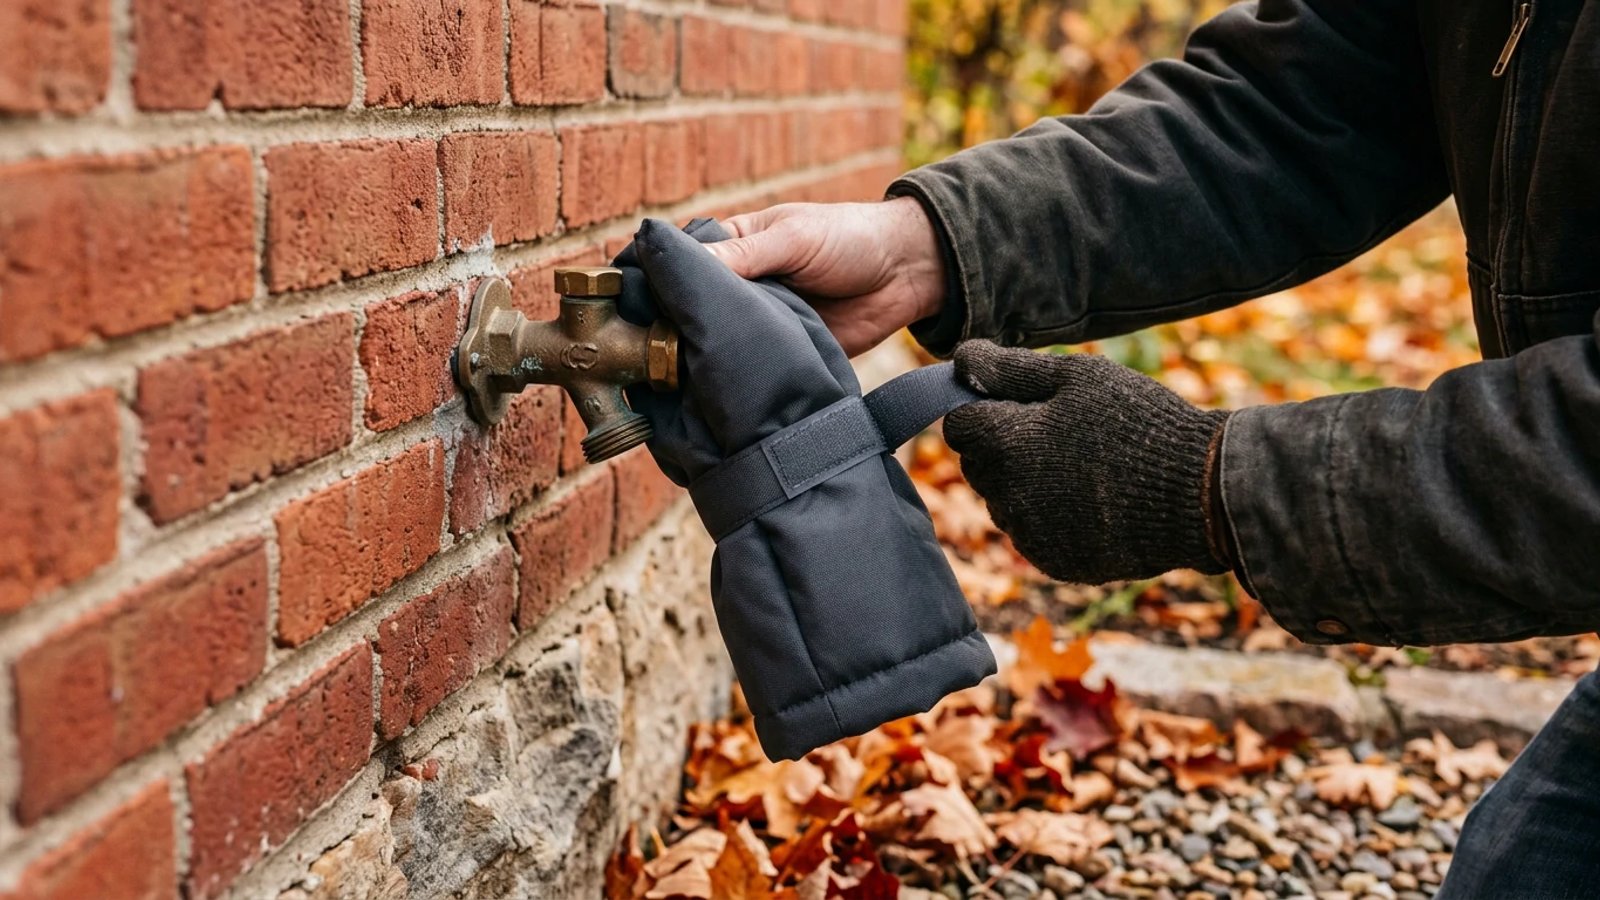
- Insulated fabric bags: These look like heavy-duty, weather-resistant pouches lined with thick insulation. You slide the bag over the entire fixture and pull a velcro strap tight around the base to seal it.
Last November, we replaced the brittle, old hard-foam covers on our house with a set of heavy-duty insulated bags. I noticed the flexible bag style hugged our uneven brick siding much tighter, sealing out harsh winds far better than the rigid foam domes ever did. Whichever style you choose, ensure it sits completely flush against the siding so cold air cannot slip behind it.
Reactivating Your Outdoor Faucets in Spring
Once the threat of freezing temperatures has completely passed, typically in late spring after the last frost date, it's time to bring your outdoor plumbing back to life. Rushing this process can lead to unexpected leaks and potential water damage, so take a moment to reactivate your system carefully and methodically. A little patience now can save you from a soggy surprise later, ensuring your garden hoses and sprinklers are ready for the season.
- Remove the insulated faucet cover. Carefully unhook or unstrap the cover and store it in a clean, dry place like your garage or shed. Inspect it for any damage so you can replace it if needed next fall.
- Close the exterior spigot. Go outside and turn the faucet handle completely off. This is crucial before restoring the water supply to prevent water from immediately gushing out.
- Open the indoor bleeder cap (if applicable). If your shut-off valve has a bleeder cap, ensure it is securely tightened. You don't want water spraying inside your home.
- Slowly open the interior shut-off valve. Return to your basement or utility room and slowly turn the isolation valve handle counter-clockwise (for a gate valve) or parallel to the pipe (for a ball valve). Open it halfway at first, listen for any unusual noises, then open it fully.
- Check for leaks. After opening the valve, carefully inspect the indoor shut-off valve and the pipe leading to the exterior for any drips or wet spots. If you see any, close the valve immediately and call a plumber.
- Test the exterior faucet. Go back outside and slowly open the spigot. Water should flow freely. Check around the base of the faucet and the connection point for any leaks. If everything looks good, you're ready to reattach your garden hose and enjoy your yard!
Taking these simple steps ensures that your outdoor plumbing is ready for the warmer months without any unexpected issues. It's a small task that prevents big headaches, keeping your home's exterior functioning perfectly.
What If You Cannot Find an Indoor Shut-Off?
If you live in an older house, or one built on a slab, you might not have dedicated interior shut-off valves for your exterior plumbing. If you cannot locate a shut-off, you must rely entirely on thermal protection. Make absolutely certain all hoses are disconnected. Check the spigot to ensure it is not dripping (a slow drip will freeze and build an ice dam). Finally, securely install a high-quality insulated cover.
For homes without isolation valves, it is highly recommended to follow the guidelines from authoritative sources like Ready.gov regarding winter weather preparedness: keep your home's interior temperature above 55°F, and during extreme deep freezes, you may need to let indoor faucets drip slightly to relieve pipe pressure. Next spring, consider hiring a plumber to retrofit an isolation valve into the line so you can properly secure it next fall.
Taking a few minutes this weekend to walk the perimeter of your house and secure your hose bibs saves serious headaches in January. Grab a pair of pliers, pick up a few insulated covers from the hardware store, and get the job done before the freezing weather settles in for the season.
- Disconnect all garden hoses before nighttime temperatures drop below freezing.
- Always leave the exterior faucet handle in the 'open' position during winter to give any remaining water room to expand.
- Check your indoor shut-off valves for leaks or corrosion before forcing them closed.
- Use insulated foam or fabric covers to protect the metal pipe from acting as a thermal bridge into your home.