How a Frost Free Hose Bib Works (And How to Spot One)
A frost free hose bib protects your plumbing from winter bursts by keeping the shut-off valve deep inside your heated house. Learn how to identify yours and avoid the one mistake that ruins them.
Full guide Plumbing Learn how your home plumbing works and how to stop leaks before they ruin your house.Mid-fall brings crisp air, falling leaves, and the inevitable drop in temperature. As you prepare your home for the colder months, you will likely hear the advice to check your "frost free hose bib." But if you are not entirely sure what that is, how it works, or if your house even has one, you are not alone.
A burst exterior pipe is one of the fastest ways to cause severe water damage to a basement or crawlspace. The good news is that preventing it takes only a few minutes once you understand the mechanics of your exterior plumbing.
What Exactly Is a Frost Free Hose Bib?
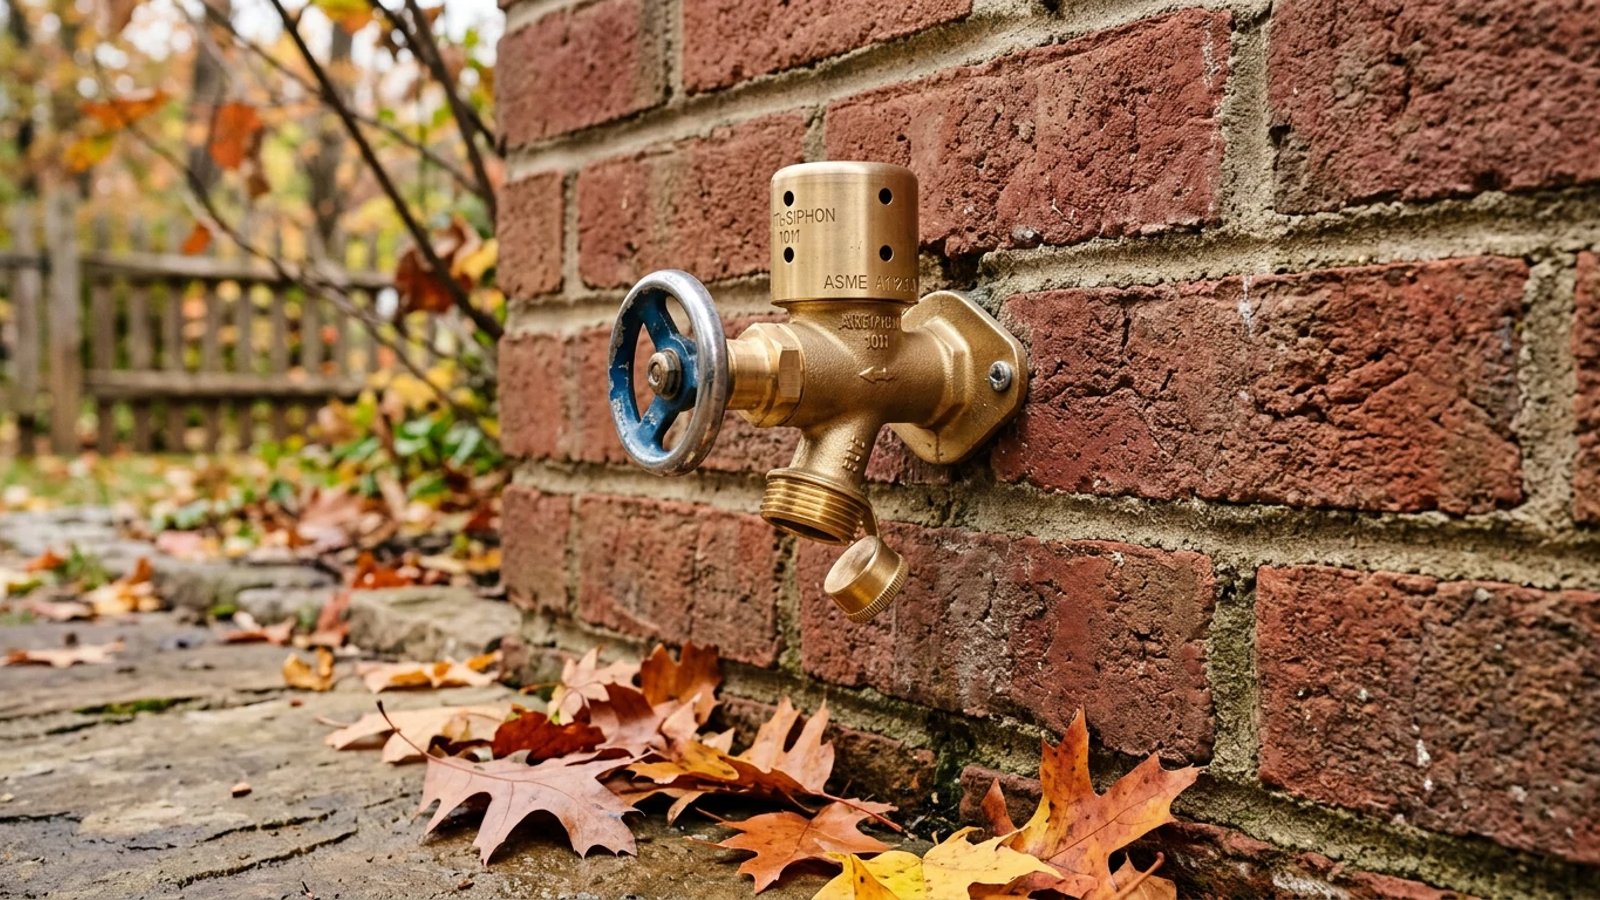
From the outside of your house, a frost-free hose bib (also called a frost-proof sillcock or wall hydrant) looks like a standard outdoor faucet. But the magic happens out of sight.
Instead of the water shutting off right at the exterior wall—where it is exposed to freezing wind—the actual valve mechanism sits at the end of a long copper tube, typically 8 to 14 inches deep inside the house. Because this internal valve sits inside your heated basement or floor joists, the water stays warm. When you turn the handle outside, a long rod turns the valve inside, shutting off the flow and allowing the remaining water in the exterior tube to drain out.
Crucially, for the design to work effectively, the hose bib must be installed with a slight downward slope towards the exterior. This ensures that when the internal valve is closed, gravity assists in draining any residual water from the tube, preventing it from pooling and freezing. Without this proper pitch, even a frost-free bib can hold water, making it vulnerable to freezing and bursting.
When we replaced the old outdoor faucets on my 1970s ranch, pulling out the original plumbing revealed exactly why standard spigots fail. The old valves stopped the water right against the freezing brick. Upgrading to a longer stem meant the water line was safely tucked away next to my basement heating ducts.
How to Tell if You Have a Frost-Proof Faucet
You do not need to tear open your walls to figure out what kind of plumbing you have. A quick visual inspection is usually all it takes to identify your hardware.
- Check the handle orientation. Standard spigots usually have a handle that sits at an upward 45-degree angle. Frost-free handles typically sit straight out, perpendicular to the wall.
- Look for a mounting flange. Frost-free bibs have a flat metal plate (a flange) that sits flush against the siding, usually secured with two screws. Standard spigots often just emerge from a hole in the wall.
- Spot the anti-siphon cap. Many frost-free models have a mushroom-shaped plastic or brass cap on top of the spout, which acts as a vacuum breaker.
- Read the metal stamping. Look closely at the brass body. If you see "ASSE 1019" stamped into the metal, you have a modern frost-proof fixture.
Beyond the Bib: Comprehensive Winter Plumbing Protection
While ensuring your exterior faucets are frost-proof is a critical first step, a truly resilient winter plumbing strategy involves a few other considerations. Your home's overall preparedness will prevent headaches when temperatures really plummet.
First, locate the shut-off valves for your exterior faucets inside your home. Many homes have separate valves for each outdoor spigot, usually found in the basement or crawlspace near where the pipe exits the wall. Even with a frost-free bib, shutting off this interior valve and then opening the exterior faucet to drain the line provides an extra layer of security. This ensures absolutely no water pressure is held in the line leading to the bib.
Next, consider any other exposed pipes. While the main focus is often on hose bibs, pipes running through unheated garages, crawlspaces, or even poorly insulated exterior walls can be vulnerable. Adding insulation sleeves or heat tape to these areas can be a low-cost, high-impact preventative measure. Remember, moving water is less likely to freeze, but stagnant water in cold pipes is a ticking time bomb.
Finally, if you plan to be away from home during cold snaps, setting your thermostat no lower than 55°F (13°C) is crucial. This ambient heat helps keep interior wall cavities and plumbing lines above freezing, even in rooms you don't actively use. A small energy bill increase is far preferable to the extensive damage and repair costs of burst pipes.
The Fatal Winter Mistake: Leaving the Hose Attached
Having a high-end frost-free faucet gives many homeowners a false sense of security. They assume the hardware does all the work, leading to a very expensive mistake.
Leaving a garden hose attached in December turns a $50 frost-proof faucet into a guaranteed burst pipe.
For a frost-free bib to work, the water left inside the 12-inch tube (which can hold about 2 ounces of water) must be able to drain out completely when you shut off the valve. If you leave a garden hose, a Y-splitter, or a watering timer attached, you trap that water inside the copper tube. When temperatures drop below freezing, that trapped water turns to ice, expands, and splits the copper pipe wide open.
The physics of freezing water are unforgiving. Water expands by about 9% when it turns to ice. When this expansion occurs within an enclosed pipe, the immense pressure generated—potentially thousands of pounds per square inch—has nowhere to go, inevitably leading to a split. This damage isn't just a small crack; it's often a longitudinal rupture along the pipe, creating a significant leak path when water eventually flows again.
The worst part? You will not know it burst until spring. The split happens inside your wall. When you turn the faucet on to water your spring flowers, water will spray out of the split pipe directly into your basement.
How Much Does It Cost to Upgrade?
If you discover you have older, standard spigots, upgrading them is a smart preventative measure. The cost depends heavily on whether you do it yourself or hire a professional.
The parts are relatively cheap. A high-quality, 12-inch frost-free hose bib costs between $30 and $60 at most hardware stores. If you are comfortable shutting off your main water line, cutting copper pipe, and using push-to-connect fittings (like SharkBite) or soldering sweat fittings, you can complete the job in 30 to 60 minutes.
When selecting a new frost-free hose bib, pay attention to the stem length. Measure the distance from your exterior wall to the interior water supply pipe connection to ensure you purchase a bib long enough for the valve to sit safely within the heated envelope of your home. Standard lengths range from 4 to 14 inches, and choosing the correct size is crucial for effective frost protection.
Beyond preventing costly bursts, upgrading to a modern frost-free bib often brings other benefits. Many newer models feature quarter-turn ball valves for easier operation, improved flow rates for faster watering, and integrated vacuum breakers for better backflow prevention, protecting your household water supply from contamination. It's an investment in both your home's security and plumbing efficiency.
Hiring a plumber to swap out an easily accessible spigot usually costs between $150 and $300 for labor and materials. It is a small price to pay compared to the thousands of dollars a flooded basement requires for water extraction and drywall repair.
Take a walk around your home's exterior right now. Disconnect those hoses, inspect your hardware, and rest easy knowing your pipes are safe from the incoming winter chill.
- Check your exterior faucets before the first hard freeze to confirm if they are standard or frost-free.
- Always disconnect garden hoses, splitters, and timers by late fall to allow the spigot to drain properly.
- Look for the ASSE 1019 stamp on the metal, which indicates the fixture meets anti-siphon and frost-proof standards.
- If you have a standard spigot, locate the interior shut-off valve in your basement and drain the line before winter.