How to Add Rim Joist Insulation and Stop Basement Drafts
Stop cold basement drafts and lower your heating bills by properly air-sealing and insulating your rim joists with rigid foam.
Full guide Foundation & Structure Learn how to spot dangerous foundation cracks and protect your home from costly structural damage.As fall temperatures drop, many homeowners start noticing cold floors on the main level and distinct, chilly drafts in the basement. You might turn up the thermostat, but the cold always seems to find its way back in. The culprit is almost always the rim joist—the perimeter framing where your house sits on top of the concrete foundation. Proper rim joist insulation can address this. Because this area is riddled with seams, joints, and gaps, it allows massive amounts of outside air to leak directly into your home. In my experience, these rim joist leaks are a primary source of drafts and can contribute to over 15% of a home's total heat loss.
Fixing this issue with proper rim joist insulation is one of the most cost-effective ways to improve your home's energy efficiency. Not only does it stop the drafts, but it also prevents destructive moisture buildup that can rot your home's framing. We will look at why the old methods of insulating this space fail, and walk through the exact steps to air-seal and insulate your rim joists the right way.
What is a Rim Joist and Why Does it Leak Air?
The rim joist, sometimes called a band joist, is the wooden board that caps the ends of your floor joists. It sits right on top of the sill plate, which rests directly on your concrete foundation wall. This entire assembly forms the transition between the masonry of your foundation and the wood framing of your house.
Wood and concrete expand and contract at different rates as temperatures change. Over the years, the framing lumber also shrinks as it dries. This movement creates hundreds of tiny gaps along the perimeter of your home. Due to a phenomenon called the stack effect, warm air rising up into your attic pulls cold outside air into the lower levels of your home through these exact gaps.
When I insulated the rim joists in my 1970s split-level a few years ago, the draft was so strong in some spots that it could blow out a lighter. Pulling out the old insulation revealed black spots of mold on the wood and a collection of dead bugs that had simply walked in through the gaps. Air sealing this perimeter is critical before any insulation is added.
Why Fiberglass Batts Are the Wrong Choice
For decades, builders and homeowners simply stuffed pieces of pink fiberglass insulation into the rim joist cavities. If you look at your basement ceiling right now, you might see these fluffy batts wedged above the foundation wall. Unfortunately, this is the worst possible way to handle the space, often providing less than R-1 of effective insulation when exposed to air movement.
Fiberglass is an excellent insulator when enclosed inside a sealed wall cavity, but it cannot stop air movement. It acts like a furnace filter. Cold winter air blows right through the fiberglass and into your basement, allowing for significant air leakage – often as much as 10-20 cubic feet per minute (CFM) per linear foot of rim joist in older homes. Worse, the warm, humid air from inside your house moves outward through the fiberglass until it hits the freezing cold wooden rim joist.
According to the Energy Star guidelines for home sealing, any insulation placed against a rim joist must create a complete air barrier. Fiberglass simply cannot do this on its own.
The Right Way: Rigid Foam and Spray Foam
To properly insulate a rim joist, you need a material that stops heat transfer and blocks air movement at the same time. The most accessible and effective DIY method involves a two-part system: rigid foam board and expanding spray foam sealant.
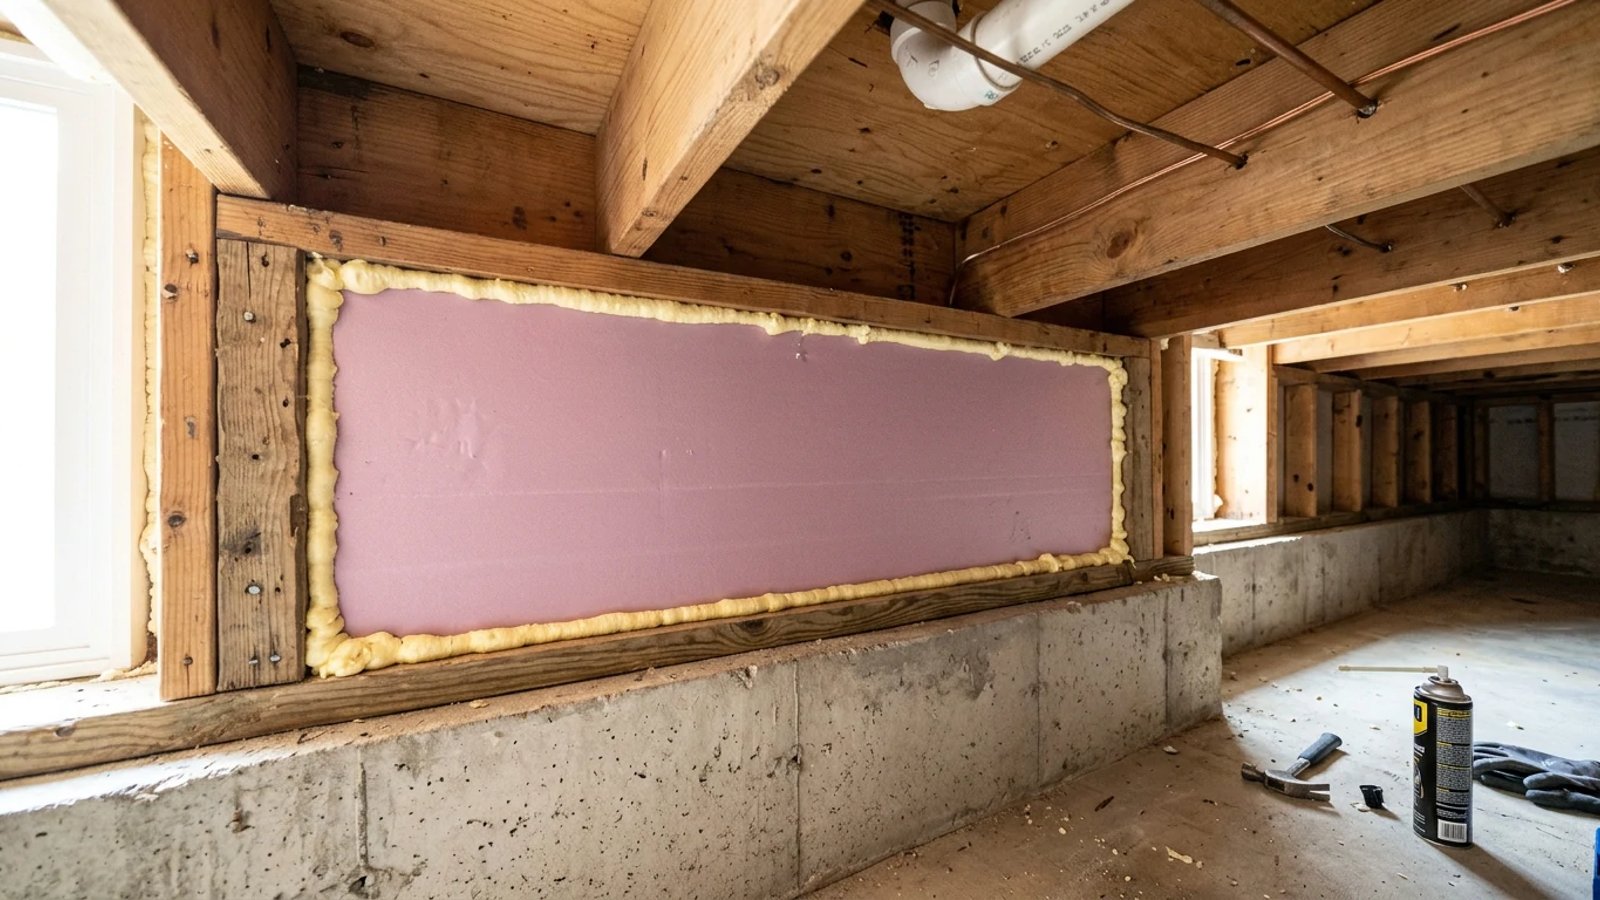
Extruded polystyrene (XPS) or expanded polystyrene (EPS) rigid foam boards are completely impermeable to air. By cutting a block of rigid foam slightly smaller than the joist bay, pressing it against the rim joist, and sealing the perimeter with expanding spray foam, you create a custom-fit, airtight plug. This stops the draft entirely and keeps indoor moisture away from the cold wood.
Air sealing and insulating the rim joist is a two-for-one fix: you stop the drafts stealing your heat, and you stop the condensation rotting your wood.
You will want to use rigid foam board that is at least 2 inches thick. Two inches of XPS provides an R-value of roughly R-10, which meets the minimum requirements for basement insulation in many climate zones while providing a strong vapor retarder.
How to Install Rim Joist Insulation
Tackling this project, which can take an average of 4-8 hours for most homes, requires some patience, as you will be working overhead in tight spaces, but the process itself is straightforward. You will need a tape measure, a sharp utility knife or fine-tooth saw, a straight edge, 2-inch rigid foam board, and several cans of expanding spray foam sealant.
Here is the exact process for sealing and insulating your rim joist cavities:
- Clear the bays. Remove any existing fiberglass insulation, cobwebs, and dust from the wood framing using a shop vacuum.
- Measure the cavity. Measure the height and width of the space between the floor joists, the subfloor above, and the sill plate below.
- Cut the foam board. Using a utility knife and straight edge, cut the rigid foam block about 1/4-inch to 1/2-inch smaller than your measurements on all sides.
- Dry fit the block. Push the cut foam block into the cavity against the rim joist, ensuring there is a small, even gap around the entire perimeter.
- Apply the spray foam. Insert the nozzle of your foam gun into the gap and apply a continuous bead of expanding foam around all four edges.
- Seal the sill plate. Run an extra bead of spray foam along the seam where the wooden sill plate meets the top of the concrete foundation wall.
- Check for missed spots. After the foam cures (usually about an hour), inspect the perimeter for any gaps where light or air might still pass through, and touch them up.
Remember to measure every single bay individually. Floor joists are rarely spaced perfectly, and a block cut for one cavity will often be too large or too small for the next one.
Hiring a Professional for Closed-Cell Spray Foam
While the rigid foam method is excellent for DIYers, it is incredibly time-consuming. If you have a large home, a finished basement ceiling that blocks access, or you simply do not want to spend a weekend covered in foam dust, hiring an insulation contractor, who can complete the job in a single day, is a smart alternative.
Professionals use two-part closed-cell spray foam. They spray this chemical mixture directly against the rim joist, where it expands instantly to fill every crack, seam, and gap before hardening into a dense, airtight layer. Closed-cell foam boasts an impressive R-value of about R-6.5 to R-7 per inch, meaning a standard 2-inch to 3-inch application provides exceptional thermal resistance and completely blocks moisture.
Understanding 2026 Costs and Rebates
Budgeting for this project depends heavily on which route you take. The materials for the DIY method are relatively inexpensive, but you are paying with your weekend. Professional installation costs more upfront but is finished in a matter of hours.
When planning your budget, it is important to note that the federal Energy Efficient Home Improvement Credit expired at the end of 2025. You can no longer claim this project on your federal tax return. However, many state energy offices and local utility companies have stepped up with their own weatherization rebates for 2026. Check with your local gas or electric provider before starting the work, as some require a pre-project energy audit to qualify for the rebate.
Taking the time to air-seal and insulate your rim joists properly will transform how your basement feels during the colder months. By blocking those perimeter drafts, your furnace won't have to work as hard, your floors will stay warmer, and you will protect your home's structural framing from hidden moisture damage for decades to come.
- Never use standard fiberglass batts to insulate a rim joist without an air barrier.
- Measure every single joist bay individually, as framing spacing is rarely perfectly uniform.
- Leave a 1/4-inch gap around your rigid foam board to allow enough room for the spray foam sealant to expand and lock it in place.
- Invest in a $40 professional foam dispensing gun for precise application and less mess.
- Check your local building codes regarding fire barriers; exposed foam may need to be covered with drywall or intumescent paint.