How to Clean Furnace Flame Sensor (And Fix Short Cycling)
Furnace turning on and shutting right back off? Before you call a pro, learn how to clean your furnace flame sensor—a simple 10-minute fix that stops short cycling.
Full guide HVAC & Climate Control How your home heats, cools, and moves air, and the decisions that matter.It happens every year. The first chilly morning of fall hits, and you walk to the hallway thermostat to switch the system from cool to heat. You hear the familiar hum of the inducer motor in the basement, the click of the gas valve, and the satisfying whoosh of the burners igniting. But four seconds later, everything goes completely silent. The heat is off. Your heart sinks as you picture a massive repair bill.
Before you panic, you need to know how to clean furnace flame sensor rods. This specific symptom—where the furnace fires up perfectly but shuts down entirely just a few seconds later—is called short cycling. In the vast majority of cases, the culprit is nothing more than a microscopic layer of carbon soot on a small metal rod. It is a 10-minute, zero-cost DIY fix that can save you a $150 to $250 emergency service call.
If you do not smell gas and you simply have a furnace that refuses to stay lit, you are in the right place. Let's look at exactly what this part does, why it fails, and the safe way to get your heat running again.
Why Does a Dirty Flame Sensor Cause Short Cycling?
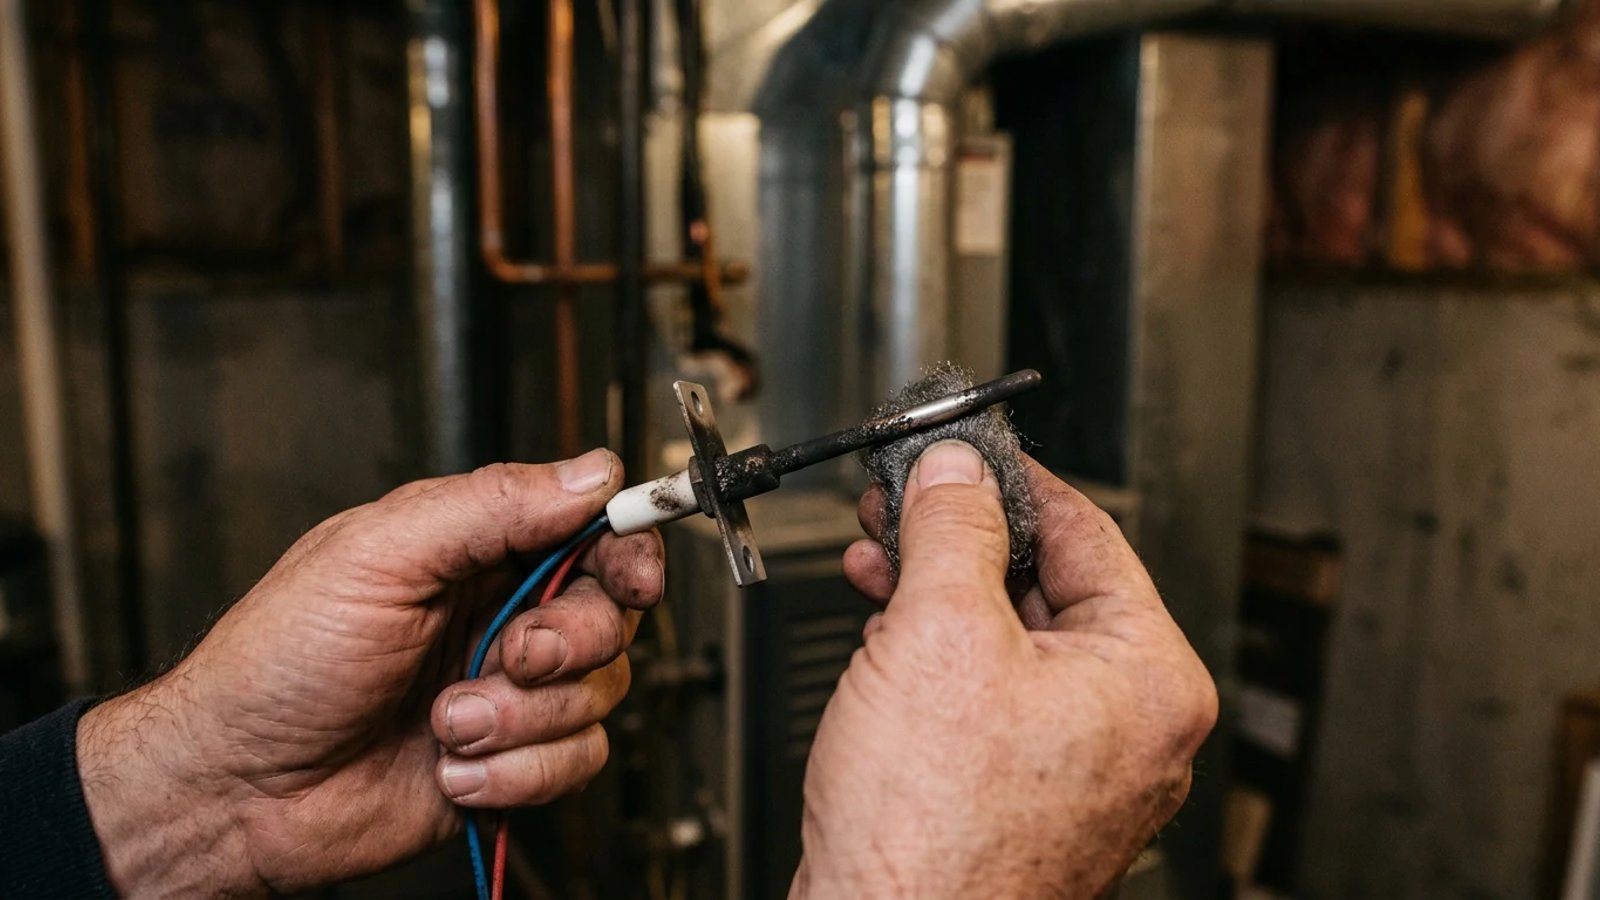
Modern gas furnaces are packed with safety switches. The flame sensor is arguably the most critical one. It is a thin, usually L-shaped metal rod with a ceramic base, sitting directly in the path of the burner flames. Its only job is to confirm that a fire is actually burning when the gas valve is open.
When the burners ignite, the flames envelop the metal rod. The furnace control board sends a tiny electrical current (measured in microamps, typically 0.5 to 6) through the sensor. The flame itself conducts this electricity, completing the circuit back to the metal chassis of the furnace. This process is called flame rectification.
If the control board detects the current, it knows the fire is safely lit and keeps the gas valve open. If it does not detect the current within 4 to 7 seconds, it assumes the burners failed to ignite. To prevent your basement from filling with raw, unburned natural gas, the control board immediately slams the gas valve shut. This is the short cycling you are experiencing.
Over months of operation, trace amounts of carbon, dust, and oxidation bake onto the metal rod. This microscopic layer of soot acts as an insulator. Eventually, the soot blocks the electrical current entirely. The fire is burning, but the sensor cannot feel it, so it shuts the system down.
The fire is burning, but the sensor cannot feel it. To prevent a gas leak, the control board shuts the system down.
Last November, I helped my neighbor troubleshoot a three-year-old high-efficiency unit doing exactly this. He was convinced the main control board was fried and was ready to order a $400 replacement part. Five minutes with a piece of fine steel wool on the flame sensor fixed the problem instantly, saving him a massive headache and a freezing weekend.
Gathering Your Tools
You do not need specialized HVAC equipment for this job. You likely have everything you need in your kitchen junk drawer or garage toolbox.
- 1/4-inch nut driver or socket: Almost all flame sensors are secured to the burner assembly with a single 1/4-inch hex-head sheet metal screw.
- Fine steel wool (0000 grade): This is the ideal abrasive. It is aggressive enough to remove baked-on carbon but gentle enough not to scratch the metal rod.
- A crisp dollar bill: If you do not have steel wool, a crisp paper bill works surprisingly well. The linen and cotton blend of US currency acts as a very mild abrasive.
- Microfiber cloth or paper towel: For wiping the rod clean after scrubbing.
How to Clean Furnace Flame Sensor Safely
This process takes about 10 to 15 minutes. Work slowly, do not force any stubborn screws, and keep track of the single wire you will be disconnecting.
- Shut off the power. Locate the electrical switch mounted on the side of the furnace or on a nearby wall (it looks exactly like a standard light switch) and turn it off. For absolute safety, flip the furnace breaker in your main electrical panel to the "off" position as well.
- Turn off the gas. Locate the gas valve on the pipe leading into the furnace. Turn the handle perpendicular to the pipe to shut off the gas flow.
- Remove the access panel. Lift and pull the top front panel off your furnace cabinet. You may need to slide it upward to unhook it from the bottom lip. Set it aside.
- Locate the flame sensor. Look at the burner assembly (the row of metal tubes where the fire comes out). On the far side, usually opposite the igniter, you will see a small ceramic block with a thin metal rod extending into the burner path. It will have a single wire attached to the bottom.
- Disconnect the wire. Gently pull the wire connector straight down and off the spade terminal on the sensor. Do not pull by the wire itself; grip the plastic or metal connector.
- Remove the mounting screw. Use your 1/4-inch nut driver to remove the single screw holding the sensor bracket in place. Keep your hand under it so the screw does not drop into the furnace cabinet.
- Pull the sensor out. Carefully slide the long metal rod out of the burner assembly. Be gentle so you do not crack the delicate ceramic base.
- Scrub the metal rod. Hold the ceramic base in one hand. Using your fine steel wool or a crisp dollar bill, gently rub the metal rod up and down. You do not need to apply heavy pressure. Just polish it until the dull, blackened soot is gone and the bare metal shines again.
- Wipe it clean. Use a clean microfiber cloth or a dry paper towel to wipe away any residual dust from the scrubbing process. Avoid touching the metal rod with your bare fingers, as the oils from your skin can cause it to foul up faster in the future.
- Reinstall the sensor. Slide the rod back into the hole, align the bracket, and tighten the 1/4-inch screw. It just needs to be snug—do not overtighten it and strip the sheet metal.
- Reconnect the wire. Push the wire connector firmly back onto the spade terminal.
Reassembly and Testing the Furnace
Once the sensor is securely back in place, replace the front access panel on the furnace cabinet. Make sure the panel is seated correctly; many furnaces have a safety door switch that prevents the unit from running if the door is loose or off.
Turn the gas valve back parallel with the pipe to restore gas flow. Flip the wall switch back on, and turn on the breaker at the electrical panel.
Go to your thermostat and set it to heat, bumping the temperature up a few degrees above the current room temperature. Walk back to the furnace and watch the sequence of operations. It should happen in this exact order:
- The inducer motor (a small fan near the exhaust pipe) will turn on to clear out any residual gases.
- The igniter will begin to glow bright orange, or you will hear the rapid clicking of a spark igniter.
- You will hear a dull click as the gas valve opens.
- The burners will ignite with a whoosh.
- The critical moment: The flames should remain lit past the 7-second mark.
- About 30 to 60 seconds later, the main blower fan will kick on, sending warm air through your vents.
If the burners stay lit and the blower fan engages, congratulations. You just successfully cleaned your flame sensor and fixed your heating system.
Understanding Thermocouples vs. Flame Sensors
If you open your furnace and cannot find a thin metal rod with a single wire, you might have an older furnace equipped with a standing pilot light. These older units (typically built before the late 1990s) do not use electronic flame sensors. Instead, they use a thermocouple.
A thermocouple is a thicker copper tube that sits directly in the small, always-burning pilot flame. While a flame sensor sends an electrical signal generated by the control board, a thermocouple actually generates its own tiny voltage (millivolts) purely from the heat of the pilot flame. If the pilot light blows out, the thermocouple cools down, stops generating voltage, and the gas valve snaps shut.
Thermocouples cannot usually be fixed by cleaning. If your pilot light will not stay lit when you release the gas valve button, the thermocouple has likely failed internally and needs to be replaced. Fortunately, universal replacement thermocouples cost around $15 at most hardware stores and simply screw into the gas valve.
When to Call a Professional
While cleaning a flame sensor is a highly effective fix, it is not a magic cure for every furnace problem. If you complete the cleaning process and the burners still shut off after 5 seconds, you have ruled out the most obvious culprit and uncovered a deeper issue.
Persistent short cycling could mean the sensor itself is internally broken and cannot pass a current, which requires a multimeter to test. It could also indicate a failing gas valve, a clogged exhaust flue causing the pressure switch to trip, or a bad control board dropping the circuit. More seriously, it could point to a cracked heat exchanger, which is a major safety hazard.
The National Fire Protection Association (NFPA) recommends having your heating equipment inspected by a qualified professional once a year. A pro will not only clean the sensor but also check the gas pressure, test the safety limits, and inspect the heat exchanger for dangerous cracks that could leak carbon monoxide into your home.
Taking 10 minutes to clean the flame sensor at the start of the heating season is one of the smartest maintenance habits a homeowner can develop. It keeps your system running smoothly, prevents midnight breakdowns, and leaves you with the confidence that you understand exactly how your home works.
- Identify short cycling by watching your furnace: if the burners ignite but shut off completely within 4 to 7 seconds, the flame sensor is the likely culprit.
- Never use heavy sandpaper to clean the sensor; the silica dust can melt into a glass coating and permanently ruin the part.
- If you smell rotten eggs, immediately evacuate your home and call your gas provider—do not attempt any DIY fixes.